In this lab, you will learn two ways to create a graphical user interface (GUI): By writing the code directly (Part 1) and by using the Netbeans GUI Builder (Part 2).
For more practice, after completing Parts 1 and 2, you can try to create a GUI for your Make Change program.
Even though this lab will not be collected, it is important to complete because you will need to know how to create GUIs for future labs.
 | Part 1: Creating a GUI by Hand |
Writing the GUI code directly is a lot more work than using the Netbeans GUI Builder as is done in Part 2. However, in order to understand what the GUI builder is doing, you need to build the code yourself at least initially.
Create a new Netbeans project containing a class containing the main method. Modify main to be the following:
public static void main(String[] args) {
	JFrame myFrame = new JFrame("My Window Title"); // you will need to "fix imports"
	myFrame.setSize(400, 300);   // sets the size of the window
	myFrame.setDefaultCloseOperation(JFrame.EXIT_ON_CLOSE); // Closing the window will stop the program.
	myFrame.setVisible(true);   // Make the window visible.
}
Run the program. It should create a window. You can close the window by clicking on the "x" in the upper right corner.
Try changing the window size or try commenting out some of the above lines to see how it changes the program. For example, if you comment out the line with setDefaultCloseOperation, you will find the window will still close upon clicking the "x" but the program will still be running.
The above program will create a window with the title "My Window Title", but the window doesn't do or contain anything. In order to add items to the window, you need to create a new class that "extends" the JFrame class. We have not yet talked about inheritance so the concept of "extending a class" may not make complete sense. Right now, just think of it as adding on to an existing class, in this case, the JFrame class. This will allow you to add keep all of the functionality of the JFrame class while also adding your own functionality. To do this, add a new Java class to your Netbeans project and name it something like, MyJFrame. Modify your new class by adding "extends JFrame" as shown here:
public class MyJFrame extends JFrame {
}
You will also need to "fix imports".
Now, back in main, delete the line:
JFrame myFrame = new JFrame("My Window Title");MyJFrame myFrame = new MyJFrame();Run the code. Except for the title, it should be identical to your previous code. It is the same because, MyJFrame is really the same as a JFrame, because it extends it.
Now, let's start to modify MyJFrame. The first thing to do is to add a constructor (this will take the place of the JFrame's default constructor). In the constructor, we will place all the initialization that was originally placed in main. Thus main becomes:
public static void main(String[] args) {
        MyJFrame myFrame = new MyJFrame("My Window Title");
    }
public MyJFrame(String title) {
        super(title); // this calls the original JFrame constructor in order to set the title
        setSize(400, 300);   // sets the size of the window
        setDefaultCloseOperation(JFrame.EXIT_ON_CLOSE); // Closing the window will stop the program.
        setVisible(true);   // Make the window visible.
    }
Run the code to see that, once again, nothing really has changed!
Now, lets add a component to MyJFrame (e.g. buttons, labels, textfields, etc) . Let's start with a Label. We first want to add a Label object as a member variable and initialize it in the constructor:
public class MyJFrame extends JFrame {
    private JLabel messageLabel; // member variable

    public MyJFrame(String title) {
        super(title);
        setSize(400, 300);   // sets the size of the window
        setDefaultCloseOperation(JFrame.EXIT_ON_CLOSE); // Closing the window will stop the program.
        messageLabel = new JLabel("This is a message");  // creates the Label object
        add(messageLabel);             // adds the Label to the window
        setVisible(true);   // Make the window visible.
    }
}
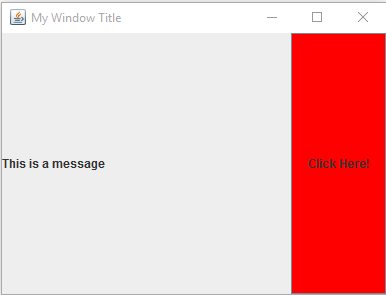
Run the code to see that the message is now written in the window.
public class MyJFrame extends JFrame {
    private JLabel messageLabel;
    private JButton myButton;

    public MyJFrame(String title) {
        super(title);
        setSize(400, 300);   // sets the size of the window
        setDefaultCloseOperation(JFrame.EXIT_ON_CLOSE); // Closing the window will stop the program.
        messageLabel = new JLabel("This is a message");
        add(messageLabel);
        myButton = new JButton("Click Here!");
        myButton.setBackground(Color.red);

	// If you are on a Mac, you may need to add the following 2 lines:
	myButton.setOpaque(true);
	myButton.setBorderPainted(false);

        add(myButton);
        setVisible(true);   // Make the window visible.
    }
}
public MyJFrame(String title) {
    super(title);
    setSize(400, 300);   // sets the size of the window
    setDefaultCloseOperation(JFrame.EXIT_ON_CLOSE); // Closing the window will stop the program.
    messageLabel = new JLabel("This is a message");
    add(messageLabel,java.awt.BorderLayout.LINE_START);
    myButton = new JButton("Click Here!");
    myButton.setBackground(Color.red);
    add(myButton,java.awt.BorderLayout.LINE_END);
    setVisible(true);
}
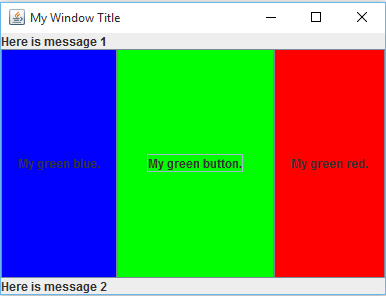
Try changing the locations of the components, e.g. use PAGE_START or PAGE_END or CENTER.
Add 3 more labels and/or buttons so that you have a total of 5. Place them in different sections of the
layout. Note, you can only have one component per region of the layout manager, e.g. you can't put 2 components in the
SOUTH area - if you do, only one will show.
For example:
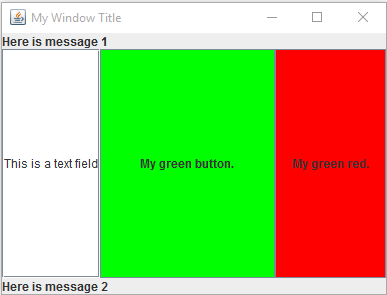
Textfields enable a user to enter data. You can create one just like you did the button and label. For example, in the above code, the blue button is replaced with a textfield. The code for the textfield member variable is:
private JTextField myTextField;myTextField = new JTextField("This is a text field");
add(myTextField,java.awt.BorderLayout.LINE_START);
myButtonGreen = new JButton("Click Here!");
myButtonGreen.setBackground(Color.green);
add(myButtonGreen, java.awt.BorderLayout.CENTER);
myButtonGreen.addActionListener(new java.awt.event.ActionListener() {
	public void actionPerformed(java.awt.event.ActionEvent evt) {
		Color color = new Color((int) (256 * Math.random()), (int) (256 * Math.random()), (int) (256 * Math.random()));
		myButtonGreen.setBackground(color);
	}
});
Modify the code for one of your buttons to be similar to the above code. Run the code to test that it works. When you click on the button, it should change color.
Note, the above code is a little more compact than what was done in the text and it is a little hard to parse given all of the parentheses and brackets, so let's break it down. First, we want to add an actionListener object to myButtonGreen. To do this we call the method addActionListener:
myButtonGreen.addActionListener(we need an ActionListener object here!);
Inside of the parentheses, we need an ActionListener object as an argument. We create an unnamed class right inside of the parentheses. If you look at the code closely, you will see that the entire following code is the argument for the addActionListener method:
new java.awt.event.ActionListener() {
    public void actionPerformed(java.awt.event.ActionEvent evt) {
        Color color = new Color((int) (256*Math.random()), (int) (256*Math.random()),(int) (256*Math.random()) );
        myButtonGreen.setBackground(color);
    }
}
public void actionPerformed(java.awt.event.ActionEvent evt) {
    Color color = new Color((int) (256*Math.random()), (int) (256*Math.random()),(int) (256*Math.random()) );
    myButtonGreen.setBackground(color);
}
Color color = new Color((int) (256*Math.random()), (int) (256*Math.random()),(int) (256*Math.random()) );
myButtonGreen.setBackground(color);
The complete final code for the above is here:
import java.awt.Color;
import javax.swing.JButton;
import javax.swing.JFrame;
import javax.swing.JLabel;
import javax.swing.JTextField;

public class MyJFrame extends JFrame {

    private JLabel messageLabel1;
    private JLabel messageLabel2;
    private JButton myButtonRed;
    private JTextField myTextField;
    private JButton myButtonGreen;

    public MyJFrame(String title) {
        super(title);
        setSize(400, 300);   // sets the size of the window
        setDefaultCloseOperation(JFrame.EXIT_ON_CLOSE); // Closing the window will stop the program.
        messageLabel1 = new JLabel("This is a message 1");
        add(messageLabel1, java.awt.BorderLayout.PAGE_START);
        messageLabel2 = new JLabel("This is a message 2");
        add(messageLabel2, java.awt.BorderLayout.PAGE_END);

        myButtonRed = new JButton("My Red Button");
        myButtonRed.setBackground(Color.red);
        add(myButtonRed, java.awt.BorderLayout.LINE_END);

        myButtonGreen = new JButton("Click Here!");
        myButtonGreen.setBackground(Color.green);
        add(myButtonGreen, java.awt.BorderLayout.CENTER);
        myButtonGreen.addActionListener(new java.awt.event.ActionListener() {
            public void actionPerformed(java.awt.event.ActionEvent evt) {
                Color color = new Color((int) (256 * Math.random()), (int) (256 * Math.random()), (int) (256 * Math.random()));
                myButtonGreen.setBackground(color);
            }
        });

        myTextField = new JTextField("This is a text field");
        add(myTextField, java.awt.BorderLayout.LINE_START);

        setVisible(true);
    }
}
The Netbeans GUI Builder organizes its code into separate methods (just like you did for your Expert system). Let's rearrange the above code to better match what you will see in the GUI Builder. First, we create a private method called initComponents where all of the components are initialized. This method is called from the JFrame constructor. Next, we move the contents of myButton2's actionPerformed method into a separate private method called myButton2ActionPerformed. The result is closer to (but not exactly equal to) what you will see in the GUI Builder. Carefully study how things were moved around. No new functionality has been added, rather instructions have just been moved around. New method calls are in red. The new method headers are in green.
import java.awt.Color;
import javax.swing.JButton;
import javax.swing.JFrame;
import javax.swing.JLabel;
import javax.swing.JTextField;

public class MyJFrame extends JFrame {

    private JLabel messageLabel1;
    private JLabel messageLabel2;
    private JButton myButtonRed;
    private JTextField myTextField;
    private JButton myButtonGreen;

    public MyJFrame(String title) {
        super(title);
        setSize(400, 300);   // sets the size of the window
        initComponents();
        setVisible(true);
    }

    private void initComponents() {

        setDefaultCloseOperation(JFrame.EXIT_ON_CLOSE); // Closing the window will stop the program.
        messageLabel1 = new JLabel("This is a message 1");
        add(messageLabel1, java.awt.BorderLayout.PAGE_START);
        messageLabel2 = new JLabel("This is a message 2");
        add(messageLabel2, java.awt.BorderLayout.PAGE_END);

        myButtonRed = new JButton("My Red Button");
        myButtonRed.setBackground(Color.red);
        add(myButtonRed, java.awt.BorderLayout.LINE_END);

        myButtonGreen = new JButton("Click Here!");
        myButtonGreen.setBackground(Color.green);
        add(myButtonGreen, java.awt.BorderLayout.CENTER);
        myButtonGreen.addActionListener(new java.awt.event.ActionListener() {
            public void actionPerformed(java.awt.event.ActionEvent evt) {
                myButtonGreenActionPerformed(evt);
            }
        });

        myTextField = new JTextField("This is a text field");
        add(myTextField, java.awt.BorderLayout.LINE_START);

    }

    private void myButtonGreenActionPerformed(java.awt.event.ActionEvent evt) {
        Color color = new Color((int) (256 * Math.random()), (int) (256 * Math.random()), (int) (256 * Math.random()));
        myButtonGreen.setBackground(color);
    }

}
In the above example, when you press myButtonGreen, the button changes color. We now show how to use a button to change value of another component. Specifically, myButtonRed will copy the text from myTextField, and place it on the label messsageLabel1. That is, when you run the program, a user can enter text into myTextField, press myButtonRed, and have the text appear on the label messageLabel1 (the top label).
To accomplish this, start with the modularized code above. Then add an action listener to myButtonRed:
myButtonRed = new JButton("My Red Button");
myButtonRed.setBackground(Color.red);
add(myButtonRed, java.awt.BorderLayout.LINE_END);
myButtonRed.addActionListener(new java.awt.event.ActionListener() {
	public void actionPerformed(java.awt.event.ActionEvent evt) {
		myButtonRedActionPerformed(evt);
	}
});
You next need to add the method called myButtonRedActionPerformed. Place this method right before or after the method myButtonGreenActionPerformed.
private void myButtonRedActionPerformed(java.awt.event.ActionEvent evt) {
	String myText = myTextField.getText();  // get the text from the textfield
	messageLabel1.setText(myText);          // copy the text to the label
 }
What this code does is to grab the text that appears in myTextField and then copy it into the text of the label. All of this happens when one presses myButtonRed. Try running it.
Whew! I know this is confusing! Unfortunately, GUI programming is complicated. We have used the above code structure because it is the structure used by the Netbeans GUI Builder. The Netbeans GUI Builder is drag-and-drop and writes the code for you. While you don't have to write the code yourself, you do need to understand what the code is doing, or at least, understand the portions of the code you need to modify to get the program to do what you want.
 | Part 2: Using the Netbeans GUI Builder:
|
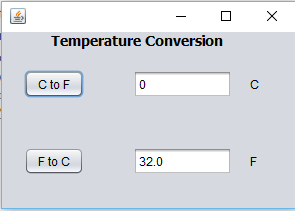
The two videos below show how to create a temperature conversion program using the Netbeans GUI Builder. These are in quicktime format (*.mov) so you should be able to right-click on the link and Save Link As. Once you have downloaded the file, open it up using the Quicktime Player.
The goal of this part of the lab is to give you practice applying the above concepts by creating a GUI for your Make Change program. The window might look like the picture below. The user enters an amount, presses the compute button, and the program calculates and diplays the number of dollars and coins cooresponding the amount entered.
Before attempting this assignment, be sure you have worked through Parts 1 and 2 above. Once you are familiar with creating a GUI you can begin work on your Make Change program.
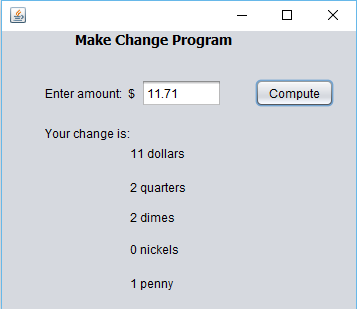 | Make Change Program - you will need: 8 labels, 1 textfield, and 1 button. Add an action listener for the button. The calculations can be done in the ActionPerformed method for the button. Please remember to rename your components when using the GUI Builder. |