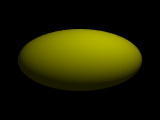
sphere {
    <0, 0, 0>, 1
      pigment { color Yellow }
      scale 2*x
}
|
|
Due Date: Tuesday, Jan 30.
In case you haven't noticed, POV-Ray is rather picky about syntax. Forgetting a bracket or a semi-colon can mean that your script does not run. When things don't run, POV-Ray highlights in yellow the line it believes has the error and it puts an error message at the very bottom of the window. Sometimes the yellow marker and the error messages are helpful and sometimes they aren't. Below are some helpful hints at finding and correcting errors:
In class, we will discuss how color is stored in the computer and how it is set both in your html document and in POV-Ray.
For example, in HTML, the background color might be set as follows
Using the above syntax, how would you set the color to white, red, magenta, gray, light blue, or yellow? Test it in your web page to make sure the answers you give are correct. Finally, pick a color you like, and use it as the background color of your html document.
In POV-Ray, the color might be set in any number of ways, one of which is
Using the above syntax, how would you set the color to white, red, magenta, gray, light blue, or yellow? Test it by setting the color of a sphere in POV-Ray to make sure the answers you give are correct.
POV-Ray allows you to very easily translate (i.e. move), rotate, and scale objects. For example:
| translate < 1,0,-3> | moves an object 1 unit along x and -3 units along z. | scale < 1,2,1> | double the length of an object along the y-direction. | rotate< 90,0,0> | rotate an object by 90 degrees about the x axis. |
The transformation is placed within the brackets of the shape as shown below:
sphere {
<0, 0, 0>, 1
pigment { color Yellow }
scale 2*x
}
|
|
One must be careful though. Here are some things to note:
Practice: Once you are comfortable using transformations, create a shape made up of multiple objects.
For example, the following picture is made with 6 spheres scaled and rotated. Do you see how it was created? Try making something similar. |
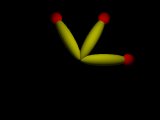
|
One of the powerful capabilities of POV-Ray (and most programming languages) is the ability to define an object once, and then to re-use it by just invoking its name. For example, below I define my object of 6 spheres using the "declare" command:
#declare petals = union {    // this just defines the object.
  sphere {
        ....
  }
  sphere {
        ....
  }
  etc
}

petals   // typing the name causes POV-Ray to actually draw the object
To create a second transformed copy, I can do the following
petals  // this draws the first petal object
object {    // this draws the second one but rotated.
  petals
  rotate 180*z
}
|
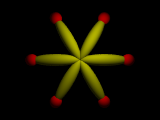
|
Practice: Try taking the object you created in the previous section, give it a name (using #declare) as shown above, and then create multiple copies transformed.
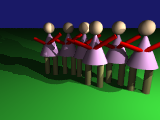
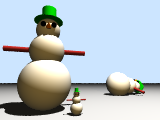
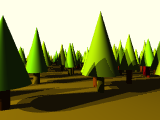
Using what you have learned above, create a scene built from transformed basic shapes and re-used objects. Create several variations of your scene by changing the camera location or the number, location, or size of your object. For example, in the left image, a "person" object was created and re-used multiple times. In the middle, a snowman object was created, and on the right a tree object was created:
 |
| 
|
Note: the image of trees on the right, has many, many trees in it. In a later lab, we will learn how to generate many objects, e.g. without having to type "trees" a thousand times!
For each variation of your scene, save two images as before: one image that is small (160x120) and one large (640x480). Place these images in your public_html folder (preferably in a subfolder called something like lab2images. Add the small images to your web page and,add links so that when you click on the small image, the large image will open.
Email your povray file (for just one of the variations) as an attachement to gorr. It is important that you put
in the subject line so that your email can easily be found in your instructor's sadly overwhelmed email box.
Place the images on your webpage and email the povray code, no later than class time on Tuesday, Jan 30. We will discuss them during class.