 |
Lab 7: Animation |
CS 142: The Mathematics of Computer Graphics,Spring 2007 | |
|
|
Lab 7: Animation |
CS 142: The Mathematics of Computer Graphics,Spring 2007 | |
Due Date: Tuesday, March 20.
In class, we will discuss how to make animations in Povray. All of the information discussed in class can also be found online in the following locations:
Create a new folder (e.g. called Lab7) on your H-drive where you plan to work. In this folder create a subfolder called "frames". This is where the images will be kept.
Width=320
Height=240
Initial_Frame = 1
Final_Frame = 10
Output_File_Name=frames\
Save this file into your Lab7 folder. Call the file animation.ini. This is the initialization file that you will use to render the animation. It instructs Povray to generate 10 images that have a size 320x240. The last line tells Povray to store the images in the folder called frames.
In Povray, create a new file again. Cut and paste into this new file the povray code located in section 2.3.8.1. Save the file, calling it something like ball.pov. In Povray, choose the Menu Render and then Edit Settings/Render. A window should open up. In the middle section where it says "INI File:" click the button labeled "Browse" and navigate to your animation.ini file. Click "Open". This will tell Povray to use the settings in your animation.ini file. Click the "Render" button.
When Povray is done rendering, you should have 10 images in your frames folder. If not, repeat the steps above to make sure you did everthin correctly.
You now need to create an animation from your frames. To do this, follow these animation. These instructions show you how to created an animged GIF file and place it on your webpage. Once you have done this, your animation should look like:
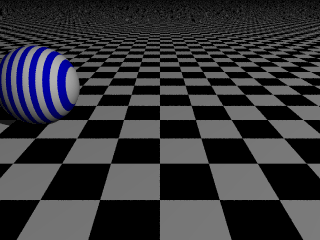 Click image for the animation.
The animation looks a bit grainy because there are not many frames. Rendering can take a long time, so is good to start with a small number of frames and a small image size. Once you like what you have, you may increase the image size and number of frames.
Once you get everything working, go back and look at the code in the povray file. Do you understand what it is doing? If not, re-read the material given in the "Overview of Animation" section.
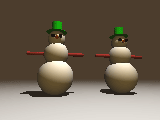
Once you are comfortable with how animations work in Povray, decide what you want to do for your own animation. Keep it fairly simple but try to have several interacting shapes. For example
 Click image for the animation.
No later than class time on Tuesday, March 20, please do the following:
We will look at your animation during class on March 20.