Lab 1: HTML and Javascript (JS)
CS 445 Computer Graphics, Fall 2017


Due Date: The beginning of lab, Wednesday Sept 6
Goals
- Learn the basics of HTML coding including webpage structure,
tags, links, HTML5 canvas, and mouse interaction.
- Begin to learn the basics of Javascipt 5 (JS5, ECMAScript 5) coding,
including functions, arrays, and classes.
- Familiarize yourself with using Netbeans to code HTML and JS5.
- Create a simple interactive webpage.
Note, this is not a course in HTML or JS. We focus here primarily on some of the
language constructs you will need in the later labs. However,
you are encouraged to dig into the languages as much as you can. Many references are available in books and online.
There are many libraries and tools available for creating webpages with HTML/Javascript and WebGL.
These can be very useful down the road but, in this course, we will not be using any of these because they hide a lot of what is going on especially in regard to webGL.
Be careful: JS and Java can look deceptively similar but are, in fact, very different languages. A few differences are described here. JS arrays, functions, and objects can be quite different than what you are used to in Java so please carefully read up on these topics.
Javascript and Browser Support
To learn more about JS and browser compatability, check out:
Resources HTML
As already mentioned, you do not have to be an expert in every aspect of HTML. You do
need to know how to create a bare bones web page and how to use the HTML5 canvas and how to
handle mouse and keyboard events.
Resources Javascipt
It is important that you get a good book on JS5. There is a lot you can find online but it can be difficult to learn about some of the more subtle issues especially about arrays, objects, event handlers, the DOM, and the communication between HTML and JS. Any advanced reference should work. In this course, the code you will be given is based on Javascript 5, also known as ECMAScript 5 or JS5. If you prefer to use JS6, please do but be warned that the lab code you will be given will be based on JS5.
Netbeans IDE
It is recommended that you use Netbeans to develop your HTML and JS code. The labs and demos for this course have been developed as Netbeans projects running in the Chrome browser.
There are a few things you need to install to get everything running:
- I assume you already have Netbeans and Chrome installed on your computer. Now is a good time to make sure you have the latest versions of both.
- You need to install the Netbeans HTML5 Kit plugin. You can do this through the Netbeans Tools->Plugins menu.
- You also need the Netbeans Connector Chrome Extension. Once you have installed the HTML5 Kit plugin, create a new Netbeans HTML5/Javascript project. At this point, you should be prompted to also install The Netbeans Connector Chrome Extension. The full instructions are here.
The following things may go wrong:
- If you don't have all the latest versions you may get the error "Driver Power State Failure".
- You may need to enable silent debugging. To do this, enter "chrome://flags" in Chrome's address
bar. Scroll down to find silent debugging, click to enable.
Lab Instructions
You are to work with a partner which will be randomly assigned to you. They only part that
will be collected is the item "Writing your own class". Feel free to do the other items individually
or together.
If you are already familiar with HTML and/or JS, then try something more advanced than below, specifically, try to implement something you don't already know.
- Web Page on Willamette's Server: If you don't already have a webpage for yourself on Willamette's server, then set one up using the instructions here.
- Create a basic html webpage (e.g. index.htm): Include information about yourself. Use some of the basic tags listed at HTML Introduction. Include one or more
images and links to other html pages, such as this lab page!
- HTML5 Canvas: Add a link, e.g. from your index.htm, to another webpage that you create and which contains an HTML5 canvas. Draw some simple shapes as shown in a few of the examples.
- Adding JS Scripts to your webpage: Javascript is code that enables one to control the behavior of your webpage. Javascript
can be embedded right in the html tags but we will mostly be writing code in external files and loading the source via
script tags. This is how you want to
do things.
- Javascript Coding: Skim through the other sections of the w3schools JS Tutorial to learn more about Javascipt
programming, etc. A lot of it looks like Java code so it should not take you too long to pick up,
but be careful because looks can be deceiving.
- Event Handlers and Classes: Create a new empty Netbeans HTML/Javascript project and add the files gui_mouse.html and gui_mouse.js to the project. Run the code. Comments:
- This code shows how mouse and key press events can be added to an HTML5 canvas.
- We will go over this code in class. It is your responsibility to read through code to make sure you understand every line! We will see a more complicated version of this code in a later lab.
- The code
gui_mouse.js shows one approach for defining a class in JS5. Note, JS5 doesn't really have classes but this sort of mimics a class. (JS6 introduces more standard class syntax.)
- In
gui_mouse.html, you will see the attribute oncontextmenu="return false". Try
removing it and rerunning the code to see what effect it has.
- Writing your own class: For the last part of this lab you are to practice
writing your own class and drawing on a canvas.
Below is an example of the type of thing you could do. Feel free to do something different
as long as it includes similar features (e.g. at least one class, a canvas, an array, communication between html and js, and mouse interaction).
- In a .js file, create a Circle class that stores the radius and center of a circle (e.g.
as an array [x,y]).
- Add a Circle.prototype function to draw the circle. (the canvas and context can be global variables)
- Include a window.onload function to define the canvas, context and mouse event listeners.
- In window.onload, create a Circle object and draw it on the canvas.
- In the html file, be sure to add a script tag to read in your .js file.
- In the html file, add text tags (with id) to display information, e.g. instructions and
the location and radius of your circle. You will need to add code to your .js file
to update these tags.
- Run the program to make sure it does what you think it should do.
- Once the above is working, expand your program as follows:
- Add an initially empty array of Circles.
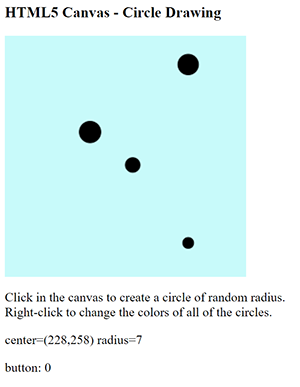
- Each time you left-click on the window, create a new Circle with random radius with center
located at the click location. As they are created, the circles are added to the array of
Circle objects.
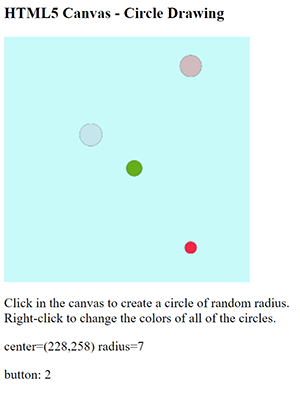
- When you Right-click, the circles are all redrawn in random colors.
| 
|
| After 4 left-clicks. The circles are at the location of the clicks |
After a single right-click anywhere in the canvas window. |
To Hand In
Demonstrate your program in lab on the due date no later than the end of lab.
One partner should submit to WISE the html and js code for the above "Writing your own class".
Add standard JS comments and also comments containing
the name of both partners at the top of all files. In WISE,
go to the tab for CS-445 01 17/FA, select the Assignments link on left, and then
select Lab 1: HTML and Javascript (JS).
Remember: Assignments are due by the end of lab on the due date. Assignments turned in after this are considered late.
