|
Lab 5: Lighting & Shading
CS 445: Computer Graphics,
Fall 2017
|


 Due Date: be ready to demo at the beginning of lab Friday, Oct 13
Goals
- Learn about vertex and fragment shaders.
- Learn the basics of GLSL (shading language)
- Learn how phong lighting is implemented in shaders.
- Learn how the shaders interact with the WebGL program.
- How are lights placed in the scene.
- What is the difference between Gouraud vs Phong Shading,
and what is their relationship to Phong lighting!
As in previous labs, find a partner you have not yet worked with.
This lab is going to test your understanding of the code. If there are sections you don't understand, please take time to discuss them with
your partner, the other students, or the instructor.
Resources
Questions
Go over the material discussed in class and read the above references. You should be able to answer the
following questions.
- Where does each shader fit into the graphics pipeline?
- What functions are typically done in a vertex shader? In a fragment shader?
- At a minimum, what must the vertex shader do? At a minimum, what must the fragment shader do?
- What functions are still done by the fixed pipeline and so do not need to be done in the shaders?
- What are attribute variables and uniform variables?
Part 1: Lighting and Shaders
The color we see when we look at an object is the result of the
interaction between the object's base color and the surrounding lighting.
The base color of the surface may be obtained in several different ways, such as by using vertex colors (Lab 2), uniform colors (Labs 3-5), or colors calculated directly in the shader (Lab 6). In this lab, we continue to use uniform colors except that the
color will be modulated by the lighting.
In class, we will go over the Phong Lighting model. The lighting
parameters (e.g. ambient colors, diffuse colors, ...) are set in the javascript application
code and sent to the shader using uniform variables. The Phong lighting calculation using these parameters is done in the shader. It can be done either in the vertex (referred to as Gouraud Shading) or the fragment shader
(referred to as Phong Shading). Phong Shading is preferred for reasons
which will be discussed in class and shown below.
Start with your Lab 4 code (make a copy of the entire Lab 4 folder,
renaming it, e.g. to be Lab5Lighting (or whatever). Be sure to retain your original Lab 4 code. Make the following changes to your code.
- Add Vertex Normals to Primitives: The lighting calculation requires surface normals. These are provided for you already in the Cube class. You need to add them to your
other primitive shapes as well. However, since there are so many
changes you need to deal with in this lab, I suggest you start by creating a
scene with only cubes since you know the normals are correct. Once the code is working, you can go back and add the normals to the other shapes.
- Remove Edges: The lighting makes it possible to see the shape of an object without
the black edges. Go into Shapes.js and remove all the code related to
the edges.
- Add Vertex Buffers for Normals: Normals are vertex attributes because they are defined at each vertex. You therefore need to set up array buffers for the normals. In Shapes.js
add code to
initBuffers to create and load the normals. The code should look very similar to what is done for the vertices and colors. In drawPrimitive, you
also need to add code to bind the normal buffers. Again, follow what
is done for the colorBuffer and vertexBuffer.
- Add Shader Variables for Normals: In the
shaderSetup function (in render_scene.js) add the attribute
variable vNormal (similar to vPosition).
- Replace Shaders: Recall that the glsl shader code is
stored in start_here.html. You need to replace the
vertex and fragment shaders currently there with ones that compute the Phong lighting. Download and unzip shaders.zip.
It contains 2 sets of shaders: the Phong vertex and fragment shaders and the Gouraud vertex and fragment shaders. For now, you just need the Phong
shaders. Take a look at the code. Note, in Phong Shading the lighting calculation is primarily done in the fragment shader.
- Add Lighting.js: Download Lighting.js and add to the top level
of your Lab5 folder. This code contains 1) the lighting parameters and 2)
a setUp function for creating the uniform variables. Read through the code
to make sure you understand it.
- Load Lighting.js: Load in Lighting.js in start_here.html
- Create Lighting Object: In render_scene.js, you need to declare and create a Lighting object at the top of the file, and call the lighting
setUp function from the render_scene init function. Note, you must have created a
"program" object before you call setUp. Do you know where the program object is created? If not, look for it.
- Set World Coordinate Light Position:The initial light position is set in Lighting.js (light_position) where we will assume it is in World coordinates since this is the most natural way to think of its location.
It is sent to the shader via the uniform variable uLight_position.
However, if you study the shader code, the shader assumes uLight_position
is in the eye coordinate system. Thus, you need to transform light_position from
world to eye coordinates before setting the value of uLight_position.
Use what you learned in class to figure out how to do this. If you do it correctly then the light should always be in the same place relative
to the axes and objects even when you navigate around the scene.
Aside: There are times when you want to light to be attached to the camera (e.g. if the camera is positioned on the
driver sitting in a car, then you want the headlights
attached to the car and thus to the camera.) In such a case, you probably want
to specify light_position in Lighting.js
in eye coordinates and so you do not need to transform them before sending to the shader.
- Create a Light Cube: To help you see where the light is,
add a small cube to the scene in the location of the light. If the
light_position is in world coordinates, then you need to transform the cube just as you would any other object that is to be placed at some location in world coordinates. (how would you place the cube if the light was attached to the camera, that is, light_position was
given in eye coordinates?)
Once you have done all of the above, try running the code. Chances
are you will get a lot of errors. Be patient, ask questions, and work though the errors
one at a time. It can be frustrating because it isn't always obvious where the problems are. Sometimes no errors are generated yet you still don't see anything showing up on the canvas. At this point, methodically go through all the steps above to make sure you didn't skip something or interpret something
incorrectly. It will take time.
Once you have the code working, do the following:
-
Go back and add normals to your other primitives. Carefully checked
the scene to make sure the normals look correct. It can sometimes be hard
to tell. Once all of your primitives are working, try adding your
composite object to the scene.
-
Animate the light. Add a slider to the html so the user can set
the angle (about y) to place the camera. E.g.
<p>light angle about y axis: 0% <input id="slider" type="range"
                  min="0" max="360" step="20" value="0" /> 100%</p>
Add an event handler for the slider (it generates "oninput" events) which sets a variable (e.g. lightAngle). Use lightAngle
in the render function to place the light (you just need to add an additional y rotation).
-
Question: how would you modify the code so the light is attached to the object, e.g. as
if you had a headlight? You don't have to implement this but you should at least think about
what would change.
-
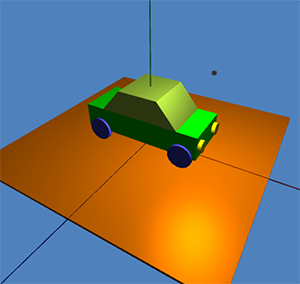
Try running the code with the Gouraud shaders. You can just duplicate
start_here.html (e.g call it start_hereGouraud.html) and replace the Phong with the Gouraud
shaders.
Car with Gouraud Lighting
|
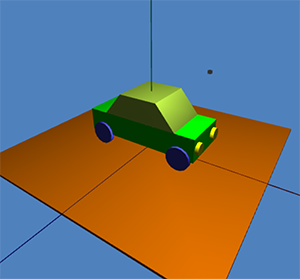
Car with Phong Lighting
|
To Hand In
By the beginning of lab on the due date above, be ready to
demonstrate your finished program using the Phong shaders. Present a scene that:
- Includes all of your primitive shapes (they could be part of your composite object)
so that it is clear that the normals are properly set.
- Includes a slider (or some system) to move the light so that one can see
how the light changes as its position changes.
Then submit your code to WISE:
- Be sure your code is clean, formatted, and well commented. Both you and your partner's names
should be at the top of the render_scene code.
- Zip together your Lab5 folder (please delete old or unused files) and submit via WISE
(only one partner needs to do this). One should be able to run your code by placing the unzipped folder into a Netbeans project that already contains the Common folder.
- Add your partner's name to the inline portion of the WISE Lab 5 assignment.
