Bitmaps: In class we looked the programs BitMapListener.java and PixMapListener.java to examine how bitmaps and pixmaps can be used to draw on the OpenGL color buffer. This code can be found on \\home\classes in the folder \gorr\cs445\project4. Read through and run both programs to understand what they do.
BitMapListener.java creates a bitmap (1 bit per pixel) and stores it in a ByteBuffer. It is then "drawn" onto the color buffer using the glBitBuffer function. The bitmap created in this program generates a checkerboard pattern whose color is determined by the foreground color, the background color, and logic operator.
Experiment with different values of the foreground color, the background color, and logic operator. You should be able to predict the result. Can you?
Modify the BitMapListener.java program so that you generate:
Pixmaps: PixMapListener.java shows how to create procedural textures (procdedural textures are textures generated mathematically rather than, say, an image taken with a digital camera. Two textures are created a checkerboard pattern and soft stripes. Read through and run the code so that you understand what it is doing. Modify the code so that you get other textures, for example, see the textures at 2D Procedural Textures.
Pixmaps and Convolution: The netbeans project PixImageExample contains a program similar to PixMapListener except that the image is read from an image file rather than generated procedurally. Read through the code so that you understand how the image is read and stored in an ImageBuffer as well as a ByteBuffer. OpenGL needs the image in the form of a ByteBuffer but the ImageBuffer is easier to manipulate.
Modify the program so that the program performs a convolution on the image. For example, implement an edge detector. Display both the original image as well as the modified image.
Due Date: Monday Nov 6, in class.
Textures and Modes: The netbeans project called SimpleTextureImageExample shows how to place an image texture on a square polygon. Note, a procedural texture could also easily been used. Read through the code so that you understand what it is doing.
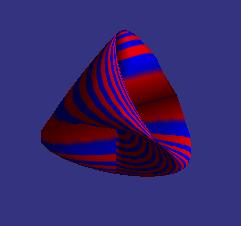
Steiner Surface: In project 3, you added lights and a material to your algebraic surface. Begin by modifying this code so that your surface has a texture. Note, you need to read in an image and add texture coordinates. Use an image with a striped or checkerboard pattern so that you can see how the texture is stretched over the surface.
In SimpleTextureImageExample, the texture is placed onto the square as a decal, that is, no lighting or material is taken into account. The decal mode is set by using GL.GL_DECAL in the command
gl.glTexEnvi(GL.GL_TEXTURE_ENV, GL.GL_TEXTURE_ENV_MODE,GL.GL_DECAL);
Other modes such as GL.GL_MODULATE, GL.GL_BLEND, or GL.GL_ADD. allow for interaction with lights and materials.
Modify the algebraic surface code so that the user can set the texture mode and see the result. For example, when
you use GL.GL_MODULATE, you should see the effect of both the texture and the lighting combined.
Navigation: The netbeans project TextureCude shows how one can efficiently store multiple textures in opengl in so that it is easy to switch quickly from one texture to another. Just as with display lists, efficiency is important when scenes become complex. Read through and run the TextureCode project to make sure you understand how the textures are stored and assigned to the cube shape.
Create a room (or several rooms) with floor, walls, and ceiling. Gather some pictures of wood flooring and walls (e.g. with windows), etc and use these images to texture the room. Remember, the images need to have dimensions that are powers of 2. Include lighting and materials as well. Add a few simple objects to the room (cubes, teapots, etc). Include your code for navigation so that you can wander around the room. Include collision detection so that you are not able to go through the walls, floor, or ceiling.
Due Date: Monday Nov 13, in class.
[top] [Schedule] [CS445 Home]