Spin me right round
Jed Rembold
October 27, 2025
Announcements
- Problem Set 5 due tonight!
- ImageShop guide posted!
- Can probably expect Breakout feedback around the end of the week
- New grade report went out last night!
- Last day to withdraw from the class is Tuesday, talk to me TODAY if you have concerns and want advice
- Exam 2 one week from Friday
- Polling: rembold-class.ddns.net
Review Question!
To the right are the contents of a text file named
PBride.txt. Which code snippet below would
print off the word “father”?
My name is Inigo Montoya.
You killed my father.
Prepare to die.
with open('PBride.txt') as f:
for line in f:
w = line.split()
if w[0] == "You":
print(w[-1])c = read('PBride.txt')
print(c.find("father"))with open('PBride.txt') as f:
c = f.read().splitlines()
print(c[1][4])with open('PBride.txt') as f:
c = f.read()
i = c.find("f")
print(c[i:i+6])Wrapping up File IO
Writing: Mostly Like Reading
You can write text files using almost the same syntax as reading:
with open(|||filename|||, |||mode|||) as |||file_handle|||:
    |||Code to write the file using file_handle|||
Note the
|||mode|||parameter toopenhere! Mode is a string which is either"w"to write a new file (or overwrite an existing file)"a"to append new contents to the end of an existing file
The file handler supports the methods:
.write(|||string|||)to write a string to the file.writelines(|||iterable of strings|||)to write each iterable element to the file
Fingerprints!
- Suppose we had a text file that stores information about a
particular users fingerprint
- Name, dimensions, and the print itself
- We want to read this information in and display the fingerprint as a
GImage - Then we want to allow the user to click on parts of the fingerprint and store those important coordinates to a file
- How might we go about doing this?
One approach
from pgl import GWindow, GImage, GOval

SCALE_FACTOR = 3
MARKER_SIZE = 10

with open('User1_Original.txt') as fh:
    name = fh.readline().strip()
    width = int(fh.readline().strip())
    height = int(fh.readline().strip())
    fp = fh.read().splitlines()

# Initially clean out points for new run
with open('points.txt', 'w') as fh:
    pass # Not doing anything, because just opening it clears things

print(name)
print(width)
print(height)
print(fp) #list of strings

# Make our scaled window
gw = GWindow(SCALE_FACTOR*width, SCALE_FACTOR*height)

# Create our array and populate it
pixel_array = [[0 for i in range(width)] for j in range(height)]
for r in range(height):
    for c in range(width):
        if fp[r][c] == 'M':
            pixel_array[r][c] = GImage.create_rgb_pixel(0,0,0)
        else:
            pixel_array[r][c] = GImage.create_rgb_pixel(255,255,255)

# Convert our pixel array to a GImage, scale it, and add it
fp_image = GImage(pixel_array)
fp_image.scale(SCALE_FACTOR)
gw.add(fp_image)

# Handling interactivity
def click_action(e):
    """Marks the clicked loc with a red dot and writes to file"""
    mx, my = e.get_x(), e.get_y()
    marker = GOval(mx - MARKER_SIZE/2, my - MARKER_SIZE/2,
                   MARKER_SIZE, MARKER_SIZE )
    marker.set_filled(True)
    marker.set_color("red")
    gw.add(marker)

    with open('points.txt', 'a') as fh:
        fh.write(f"{mx},{my}\n")

gw.add_event_listener("mousedown", click_action)
ImageShop
Introducing ImageShop
- While you have a PS due on Monday, the next project will be due the week after afterwards
- Taking a moment today to introduce ImageShop
- The guide is already posted, so you can get a start as soon as you are done with PSet 5!
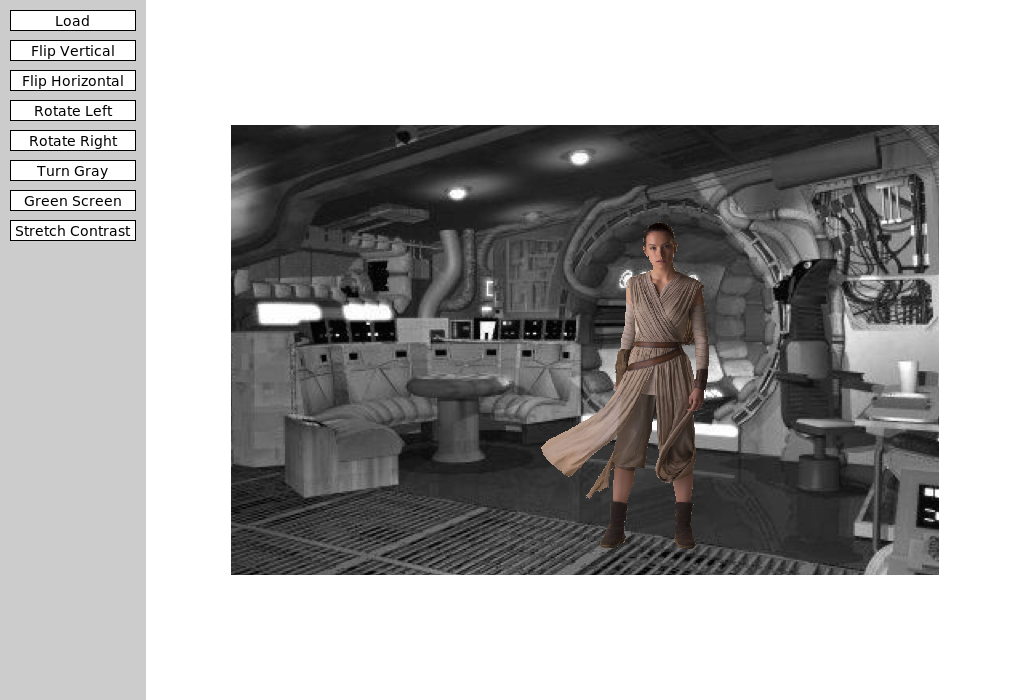
Starting

- ImageShop initially has only two buttons
- “Load” will bring up a file selection box where you can choose what
image to display
- Internally, this is handled by a function that returns the chosen file path
- “Flip Vertical” is the example feature button that flips an image vertically
- “Load” will bring up a file selection box where you can choose what
image to display
Big Picture
- Each milestone in ImageShop boils down to:
- Adding a button to the window to handle a new feature
- Writing a simple callback function that sets the new image to be equal to the output of a new function you’ll write
- Writing that function, which will generally return a
GImagetype object
- You are always free to write whatever other helper functions you might like!
So Many Files!
- ImageShop is the first project to start leveraging multi-file
layouts:
- Some functions will already be provided in
GrayscaleImage.pythat you can import into your main program - You are encouraged to write the necessary functions for Milestone 4 in their own file and import them in accordingly
- I’ve seen you all scrolling madly around trying to find the code you want. This helps with that!
- Some functions will already be provided in
- That said, don’t forget to save the file you are editing! Since it may not be the file you are running, it won’t get autosaved.
GButtons
- To help facilitate working with buttons, ImageShop introduces a new
type called
GButton - There is nothing magical about these! They are just pre-bundling PGL concepts that you already know like labels and mouse click events
- Each
GButtongets a label and a callback function name that determines what function is called when that button is clicked - ImageShop comes with a pre-defined
add_buttonfunction which will take care of adding a new button to the correct part of the screen.- You’ll just need to provide it a label and function name to callback to
The Current Image
- ImageShop holds the
GImagecurrently displayed on the window in a variable calledgw.current_image - The variable is specifically added as an attribute to
gwso that you will have access to it in any callback function you write - This will generally be the input to your various image manipulation functions, since most of those functions work with whatever image was currently displayed on the screen
- Your callback function should run
set_imageon the output of your manipulation function, which will take care of updating the value ofgw.current_imageand displaying the new image in the window
Milestone 0
- Milestone 0 has you adding a “Flip Horizontal” button
- Add the button
- Add the action callback function
- Write a function to manipulate the pixels to flip the image horizontally
- Slightly more complicated than the example function, but not much
Milestone 1
- Here you will add buttons to rotate the image left or right (or CW or CCW if you prefer)
- Most of the difficulty comes in keeping track of of rows and columns
- Need to create a new list of lists of the correct dimensions
- Need to copy over the pixels from the original to the needed location in the new list

Milestone 2
- Here you’ll add a button to convert an image to grayscale
- If you understand the other library files that have been given to you as part of the project, this milestone should be the simplest!
- Don’t copy. Import!
Milestone 3
- Here you get to enable a green screen effect!
- Unlike other buttons, when this one is clicked, you should use the
file chooser library to prompt the user to select another image
- This is the image that will be overlaid on whatever image is currently shown on the screen
- You will want to start with an “empty” pixel array with the same dimensions as the background
- This will closely mimic our in-class example from Friday, where
depending on how “green” a pixel is, you will choose between different
choices
- If green enough, you will copy the pixel from the background image to your new pixel array
- If not green enough, you will copy the pixel from the foreground image to your new pixel array
Milestone 4
- Here you’ll implement one algorithm for increasing dynamic contrast across an image!
- Doing so requires several steps and different functions. It can be
convenient to place these in their own file and import them into
ImageShop.pyas needed.- Compute all the pixel luminosities
- Construct a histogram of these luminosity counts
- Your histogram should have 256 elements, one for each possible luminosity
- Construct a cumulative histogram using your histogram
- Use the cumulative histogram to adjust the luminosity of each pixel in the pixel array
- You don’t need to display the visual histograms! But they can be a
great way to check that you are doing the other parts correctly.
- Related to Problem 1 on PS5
Extensions
- Give yourself time for extensions on this project!
- They are easy! Just come up with interesting or cool graphical effects and add a button for them!
- You’ll look at several this week in your section meetings
- Adding these in your project is encouraged and will be regarded as “sub-extensions”, but come up with your own as well!
Busting out the Vinyl
It’s a Record!
- A record is a collection of related fields treated as a single unit
- Imagine a row in a spreadsheet or database
- Or a single observation
- A record stores what the state of something was, and thus generally doesn’t change
Old Records
- Records are a very old idea, dating back to the 19th century BCE
- In 2017, researchers established that the below tablet, called the Plimpton 322 tablet, records Pythagorean triples!

Recording Dickens
- Suppose we had some records from the two-employee firm Scrooge and Marley
- Each contains the employee name, their title, and their salary
| name | title | salary |
|---|---|---|
"Ebenezer Scrooge" |
"founder" |
1000 |
"Bob Cratchit" |
"clerk" |
15 |

Tuple Time
- In Python, the simplest strategy for representing a record uses the
built-in type called a tuple
- Comes from terms like quintuple or sextuple, that denote fixed-size collections
- An ordered, immutable sequence of values
- Feel similar to lists, except immutable, and thus used very
differently
- Think of tuples as records, recording the state of something at some time
- Created by enclosing a collection of elements in parentheses
employee = ("Bob Cratchit", "clerk", 15) - An ordered collection, so each element has a corresponding index
Tuple Usage
- Can largely envision tuples as sitting between strings and lists
- Immutable, like strings
- Elements can be anything, like lists
- Common operations mimic that of strings
- Can concatenate with addition
- Can duplicate by multiplying by an integer
- Can index and slice them
- Can loop over them directly or via index
- A tuple of a single value needs a comma at the end
in order to be a tuple
- Otherwise just a set of parentheses around a value
Tuple Selection
You can select or slice elements from a tuple just like you can with lists
- Unfortunately, records are not usually ordered in a particular way. Rather, it is the field name that is usually important
If using tuples, you can make programs more readable by using a destructuring assignment, which breaks a tuple into named components:
name, title, salary = employeeWhile modern versions of Python have such thing as a named tuple, we will not look at them here.
- The more general strategy is to define a new data type (class) to better represent the objects in question
A Tangled Example
Pointy Tuples!
One of the most simple examples of tuple usage would be storing location information in 2d space
By storing both \(x\) and \(y\) coordinates in a tuple, it makes that information easier to store and pass around your program
When you need to use the points, best to destructure:
x,y = pt

Yarn Tuples
- Points often show up in graphical applications, where you may want to store a host of locations in a list
- A pretty example of points involves making some yarn art, where we:
- Place a set of “pegs” at regular intervals around a border
- Tie a piece of “yarn” around one peg
- Loop the yarn around the peg a distance
DELTAahead - Continue until we return to where we started
Expanding…
In Code
from pgl import GWindow, GLine, GRect

PEG_SEP = 3
PEG_ACROSS = 300
PEG_DOWN = 150
DELTA = 332

GWIDTH = PEG_ACROSS * PEG_SEP
GHEIGHT = PEG_DOWN * PEG_SEP

def place_pegs():
    """ Returns a list of points, where the points are tuples. """
    list_pts = []
    for i in range(PEG_ACROSS):
        list_pts.append((i * PEG_SEP, 0))
    for i in range(PEG_DOWN):
        list_pts.append((GWIDTH, i * PEG_SEP))
    for i in range(PEG_ACROSS):
        list_pts.append((GWIDTH - i * PEG_SEP, GHEIGHT))
    for i in range(PEG_DOWN):
        list_pts.append((0, GHEIGHT - i * PEG_SEP))
    return list_pts

def draw_pattern(list_pts, color='black'):
    """ Creates a window and draws in the necessary yarn. """
    gw = GWindow(GWIDTH, GHEIGHT)
    current_i = 0
    finished = False
    while not finished:
        next_i = (current_i + DELTA) % len(list_pts)
        x1, y1 = list_pts[current_i]
        x2, y2 = list_pts[next_i]
        line = GLine(x1, y1, x2, y2)
        line.set_line_width(2)
        line.set_color(color)
        gw.add(line)
        current_i = next_i
        if current_i == 0:
            finished = True

if __name__ == '__main__':
    pegs = place_pegs()
    draw_pattern(pegs, 'green')
Special Tuple Functions
Returning Tuples
- Tuples give us a convenient way to return multiple objects from a
function
return x, yis the same asreturn (x,y)
- Several Python built-in functions return tuples, of which a few are
particularly useful
enumeratezip
Enumerating
We have multiple ways to iterate through a string or list:
By element:
for ch in string:
    |||body of loop using ch|||
By index:
for i in range(len(string)):
    |||body of loop using i|||
Using
enumeratelets us get both!for i, ch in enumerate(string): |||body of loop using both ch and i|||
Zipping
Sometimes you have multiple lists that you want to loop over in a “synced” fashion
The
zipfunction iterates through tuples of pairs of elementsFor example
zip([1,2,3], ["one", "two", "three"])would yield
(1, "one"), then(2, "two"), and then(3, "three")Can unpack or destructure as part of a
forloop:for x,y in zip([1,2,3],[4,5,6]): |||body of loop using paired x and y|||