Basic Tooling
Jed Rembold
May 19/20, 2026
Announcements
- Spring grades are in! So I can focus on you all now!
- Discord invite went out as Canvas announcement
- Also in announcement: a form with
- Group preferences and strengths
- Public SSH key (more on that in a bit)
- For next week:
- Have the form filled out by end of Saturday please
- Keep an eye out for connection credentials
Evenings Plan
- SSH Remotes
- Docker Compose
- Parquet
SSH Remotes
Ensuring SSH Access
- On Windows:
- Likely already have it installed. If not recognized, can enable by going to Settings → System → Optional Features and adding OpenSSH Client
- Alternatively, install (or use) WSL2 (the Windows Subsystem for Linux). The Linux instance you get will already have SSH, so you use it through the WSL2 terminal
- On MacOS:
- It is already there
- On Linux:
- It is likely already there, or just install the OpenSSH package using your package manager
Remote Sessions
The program usually used to do so is called
ssh, standing for “secure shell”To log into a remote server, the command looks something like:
ssh {username}@{ip address or domain name}where
usernameis your username on the remote server (which may be different than your local username)ip address or domain nameis either the direct ip address of the server (eg. 165.213.13.194) or the domain name (myserver.net)- Some servers may require a special port as well, which can be
indicated with
-p
Streamlining Security
- Entering in your remote account password each time isn’t onerous but can be inconvenient
- It is also only as secure as the quality of your password, which varies wildly
- Instead of a password, you can take advantage of an ssh
key, which uses a public/private key authentication system
- You generate (or use an existing) public and private key pair on your system
- You upload the public key to the server you want to be able to connect to
- The private key always stays only on your system. It is not shared!
Using Keys
To create a new key, you can use
ssh-keygen -t ed25519 -C {desc comment}- You will be asked for a passphrase for the key. You can go without and the key will still be much more secure than most password systems, but you could also add a passphrase necessary to “unlock” the key
- Unless you name it differently, two files will be created inside
your
.sshfolder in your home directory: one with justid_ed25519and one withid_ed25519.pub
Copying Keys
Just creating the keys doesn’t do anything special. You need to copy the public key over to whatever server you want to connect to.
To copy the public key over to the desired server in Linux/MacOS:
ssh-copy-id {username}@{servername}In Windows:
type $env:USERPROFILE\.ssh\id_ed25519.pub | ssh {username}@{servername} "cat >> ~/.ssh/authorized_keys"- Or install GitBash or WSL2
You’ll need to enter in your password one more time, but then the key contents will be copied over
SSH Config
Often, you are connecting to the same servers again and again
- It would be nice not to have to repeat information about user name, server location, ports, etc
Instead, you can set up “profiles” in your
{HOME}/.ssh/configfileA general profile entry might look something like:
Host {profile_name}
  User {username}
  HostName {domain name or ip address}
  Port {port, if not default}
There are more options and settings that can be configured. See
man ssh_config.
Transferring Files
- You can transfer files between your local computer and a remote host
in a few different ways
scp: Thescpcommand combines normalcpandssh, allowing you to include a remote server in the standard formatscp local_file remote_server:remote_filersync: Syncs entire folders if desired, only transferring what information is necessaryrsync -avP local_folder/ remote_server:remote_pathUse GitHub as an intermediatary. Write and push changes from your local system to GitHub, and then pull them down to the remote.
Tunnels
- Often, remote software might be running that offers up servers on a
remote port
- A Postgres database, or a webserver
- Trying to access those services on your local machine, even if you SSH into the remote, will not work!
- So how can we still connect to those services on your local
machine?
- By utilizing SSH tunnels!
Local Tunnels
There are technically two types of tunnels, but the type that will be most useful to us are called local tunnels
Connect a resource that is available on the remote to a location on our local system
Requires adding an optional flag when calling ssh:
ssh -L {local_dest}:{remote_target} {user}@{remote}- The local destination will usually just be some port on the
localhost:
localhost:8080 - The remote target is wherever the target is residing, often at a
port on the other machine:
localhost:5432
- The local destination will usually just be some port on the
localhost:
Config Tunnels
If you always want a tunnel to be created when you connect to a remote, you can set this up in your SSH config!
Host {profile_name}
  User {username}
  HostName {domain name or ip address}
  Port {port, if not default}
  LocalForward {local port} {remote target}
You can create as many tunnels as you might need!
Limiting Holes
- When connecting to a remote network, often times you want to make many systems or services on that network available
- Poking a multitude of holes in the firewall, one for each service, is not recommended
- Instead, generally you poke a single hole, and channel all traffic through there
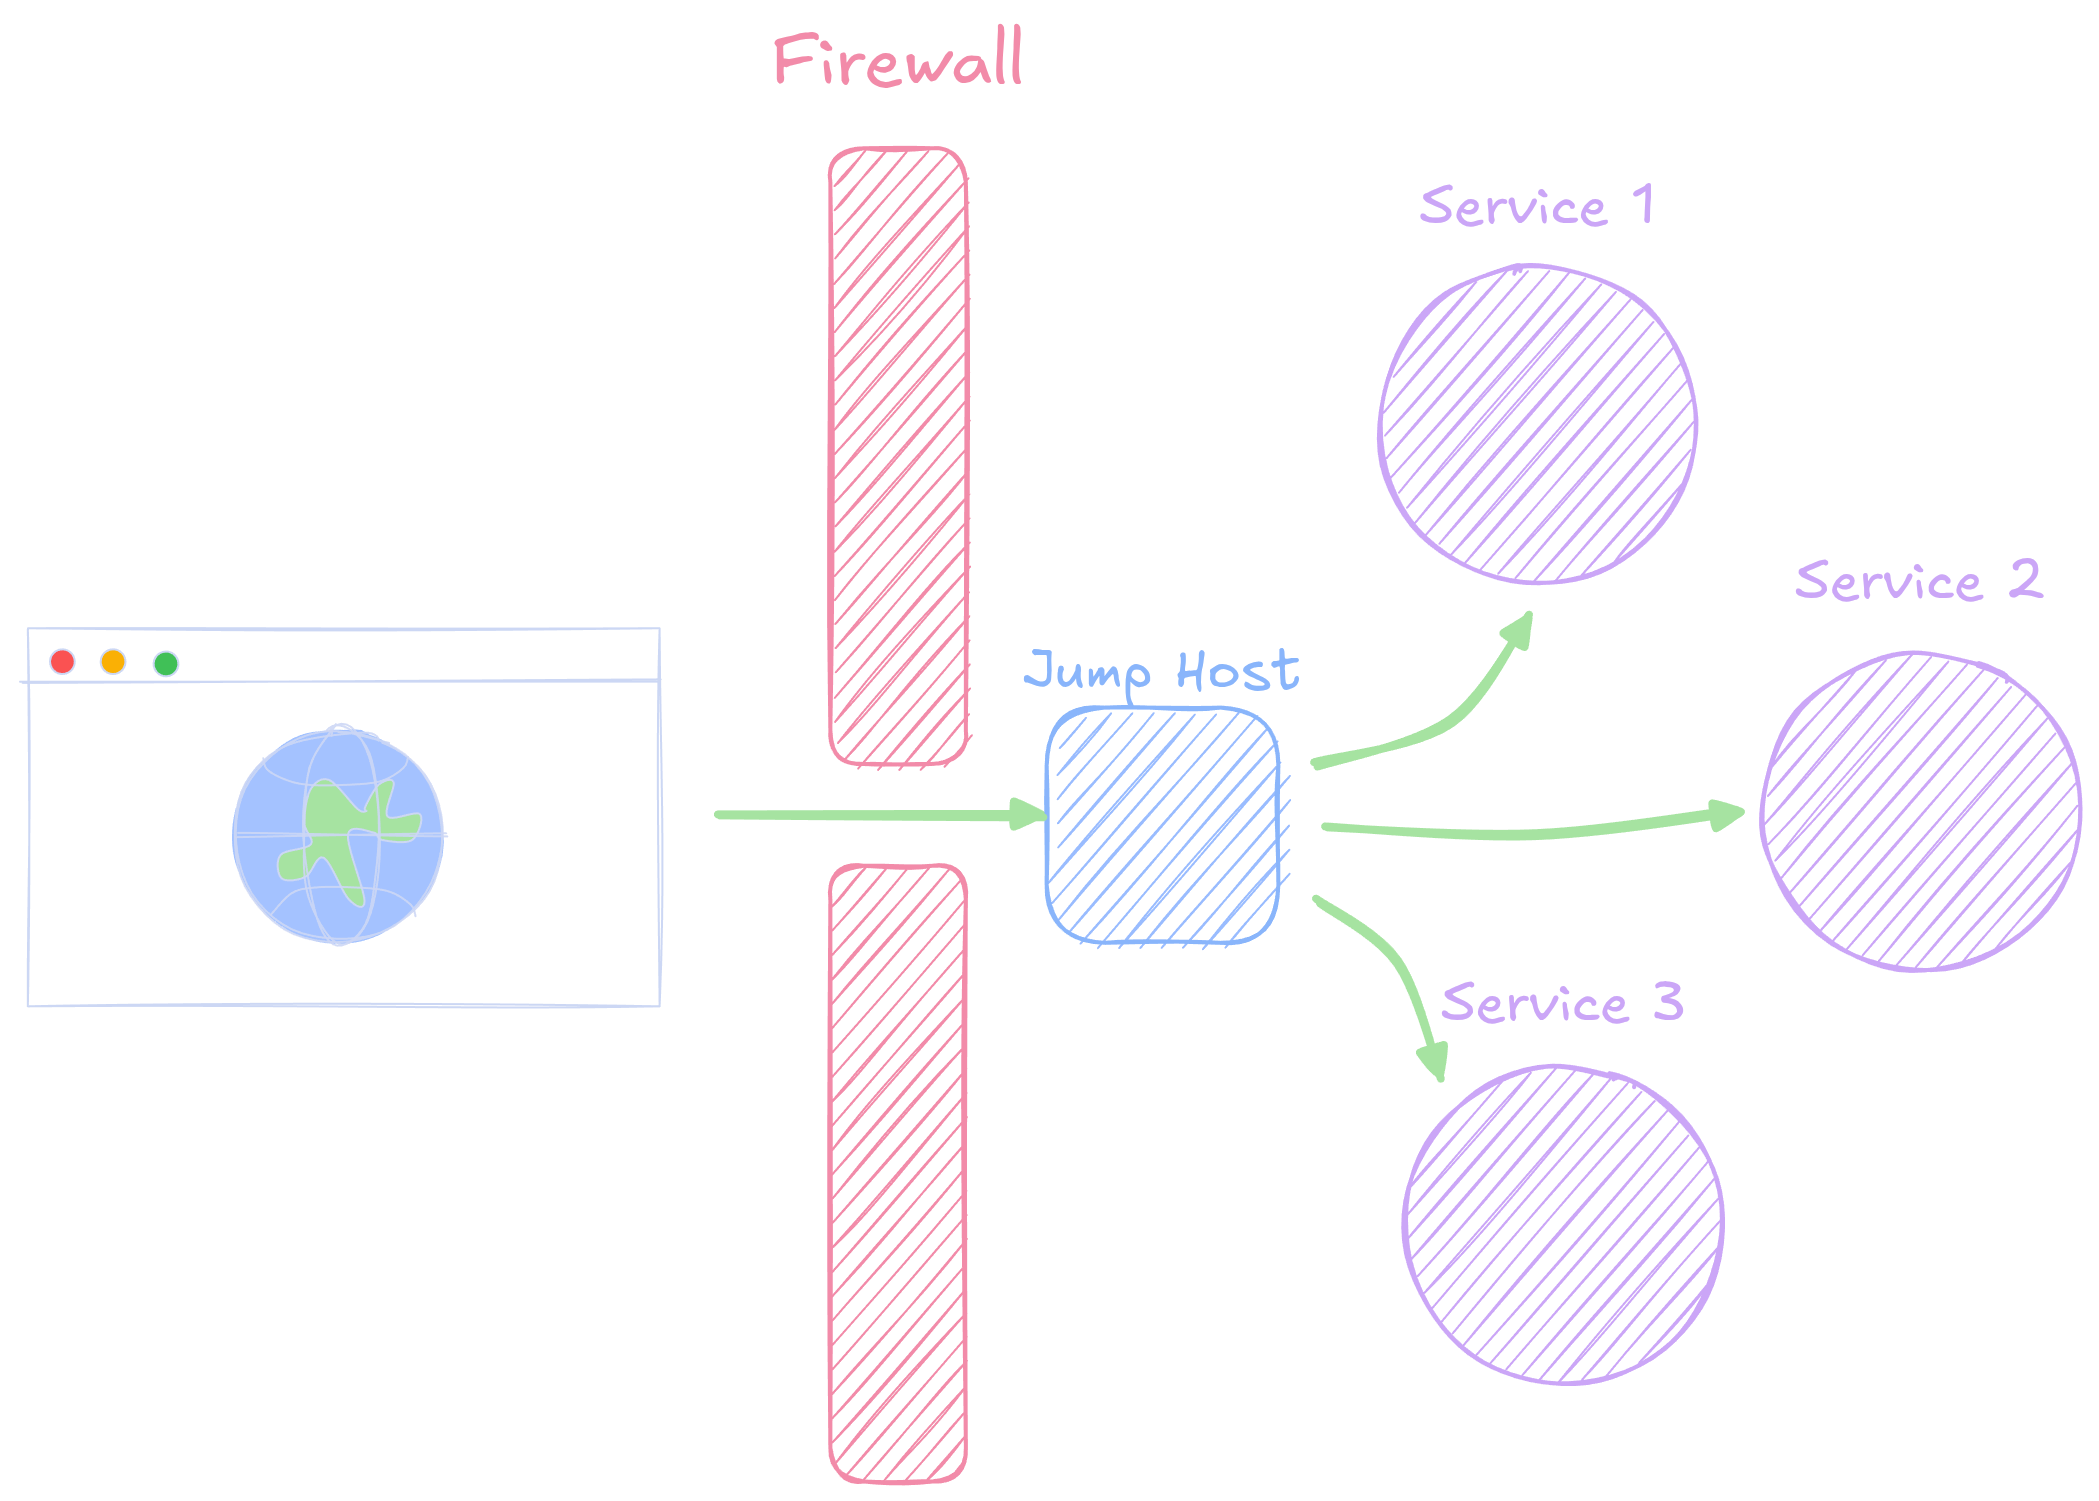
SSH Jump Usage
- We can specify we want to use a jump host in various ways:
From the CLI:
ssh -J {user}@{jumphost} {user}@{service}From SSH Config
Host {your profile name} Hostname {service} User {user} ProxyJump {user}@{jumphost}- Note that the
ProxyJumpcan also just point to another profile name
- Note that the
- Tunnels still work seamlessly! They will be created passing through the jump host
Practice
I emailed you all earlier with a server address and login information. Use that to work through the following:
- SSH into the server using your information and change your password
using
passwd. Note that when you type in passwords on most shells, they will not show anything for security but are indeed recording what you type. - How many files are in your remote home directory initially? Some might be hidden!
- Exit out, and on your local system generate an SSH key. Copy the public key over to the server. Ensure you can log in to the server now without needing your server password!
- Set up a simple profile in your
.ssh/configfile to facilitate connecting to this server - This server has a webpage being served at port 8080. Can you create a tunnel to view its contents?
Break Time
Docker Compose
Why Compose?
- Docker by itself is great for single, isolated containers to accomplish a task
- But what if we have a collection of containers that all need to work
together?
- Eg. A database, a web scraper, and an API container?
- We could launch them and configure them all independently, but might
result in ordering errors
- The database must be running before the scraper could properly dump data to it, for instance
- Docker Compose allows us to declaratively define all the
settings for a collection of containers that we want to work together
- This includes dependencies! Where one container must be running before another is started
Installation of Compose
- Did you install Docker through Docker Desktop? The congrats! You already have Docker Compose.
- Otherwise (on Linux), install it through your package manager
Anatomy of a Compose file
- Docker Compose utilizes a
docker-compose.ymlfile to declare everything that should happen - This includes:
- Things that might affect multiple containers:
services,volumes,networks - Things that affect an individual container:
image,ports,environmentvariables, etc.
- Things that might affect multiple containers:
Docker run:
docker run -p 8080:80 nginx:alpineDocker Compose:
services:
  web:
    image: nginx:alpine
    ports:
      - "8080:80"
Services
- The predominant section of the Docker Compose file is usually the
services - Here you can name each of the service containers you want to create,
along with customizing them:
image: {name}- the name of the Docker image you want the service to be based onbuild: .- build an image from aDockerfilepresent in this directorycontainer-name: {name}- an optional more meaningful container nameports:- a list of port mappings from host to containervolumes:- a list of volume mappings from host to container. Can be to local directories or to a more abstract volumeenvironment:- a collection of environment variablesdepends_on:- list of other services this service depends on
YAML Gotchas
- Some things to be aware of when working with YAML files:
- YAML is white-space sensitive!
- Indent using spaces (not tabs), usually 2 spaces
- Lists are created with an indented series of lines starting with
- - Mappings (a dictionary) are created with an indented series of lines
comprised of
key: valuepairings
- Older versions of Compose required a
versionkey at the top. That is no longer necessary, but you’ll still see it in many online Compose files
Interconnectivity
- All services defined in a Compose file share an isolated network
- You can refer to service names directly (either in the Compose file
or in code!) instead of always needing to reference localhost
- This can streamline how different containers can talk to one another, without having to poke a millions port holes (ahoy!) in each container
Persistence and Volumes
- Docker images are generally isolated. Which includes their local
storage
- If you restart the image, you start afresh with everything
- Sometimes we very much want persistance though (hello databases)!
- We declare a desire for persistence in Compose files by defining
volumes, of which there are two main types:
- Named volumes
- Bind mounts
Named Volumes
A named volume essentially sets aside some space (and gives it a name) to be managed by Docker
This space will persist across container restarts/rebuilds, and host reboots
Best for long running persistence
services:
  db:
    image: postgres:17
    volumes:
      - pgdata:/var/lib/postgresql/data

volumes:
  pgdata:
Bind Mounts
Bind mounts are basically akin to what we can do with the
-vflag when usingdocker runMaps a local directory on the host to a directory in the container
More tightly controls where on the host the data is stored
Especially useful if you want to be able to add data to a folder and then have it accessible inside the container
services:
  db:
    image: postgres:17
    volumes:
      - ./pgdata:/var/lib/postgresql/data
      - ./mntdata:/mnt/data
Compose Networking
When you launch containers using Docker Compose, it automatically creates an isolated network upon start that all the containers belong to
Containers are discoverable to one another: just using their service name as that hostname
Inside the container,
localhostmeans that container, not the host system.If you want to access content exposed inside a container, you must set up a port mapping
services:
  db:
    image: postgres:17
    ports:
      - "5050:5432"
The lifecycle
- Now that we have these “stacks” of Docker containers defined in our Compose file, how do we use them?
- In the same folder as the
docker-compose.ymlfile:docker compose upstarts everything up, with logging in the foregrounddocker compose up -dstarts everything up detached (in the background)docker compose downstops and removes containersdocker compose up --buildwill rebuild anything that used a custom Dockerfiledocker compose restart {service}will restart a specific service from the stack
Example
- Suppose we wanted to mimic a piece of our old setup from 503 where we have a scraping container dumping into a database container
Parquet: The Filetype of Big Data
What is a Parquet file?
- Parquet files are a columnar storage format which enables:
- Far better efficiency and compression
- Schema support (data types and column names!)
- Splittability (ideal for distributed processing)
- Example ideal use case: reading and processing 1 column from a 10GB table
- The price you pay: it is no longer human-readable natively
- Honestly, it is worth the price, provided you are dealing with big enough data
How?
- Parquet files are chunked up in a hierarchy:
- Row groups represent large chunks of rows (often 10k+)
- Each row group is chunked up into columns
- Each column is chunked up into pages, which encode and compress the data
- Each row group is chunked up into columns
- Row groups represent large chunks of rows (often 10k+)
- Metadata is included both on the entire table and each column in
each row group
- Includes statistics, column types, row group information
- Each column can actually be compressed differently, depending on what is most ideal
The Importance of Sorting
- Parquet is built around being fast and space-efficient for big data sets
- Proper sorting of a table can have huge effects on
both of these!
- It is possible to have a parquet file that offers very little benefit over something like a CSV if you do this actively badly
Sorting for Row Groups
- Recall the first order of division is by a group of rows, before being broken up by column
- If data in a column is sorted, then this means the row group has a clear min and max, and these are stored in the metadata
- If filtering over the entire table then, only the metadate needs to be checked to see if a particular row group even needs to be accessed
- This is a cousin to the idea of creating an index on a column
- Different approaches, but both with the idea of limiting how much information you need to look at to find the stuff you want
Sorting for Compression
- Because columns are the fundamental storage unit (within their pages), Parquet files often leverage what is called run-length encoding
- This specifies that for repeat items in a row, only the number of repeats is stored
| State | Town | Name |
|---|---|---|
| OR | Salem | Jed |
| OR | Salem | Kristen |
| OR | Portland | Calvin |
| OR | Portland | Hank |
| OR | Portland | Rachel |
| CA | Los Angeles | Todd |
The Big Takeaways
- Sorting on columns with low cardinality can make for huge space savings
- Sorting on columns likely to be heavily filtered can greatly speed up future query results
Parquet Data Types
- One of the other benefits of Parquet files is that they maintain a schema
- That means understand what data types Parquet files support though
- Generally these can be broken down into two groups:
- Physical Types
- Logical Types
Physical Types
| Type | Description |
|---|---|
BOOLEAN |
True/False |
INT32 |
32-bit signed integer |
INT64 |
64-bit signed integer |
FLOAT |
32-bit float |
DOUBLE |
64-bit float |
BYTE_ARRAY |
Binary blobs or UTF-8 strings |
Logical Types
| Type | Backed by | Description |
|---|---|---|
UTF8 |
BYTE_ARRAY |
Strings |
DECIMAL |
INT or
BYTE_ARRAY |
high-precision (fixed) floats |
DATE |
INT32 |
Days since Unix epoch |
TIME_MILLIS |
INT32 |
Time of day (ms precision) |
TIMESTAMP_MICROS |
INT64 |
DateTime with ms precision |
LIST |
Repeated fields | Arrays/lists |
MAP |
Nested fields | Dictionaries |
Potential Gotchas
- Most types map pretty clearly from how they are defined in other
systems like SQL, Python, or R, but a few things to be aware of:
- Some tools, especially Pandas, don’t always preserve decimal precision when writing Parquet unless specifically commanded
- Some tools may treat text as raw binary blobs unless explicitly set to strings for UT8
- NULLS are handled a bit differently.
- If working with compound data structures, ensure you are using a tool like Spark or DuckDB (coming soon!) that understand these types well
- Some databases like MySQL store booleans as “TINYINT”, which will
map to
INT31in Parquet unless forced toBOOLEAN
Parquet Partitioning
- On top of the other ways the Parquet breaks down big datasets, it also supports one called partitioning
- Partitioning essentially splits a parquet file up by the values in
some particular specified column
- This is very similar to a physical manifestation of how
GROUP BYworks actually
- This is very similar to a physical manifestation of how
- Writing out a partitioned parquet file will result in a folder for
each unique value in the partitioned column
- Again, this speeds up access. Any queries dealing with that value can jump immediately to the important file
- Partitioning by things like year or day can be very common
- Tools like Spark or DuckDB can natively handle these partitions and optimize queries accordingly
Working with Parquet
In Python with Pandas (needs
pyarrow)df = pd.DataFrame({'name': ['Alice', 'Bob'], 'score': [95, 100]}) df.to_parquet('students.parquet', engine='pyarrow') df2 = pd.read_parquet('students.parquet', engine='pyarrow')In R (needs the
arrowornanoparquetlibrary)df <- data.frame(name = c("Alice", "Bob"), score=c(95,100)) write_parquet(df, "students.parquet") df2 <- read_parquet("students.parquet")
Activity (if time)
- Download the most recently available yellow taxi ride data from the NYC Taxi Rides dataset here
- Load and inspect the metadata to determine how many rows it has per row-group
import pyarrow.parquet as pq
df = pq.ParquetFile(filename)
df.metadata
library(nanoparquet)
ds <- read_parquet_metadata(filename)