TaskFlow, Connections, and Warehousing
Jed Rembold
June 4, 2025
Announcements
- I’m still working on a formal syllabus and schedule, sorry for the delay
- For next week:
- Simulations will be live starting Friday morning
- A guide for the first business decisions will be out by the end of
Friday
- Start working out your dimensional models
- Should be building pipelines to:
- Daily take a snapshot of data sources and dump it into S3 storage
- (Probably also daily) update your data warehouse
- Start documenting! As you ramp up this project, you are going to be making lots of decisions. Make sure they are documented and that everyone understands the ramifications of those decisions.
- Reflections should be starting! I will post a template and source by end-of-day Friday
Current State
- Currently, you should be set up and able to:
- SSH into your group’s server
- Ensure that your Airflow stack is running, and bring it up or down as necessary
- Access the Airflow UI through your browser
- If you can not, then you are behind and need to catch up to ensure you can contribute meaningfully to your group!
Tonight
- Airflow Connections
- TaskFlow Syntax
- Documentation
- Intro to Data Warehousing
Airflow Connections
Connections
- Often, Airflows provided operators might need to interact with an
outside resource
- The
SQLExecuteQueryOperatorfor instance, needs to know what database to run the SQL query against
- The
- The outside resources are often shared across multiple tasks or DAGs
- Makes sense to define all the details in a central location, and then refer to those details from within the task
- You can find a location to set these up under the Admin → Connections option to the left in the Airflow UI
Creating a Connection
- When you create a new connection, you need to give it a name, and
choose a type
- Airflow has been around a while: there are a lot of types of connections it can easily attach to!
- Once choosing a connection, it will prompt you for the standard
fields of information to fill out
- These are the usual suspects for something like a database
- For connecting to S3 storage, we’ll talk more in a moment
- Some connection strategies will likely require an API or access key in leiu of login information
- Once configured, you need to simple save the connection, and then you are set to use it in any task you write!
Connecting to S3
- To connect to an S3 instance you should:
Choose
awsas your connection type (even if you aren’t actually using AWS)You are going to need your Access Key ID and Secret Access Key. You will need to set those up in MinIO
Additionally, you need to set up some extra fields in the provided JSON:
{
  "endpoint": "minio.advde:9000",
  "region_name": "us-east-1"
}
Accessing MinIO
- You can access MinIO (from within the internal network) at
minio.advde:9001- Note that this will require setting up another LocalForward in your SSH config
- Each group has had their own connection info sent to them
- Upon logging in, you will have access to a single S3 “bucket”
- To connect outside sources to be able to add or remove things from
this bucket, you need to create an access key
- Access keys are tied to your account, not the
bucket that you currently have access to.
- So probably don’t add them to the project documentation
- Maybe writing them down in your group’s private discord channel
- Access keys are tied to your account, not the
bucket that you currently have access to.
Bucket Names
One thing that isn’t saved in the S3 connection is which bucket you want to connect to
- Imagine buckets like database tables. Generally you might have access to many on a single server
Advisable to add the bucket name as a Variable in Airflow
Admin → Variables and then “Add Variable”
- Give it a name and then paste in the bucket name as the value
You can access within your Python tasks using
Variable.get({name})from airflow.models import Variable bucket_name = Variable.get("s3_bucket")
Using a Connection
- If using one of Airflow’s built-in operators, using the connection
is generally extremely simple
- The
SQLExecuteQueryOperator, for instance, just takes aconn_idfield
- The
- If desiring to use the defined connection from within a Python or
Bash operator, you will likely need to “unpack” the information
yourself.
- Generally you can access the information using
BaseHook.get_connection({your conn_id}), and then unpack it from there - I will provide a utility library to help with this for some common
use cases
- Database info into a database URI for instance
- S3 connection into a DuckDB secret
- Generally you can access the information using
TaskFlow Syntax
What is TaskFlow
- Starting in Airflow 2.0, a newer syntax was added for writing DAGs and Tasks
- Called the TaskFlow API, it embraced a more “Pythonic”
approach to writing tasks and DAGs
- This is especially useful if
PythonOperators were forming the bulk of tasks previously - Additionally, it greatly simplifies passing information between tasks
- This is especially useful if
- Generally amounts to:
- Using function decorators to label tasks
- Using function composability to automatically detect dependencies
The dag decorator
We know that we can define a DAG using the
DAG()functionOften this is also used with a context operator, to remove the need to assign the output to a value
with DAG(...) as dag:
  |||Define tasks and dependencies|||
In taskflow syntax, we can define a function and make it a DAG using the
@dagoperator@dag(...) def my_dag(): |||tasks and dependencies|||
The task decorator
If what we want is a
PythonOperatortype task, we can just define a Python function and add the@taskdecorator@task def clean_table(): |||Python code to read and clean a table|||The task id is automatically assigned to the name of the function
The dag is assigned to whatever dag ends up calling this function
Input and Output
- In the original syntax, passing information from one task to another was quite difficult
- Relied on complicated and cumbersome Xcom pushes and pulls
- In TaskFlow, it is as simple as returning values from one task and using them an input in another
from airflow import DAG
from airflow.operators.python import PythonOperator
from datetime import datetime

def extract(**kwargs):
    data = [1, 2, 3]
    kwargs['ti'].xcom_push(key='data', value=data)

def transform(**kwargs):
    data = kwargs['ti'].xcom_pull(key='data', task_ids='extract')
    transformed = [x * 10 for x in data]
    kwargs['ti'].xcom_push(key='transformed', value=transformed)

def load(**kwargs):
    transformed = kwargs['ti'].xcom_pull(key='transformed', task_ids='transform')
    print(f"Loaded data: {transformed}")

with DAG('classic_xcom_dag', start_date=datetime(2023, 1, 1), schedule_interval='@daily', catchup=False) as dag:
    t1 = PythonOperator(task_id='extract', python_callable=extract, provide_context=True)
    t2 = PythonOperator(task_id='transform', python_callable=transform, provide_context=True)
    t3 = PythonOperator(task_id='load', python_callable=load, provide_context=True)

    t1 >> t2 >> t3
Input and Output
- In the original syntax, passing information from one task to another was quite difficult
- Relied on complicated and cumbersome Xcom pushes and pulls
- In TaskFlow, it is as simple as returning values from one task and using them an input in another
from airflow.sdk import dag, task
from datetime import datetime

@dag(start_date=datetime(2023, 1, 1), schedule_interval='@daily', catchup=False)
def taskflow_dag():

    @task
    def extract():
        return [1, 2, 3]

    @task
    def transform(data):
        return [x * 10 for x in data]

    @task
    def load(transformed):
        print(f"Loaded data: {transformed}")

    data = extract()
    transformed = transform(data)
    load(transformed)

dag_instance = taskflow_dag()
Automatic Dependencies
- If the output of a task is used as an argument to another task, TaskFlow automatically creates the dependency!
- You can still use the
>>syntax (or.set_upstream()) to create other dependencies if not every task feeds into the next - Think of the variable that you assign a task function to as
encompassing:
- The task itself
- The data returned from the task
- When one task calls another, it not only defines the dependencies but sets up the Xcom push/pulls in the background
Parameterizing DAGs
The TaskFlow syntax also makes it simple to add parameters to the DAGs themselves
@dag(...)
def my_dag(name: str = 'Jed'):
  |||defined tasks|||
When you run a DAG manually, you can set these parameters to whatever you want, which might be useful for testing
When the DAG is run on a schedule, it will always use the default value, so you must set one (assuming you’ll be running the DAG on a schedule)
Understanding DAG Context
- Whenever Airflow runs a DAG, it has a host of internal variables and parameters that it is keeping track of, called the context
- You can access the variables within your tasks, and it can be extremely useful for setting up potential backfills
- Two main ways to access:
- Pass in the special context variable as a parameter to a
@taskfunction - Use
get_current_context()fromairflow.operators.python. Which gets you a dictionary of all the available variables
- Pass in the special context variable as a parameter to a
Common Context Variables
| Variable Name | Type | Meaning / Use Case |
|---|---|---|
ds |
str |
The logical execution date in YYYY-MM-DD
format. Used for templating filenames, partitioned data, etc. |
ds_nodash |
str |
Same as ds but without dashes. Often
used in file names. |
logical_date |
datetime |
Python datetime object of the logical
run date. Preferred when you need a datetime
type. |
data_interval_start |
datetime |
Start of the data interval (inclusive). Use this for windowed data processing. |
data_interval_end |
datetime |
End of the data interval (exclusive). Pairs with
data_interval_start. |
prev_execution_date |
datetime or None |
Logical date of the previous run, if available. Useful for delta-based logic. |
next_execution_date |
datetime or None |
Logical date of the next run (planned). |
dag_run.conf |
dict |
Dictionary of parameters passed when manually triggering a DAG. |
Break Time!
Documentation
What to Document?
- Part of the focus in this class is documentation, so that projects you work on can be easily handed off to others
- There are many ways to manage documentation, but more important is thinking about what things you should be documenting
- Some things to document depend on context, but in this class you
should strive to document:
- The pipeline architecture
- Data dictionary and lineage
- Testing/validation and monitoring
Architecture
- Visuals can be extremely useful here! (flowcharts, DAGs, etc)
- Should document the components of each stage (including technologies used) and how data moves between stages
- Usage of Architectural Design Records should be practiced
and documented!
- A starting template of what these look like will be provided, but you can adapt as you see fit
Architectural Design Records
- A short, focused document explaining a key technical decision you
made, why you made it, and what it means for the future
- Think of them as a sort of project “note-to-self”
- Not necessary for tiny decisions, but should document when you:
- Choose a particular tool for a task
- Change how the data flows
- Change the data model
Good ADRs
- A good ADR provides:
- Context/Motivation: Why was this decision necessary and what constraints were you working with? Did you consider alternatives?
- The Decision: What did you decide and why? Will there be tradeoffs or limitations?
- Consequences: What are short and long term implications? Are any follow-up actions necessary?
- Traceability: Link or connect back to past ADRs. You should never change an ADR, just create a new one.
- ALL group members should approve each ADR
- Tailor the ADR to its audience! Here that is your own group or others like you in this class. Make sure it is understandable.
Data dictionaries and lineage
- You should clearly document the data model you are using in your
warehouse
- ERDs can still be great for this
- Where did each bit of that data come from?
- Someone should be able to trace information back through your pipeline to its source
- Any transformations that occurred along the way should be clearly documented here or in the architecture portions
Testing and Validation
- The real world is messy, and thus data pipelines need to contend
with a variety of issues
- Incorrect data, late data, missing data, malformed data, etc.
- How are you checking to make sure the data making its way into the warehouse is of the highest integrity?
- How will you know if something is wrong?
- Given the above, how quickly should you expect to realize that something is wrong?
Intro to Data Warehousing
Dimensional Modeling
- Data Lakes are exceptionally versatile in what they can store, and can be operated fairly cheaply given modern storage
- But they do not otherwise impose an organizational format on the underlying data
- The data warehouse has historically served that purpose: moving data out of the lake and imposing order to it in a way that makes it useful
- Even current trends of unifying the data lake with the warehouse don’t remove the necessity of imposing this order onto the underlying data
- Dimensional Modeling is the process of determining how to store this data in a way that best facilitates analysis to answer business questions
- The “bible” in this area is The Data Warehouse Toolkit, by Kimball and Ross, now in its third edition
Different Models
- Primary purpose: facilitating transactions and maintaining state
- Focus: data integrity
- Models: Normal Forms
- Freshness: real-time
- Primary purpose: enabling analysis to answer business decisions
- Focus: speed (and resources)
- Models: Dimensional (denormalized)
- Freshness: Batched (often nightly)
Given their different use-cases, we should not be suprised at differences in organizing the data!
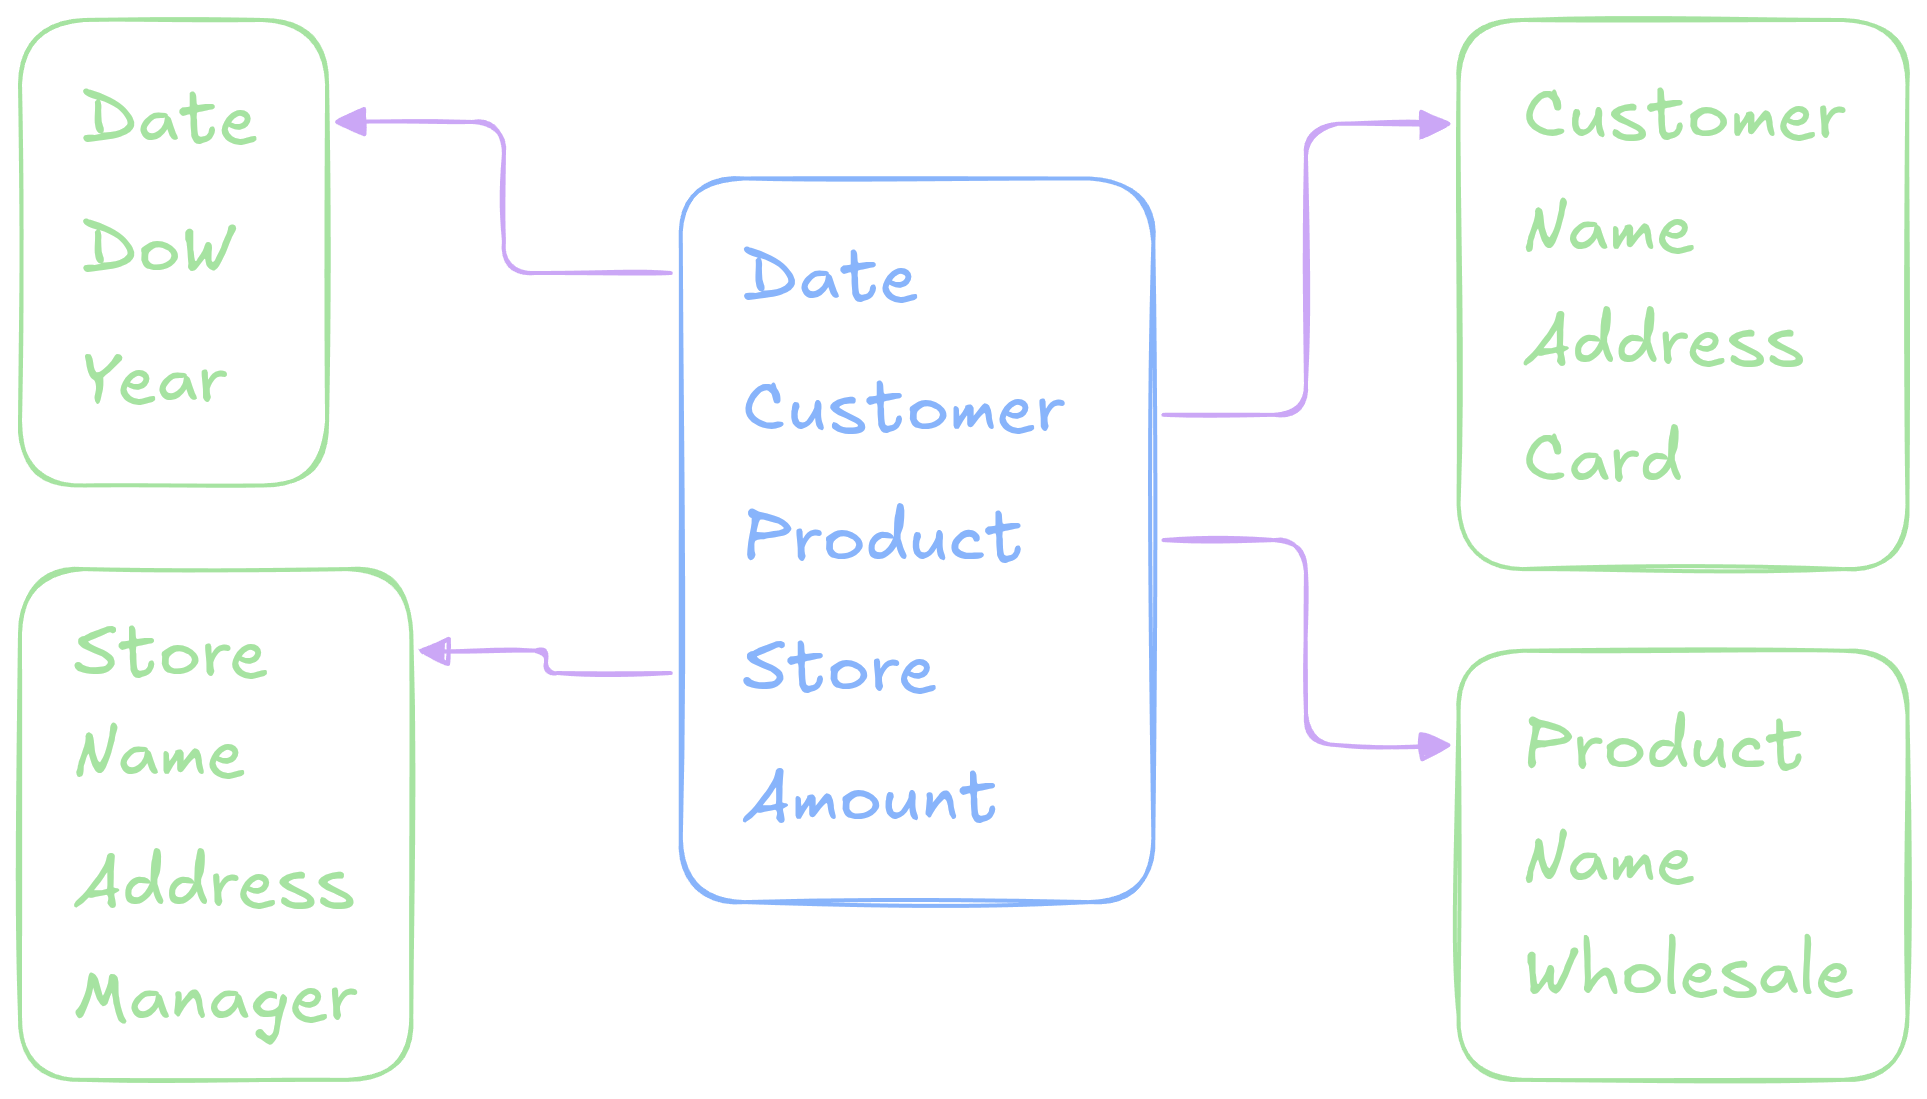
Fact Tables
- The fundamental table type that dimensional modeling tends to revolve around are fact tables
- A fact table stores measureable, quantitative data
about some business process
- Eg. sales amount, quantity sold, exam scores
- Capture events or transactions with numeric measures
- Contain foreign keys which link to associated dimension tables
- Typically very large and growing over time
- Append-only
Dimension Tables
- Dimension tables are the smaller cousins to fact tables,
and store descriptive attributes that provide context for facts
- Eg. sales items, product category, exam number, student name
- Attributes are often textual or categorical
- These are usually much smaller than the fact tables are “relatively”
static
- The same names, items, categories, etc appear in many many facts
- Generally used to filter, group, and label the facts as they pertain to different business decisions
Example
Distinguishing Facts
- Answers questions of the form:
- how much?
- how many?
- how often?
- Answers questions of the form:
- who?
- what?
- where?
- when?
Combining Facts
- Individual rows in a fact table should model a business process or event
- If multiple facts all fit a given event and have shared dimensions,
they usually belong in the same fact table
- All the pricing data in the NYC Taxi rides dataset
- If the facts represent different events or
granularities, they should go in separate fact tables
- Rule of thumb: If the chosen columns of your fact table would result in requiring NULL values for some rows, then you have likely mixed events or granularities, and should rethink your modeling
Benefits of Dimensional Modeling
- Optimized for fast query performance
- Generally relatively few joins are necessary
- Usually aggregating over the fact table in some fashion
- Enables historical and trends analysis
- Date is almost always factored in
- Gives clean, consistent reporting for downstream business decisions
Getting Started
- Facts model important business processes, so you need to start by identifying the key business processes that you are interested in analyzing
- Once you have the processes down, work out what level of granularity of the events you might need for each
- Then you can work out what facts you have (or can compute) from the underlying data that describe that process at the desired granularity
- Identify what dimensions you have access to that can provide additional context
- Create your star schema database model
Activity: Course Analytics
- You’ve been hired to build a data warehouse for a university to support academic performance reporting
- The dean wants to answer questions like:
- How are students performing by course, instructor, and department?
- What’s the pass rate for 100-level vs 400-level courses?
- How many credits are earned across departments each term?
The university collects the following data:
- Student ID
- Course ID
- Instructor ID
- Term
- Grade received
- Credits attempted/earned
- Enrollment date
- Department
Creating the Warehouse
Back to Postgres!
- After much thought and testing, we will be using Postgres for our
data warehouse
- Not technically column-oriented, but it will be fast enough for our purposes
- Everyone is already familiar with it and can access it with various clients
- Integrates easily with Airflow and Grafana
- Keeps the focus on the newer dimensional modeling skills
Docker Composing Postgres
- Each group will be responsible for spinning up an instance of Postgres using Docker Compose in their VM
- Some things to keep in mind:
- You can define environment variables for:
POSTGRES_USERPOSTGRES_PASSWORDPOSTGRES_DB
- You probably want to set up a volume to ensure persistant storage
- This is important! You don’t want to lose your entire warehouse if the container restarts! Test it!
- You can define environment variables for: