Chapter 8 contains a number of important concepts about classes and objects which can be confusing such as static variables & methods and deep copying. In this lab, you will have the opportunity to practice some of these concepts.
You will also have more practice building Graphical User Interfaces (GUIs) in Netbeans.
Create a new Netbeans project containing a main class. Copy your Card class from the BlackJack game and place it in the new project. Netbeans should ask you if you want to refactor the code (say yes) to insure that the package name is correct.
Add to the Card class the following items:
A setIndex() method for the card index member variable if you don't already have one.
A copy constructor. A copy constructor takes a parameter which is of the same type as the object being created (in this case a Card). In the constructor you are to set the index to the index of the Card parameter.
Note on Deep Copying: Objects can be complex in that they can contain many other objects and arrays. The contained objects can, in turn, contain other objects - it can get complicated! When you set an object equal to another, e.g.
Card c1 = new Card();
Card c2 = c1;Note: Another way of implementing copying is to implement a clone method (See p. 479 of your text.) )
A static (class) variable, called numberOfCards initialized to zero, and which will keep track of the total number of Card objects which have been created.
You will need to modify each of your constructors so they update numberOfCards each time a Card object is created.
A getter and setter for numberOfCards. These two methods should also be static.
Unit testing: In main(), create at least 3 Card objects each one using a different constructor: the no parameter constructor which generates a random card, the constructor which takes an integer and uses it to initialize the card index, and the copy constructor which takes one of the previous cards and creates a new card which has the same index. Each time you createa new card, print it out along with the number of cards that have been created so far, e.g.
Card c1 = new Card();    // randomly pick a card
System.out.println("Card c1: " + c1 + ", number of cards = " + Card.getNumberOfCards());
Card c2 = new Card(2);   // set card to the 2 of Spades
System.out.println("Card c2: " + c2 + ", number of cards = " + Card.getNumberOfCards());
Card c3 = new Card(c2);  // makes a copy of c2
System.out.println("Card c3: " + c3 + ", number of cards = " + Card.getNumberOfCards());
Note, to get the number of cards, we reference the class
Card.getNumberOfCards()c1.getNumberOfCards()Once the above is working, change the index of c3 using your setIndex() method, and then print out both c2 and c3 to make sure they are now different. For example:
c3.setIndex(3);
System.out.println("Changing c3 to index 3");
System.out.println("Card c2: " + c2 + ", number of cards = " + Card.getNumberOfCards());
System.out.println("Card c3: " + c3 + ", number of cards = " + Card.getNumberOfCards());
The total output should now look something like:
Card c1: 9♣, number of cards = 1
Card c2: 2♠, number of cards = 2
Card c3: 2♠, number of cards = 3
Changing c3 to index 3
Card c2: 2♠, number of cards = 3
Card c3: 3♠, number of cards = 3
Creating a GUI: The purpose of this part of the lab is to introduce you to several more GUI components: JTextAreas, JScrollPanes, and JComboBoxes.
Your goal is to create a GUI that looks something like this:
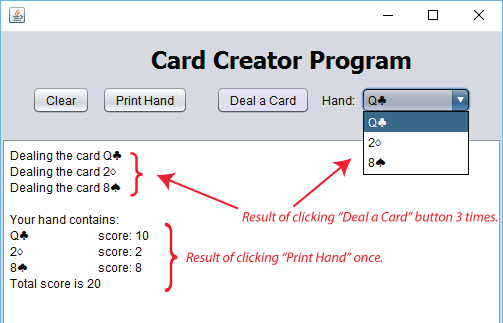
When you click the "Deal a Card" button, it will add a card to a combobox (JComboBox) and print the card to the output area (JTextArea). The "Print Hand" button prints out to the text area all the cards chosen so far. It will also include the score of each card (you can use the getPoints method in the card class) as well as the total score of all the cards. The clear button removes all cards added.
Begin by adding a JFrame form (e.g. call it CardJFrame) to your existing Netbeans project which already contains your Card class. In order for Netbeans to use the correct main method when the program is run, right click on the project name (in the projects window), select properties, click on the Run category, and click the Browse button to the right of the Main Class textfield. Select your JFrame class. If you did this correctly, the JFrame window should appear when you build and run your program.
Next, lay out your components as shown here.
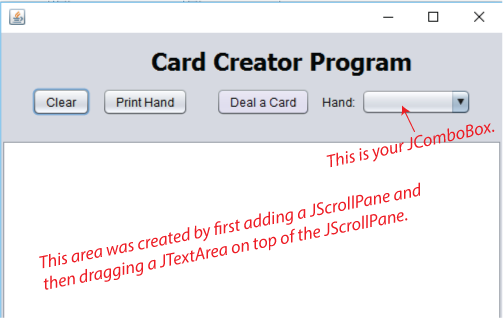
You have already worked with buttons
and labels. Here, you will also add a JComboBox and a JScrollPane/JTextArea.
Don't forget to rename your variable components : for example
clearButton, printButton, dealButton, cardComboBox, titleLabel, outputTextArea
Renaming the variables of your components makes it easier to read and write the code. The renaming can be done in the Navigator window. The instructions below will use these names.
In the Design tab, select your cardComboBox. In the properties, click the "..." next to the model property. Remove item 1, item 2, .... This way, when you first compile and run the code, there should not be anything in the drop down menu.
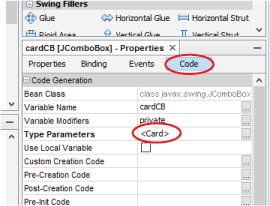
By default, a JComboBox expects String objects to be added to it. In order to add Card objects to your cardComboBox, we must set the type to Card. To do this, select cardComboBox and then in the properties on the bottom right of the Netbeans window, select the "Code" tab. In the line that says "Type Parameters", enter <Card> as shown in the picture below. After you do this, you can now add Card objects to the cardComboBox.
Back in your GUI form (in the Design tab) right-click your dealButton and select Events->Action->actionPerformed. Netbeans will take you to the part of the code responsible for responding to clicking this button (i.e. the button's event handler). Add code that will
To add an item to the cardComboBox you want to use the addItem method: cardComboBox.addItem(card). Each time you add a card, you
also want to
print it out in the text area. Note, to add text to a JTextArea without clearing the existing text, you call outputTextArea.append("my_text") .
If you want to clear the existing text in a JTextArea, you call
outputTextArea.setText("").
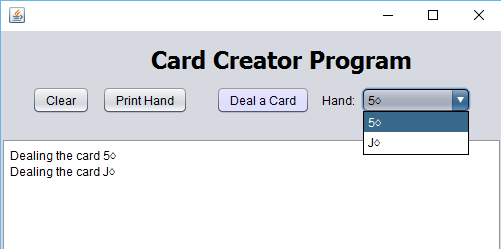
Now, as you click the dealButton, cards will be added to the combo box. Each time a card is added, it is also printed in the text area, as shown here:
Add an actionPerformed event handler to the clearButton. In the code,
add instructions to
clear the outputTextArea and also to remove the items from the cardComboBox.
To remove all of the items, you want to call cardComboBox.removeAllItems().
Add an actionPerformed to the printButton which loops over the items in the combo box. To determine what methods you will need, you will need to look up the JComboBox in the Java API (e.g. see methods getItemCount() and getItemAt(i)). At each iteration, you need to print the card and its score (use the getPoints() method) to the output area (see first picture above). While you loop over the cards, you also want to accumulate the score and then, after the loop, print the total score.
To receive full credit, you need to:
Make sure that your Java code:
Demonstrate both Card programs (i.e. Parts 1 and Part 2) to the instructor or lab assistant during the lab on the due date.
Submit only the code for Part 2 to Wise as attachments to Lab 8: