Lab 1: Introduction to Processing
CS 145: Images and Imagination,
Spring 2014


 Due Date:
Preliminary work will be looked during class on Jan 15 & 17.
Final submission is due Wed, Jan 22 before class.
This lab is worth 20 points:
each image is 10 points and will graded pass-fail.
See policy page for late penalties.
Summary of Goals
- Become familiar with the Processing Development Environment (PDE).
- Become familiar with the basic Processing coordinate system and drawing commands.
- Create 2 images using the basic Processing drawing commands, one based in a photo and one of a "character".
- Learn how to place your work on the shared drive so that it may be evaluated.
Work and Submission File Locations
Accessing the Shared Drive: The final work should be placed in the folder indicated in the lab instructions below.
The folder is located on the shared network drive.
Instructions for accessing this shared drive are given on the links page
under Ford Lab (click on links icon above).
The shared drive should accessible from any computer on campus, including in the dorm rooms. However, this drive is
not available from off campus.
-
Don't be late: You may work from and save your files to your own computer, on your H drive, or the network shared drive.
However, for the final submission, you need to make sure
both your images and your Processing sketch folders and files are copied over to the shared drive. These files will
then be copied
by the instructor on the day they are due. If your files are missing or if the file dates are after the due date,
your homework will be considered late.
-
Stay Organized! Regardless of where you work, it is important to stay organized. If you work on your own computer or your H drive,
it is recommended that you create a top-level folder called CS145. Within this folder, create a subfolder called Lab1.
Save all of your Processing sketches for this lab, into this folder. When done, copy over to the shared drive.
-
Stay Safe! It is a good idea to backup your files frequently. Use a backup location separate from
where you typically work (if you put everything on your own computer and if your hard drive dies, you will lose
the sketches and the backups). Note, Willamette backs up your H drive every day so this is a good
place to put things assuming the files aren't too large.
Loss of files is generally not an excuse for incomplete or
late work.
Becoming Familiar with Processing:
In class, we will go over the Processing environment as well as some of the syntax and behavior of
a number of the commands in Processing. At a minimum, be certain that you are familiar with the following basic commands:
- Window setup: size(), background()
- Shapes: line(), point(), quad(), rect(), ellipse(), triangle()
- Styles: fill(), noFill(), stroke(), strokeWeight(), smooth(), noSmooth,
- Comments
- Saving an image: save()
Other commands may be found in the Processing reference. For example, you might want to explore
creating shapes using arc(), beginShape/endShape, bezier(), curve(). These can be complicated to
use so do your best.
Part 1: Creating an Image from a Photo
In this part, you will place a grid over a photograph to determine the coordinates of the
basic shapes. More details will be discussed in class.
You may use your own photo (you will need to add a grid - ask if you don't know how) or
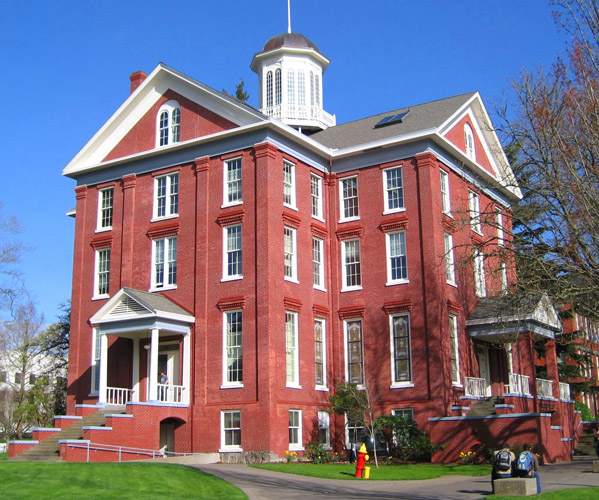
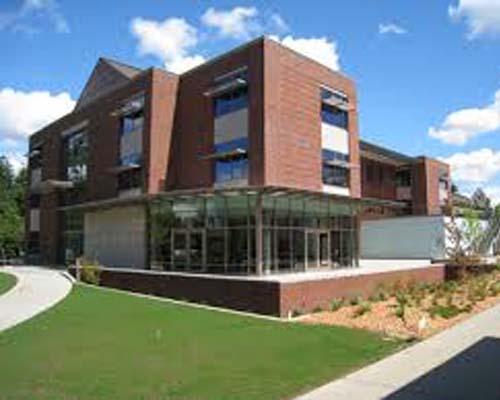
you may use these photos of Waller Hall or Ford Hall (pick the one you want and print it out - a few copies will be available in class).
For example, a very preliminary processing image is here
Be careful which points you mark on the grid.
For example, a rectangle using rectMode(Corner) is specified by the (x,y) coordinate in its upper left corner,
followed by its width and height. This is what should be marked on the graph.
When you done marking the shapes on the grid, create a new Processing sketch. Save the
sketch using a name that relates to the task, e.g. WallerHall.
As you add shapes to your processing sketch, please add comments to your code so we know what each shape
(or collection of shapes) represents. For example, label the grass, sky, left side of building, etc.
When done, save your image by using Processing's save command at the end of the sketch, e.g. save("WallerHall.png").
You may use either the png or jpg file format. Usually png looks a bit better but creates a larger file.
Try one of each to see if it matters.
Part 2: Creating a "Character"
In this part, you are to start with graph paper (pdf) and sketch out a character using the
available Processing shapes. The basic requirements are
Submitting Your Work
Cleaning up: Before turning anything in, please clean up your code as follows (this is important!)
- Before cleaning up, create a backup copy of everything.
- Delete all but the two final Processing sketches used to generate the two images.
- In each of the two sketches files:
- Delete any unused sections of code.
- At the top of the code, add comments containing your name, the lab number, the course number,
and a one sentence description of what the code does. Additional comments should be embedded in the
code describing what each shape (or collection of shapes) represents (e.g. sky, grass, head, body, ...).
- Run the Auto-format command by going to the Processing menu: Tools→AutoFormat.
You may want to do some additional formatting by hand so that the code is as readable as possible.
Submission: By the final due date (Jan 22, before class):
- Copy your cleaned-up Processing sketch folders to the following folder on the shared network drive
CS145/Lab1/ProcessingProjects/your_name
- Copy your two final images into the folder
CS145/Lab1/FinalImages/your_name
Please name the image files (png or jpg) so that they are easily identified.