Lab 6: Turtle Graphics
CS 145: Images and Imagination,
Spring 2014


 Due Date:
Final submission is due Fri, April 4 before class.
This lab is worth 20 points
See policy page for late penalties.
|
Summary of Goals
- Learn about String concatenation and the print command.
- Learn about function return values.
- Learn about recursion.
- Learn about Fibonacci Series.
- Create fractal images using recursion.
|
Resources and Readings
- Processing's online reference: String, print(), println()
- See Shiffman videos listed on lecture page.
- Fibonacci Sequence
Recursion
In class, we will go over how recursion works. Run the example below to see what it prints out.
// Prints out the numbers from 0 to 10
 void setup() {
  printNums(10);
}

void printNums(int n) {
  if (n<0) {
    return;
  }
  else {
    printNums(n-1);
    println(n);
  }
}
|
How do you modify the above code to do the following:
- print the numbers in reverse order
- Add the numbers from 1 to 10 and return the result (you will need to review how return values work)
- multiply the numbers from 1 to 10
Fibonacci Numbers
Read about the fibonacci sequence (see links above).
The sequence can be computed recursively by noting that F(n) = F(n-1) + F(n-2).
Write processing code that calculates the fibonacci sequence for some range of n. That is,
complete the following code:
void setup() {
  for (int n = 0; n < 10; n++) {
    println("The fibonacci number for " + n + " is " + fib(n));
  }
}

int fib(int n) {
  // fill in the code here
}
|
The program should output
The fibonacci number for 0 is 0
The fibonacci number for 1 is 1
The fibonacci number for 2 is 1
The fibonacci number for 3 is 2
The fibonacci number for 4 is 3
The fibonacci number for 5 is 5
The fibonacci number for 6 is 8
The fibonacci number for 7 is 13
The fibonacci number for 8 is 21
The fibonacci number for 9 is 34 |
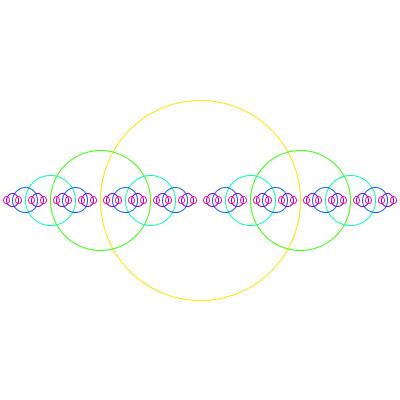
Circle Drawing
Here is an example of using recursion to draw
an image. In this case, each time the program recurses, the radius of the
circles decreases in size. Read through the code to try to make some sense of
it. Do you understand why the number of circles of a given radius increases as the radius decreases?
Note, in the picture, the colors have
been added to help you differentiate circles of different sizes. Each radius has
a specific color. There is 1 yellow circle, 2 green circles, 4 cyan circles, etc. Each level of recursion increases the number of circles by a
power of 2.
|
void setup() {
  size(400,400);
  smooth();
  startHere();
}

void startHere() {
  background(255);
  stroke(0);
  noFill();
  drawCircle(width/2, height/2,width/2);
  save("circles.jpg");
}

void drawCircle(float x, float y, float radius) {
  ellipse(x,y,radius,radius);
  if (radius > 8) {    // what happens if you change the 8?
    drawCircle(x + radius/2,y,radius/2);
    drawCircle(x - radius/2,y,radius/2);
  }
}
|
What happens if you change the 8 (int drawCircle) to a larger or smaller value? Try it.
What happens if
you modify drawCircle by adding two additional lines:
void drawCircle(float x, float y, float radius) {
  ellipse(x,y,radius,radius);
  if (radius > 8) {    // what happens if you change the 8?
    drawCircle(x + radius/2,y,radius/2);
    drawCircle(x - radius/2,y,radius/2);

    drawCircle(x ,y + radius/2, radius/2);
    drawCircle(x ,y - radius/2, radius/2);
  }
}
|
Basic Turtle Graphics
Turtle graphics involves moving an imaginary turtle around the window by giving it two possible commands: turn and move.
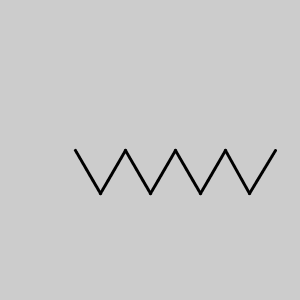
The code below shows how the move and turn functions are implemented. The zigzag() method shows how one can direct
the turtle to move in a zigzag motion. Carefully work through the code in zigzag to convince yourself why
this will generate the image on the right.
// Turtle Graphics
// Have the turtle move around the window by
// giving it "turn" and "move" commands.

void setup() {
  size(300, 300);
  strokeWeight(3);

  // Set the start position of turtle.
  // Turtle is facing right.
  translate(width/4, height/2);

  zigzag(50);
}

// move turtle in a zigzag
void zigzag(float dist) {
  turn(60);
  move(dist);
  turn(-120);
  move(dist);
  turn(120);
  move(dist);
  turn(-120);
  move(dist);
}

// turns the turtle by ang degrees
void turn(float ang) {
  rotate(radians(ang));
}

// move the turtle forward by an amount len
void move(float len) {
  line(0, 0, len, 0);
  translate(len, 0);
}
|

|
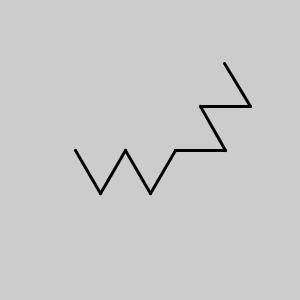
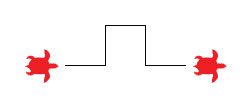
If you call the zigzag(50) function twice, you get the image below on the left.
Why don't you get the image on the right? What do you need to add to the code
in order to get the image on the right?
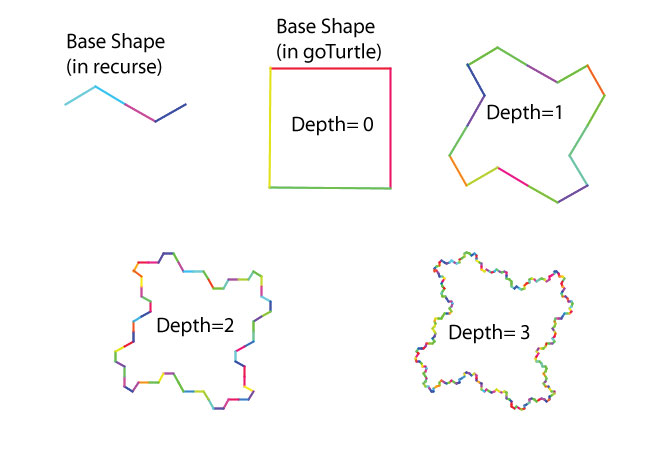
Recursive Turtle Graphics
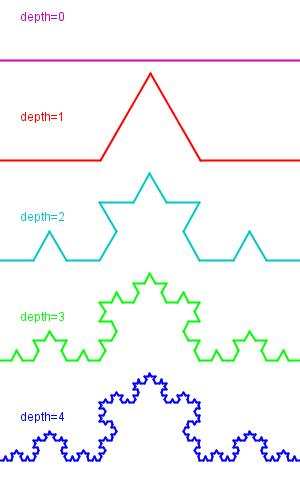
Run the Recursive Turtle Graphics code below.
Try changing the value of depth in setup() to see how the image changes. The values of depth
should range from 0 to around 4. Beyond 4, the resolution is too small. You
should get images similar to the ones on the far right above.
Study it carefully so you understand
what it is doing. Start by considering the case for degree=0 since it is the easiest to understand. Once you
undertand it, consider what happens when degree=1, etc. We will go over it in class but,
to really understand it, you need to
step through the code yourself one line at a time.
Once it starts to make sense,
// Recursive Turtle Graphics
// Use recursion to give the turtle
// fractal-like behavior

void setup() {
  size(400,300);
  strokeWeight(3);

  float len = 300;
  int depth = 2; // set the depth here.

  // move turtle to starting point
  // and facing right
  translate((width-len)/2,(height)/2);

  goTurtle(len, depth);
}

// Walk the turtle!
void goTurtle(float len, int depth) {
  recurse(len,depth);
  save("turtleRecurse.png");
}

void recurse(float l, int depth) {
  if (depth == 0) {
    move(l);
    return;
  }

  float len = l/3.;
  recurse(len,depth-1);

  turn(-60);
  recurse(len,depth-1);

  turn(120);
  recurse(len,depth-1);

  turn(-60);
  recurse(len,depth-1);
}

// turns the turtle by ang degrees
void turn(float ang) {
  rotate(radians(ang));
}

// move the turtle forward by an amount len
void move(float len) {
  line(0, 0, len, 0);
  translate(len, 0);
}
|
 |
 |
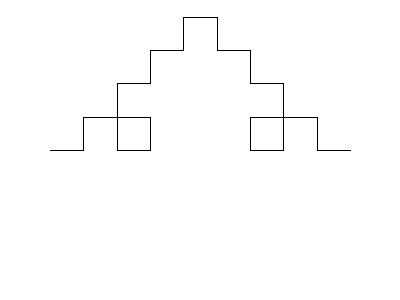
Your Assignment: Part 1
-
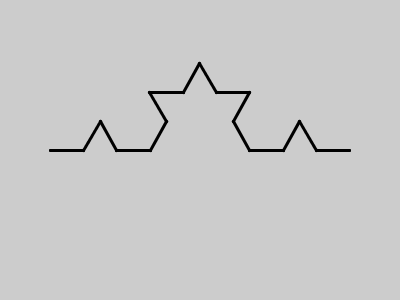
In the above code, when depth is set to 1, one gets the image
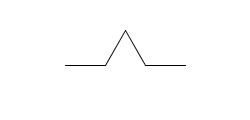
-
Modify the recurse() function so that the depth=1 image looks like following instead:
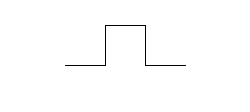 Be very careful that you choose values so that the length at depth=0 is the same as the
length at depth = 1, as shown below. Work it out on paper first.
Be very careful that you choose values so that the length at depth=0 is the same as the
length at depth = 1, as shown below. Work it out on paper first.
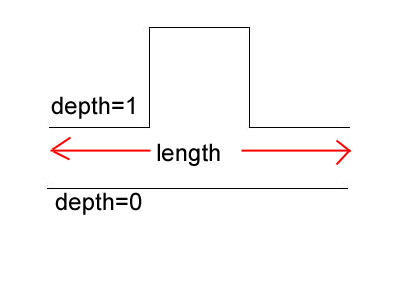 The values at each of the depths should now give you an image that looks like
-
In the above code, when depth is set to 0, one gets an image that is just a horizontal line.
Now, modify the code in goTurtle() so that the starting shape (i.e. what you get when depth=0)
is a square.
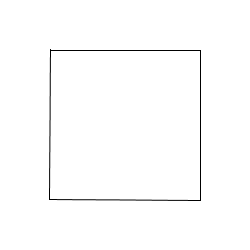
If you run the code with both of the changes you made in setup() and recurse() then you should get the image:

-
When modifying recurse as in the above problem, it is important that:
- Each segment is the same length.
- The turtle begins and ends aimed in the same direction (towards right) (see image below)
- The length remains the same at all depths (see image below)
Modify recurse() again but this time with any shape you want as long as it satisfies the above three criteria.
It helps to draw the shape on a piece of paper in order to get the lengths and angles correct. You don't have to get
the criteria exact, but try to come close.
Below is an example. Each segment is drawn with a different color so they are easier to see.
- Part 1: Deliverables: Run your code at depths 0, 1, 2, and 3. For each, save an image of the result.
Place your images in the CS145/Lab6/FinalImages folder.
Place your single sketch
folder in CS145/Lab6/ProcessingProjects.
Your Assignment: Part 2
-
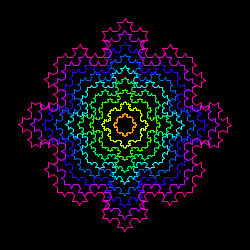
Now, relax the criteria, and see if you can come up with an interesting image. By relaxing the criteria, the
entire shape will likely shrink or grow at each recursion level. It may also move off the screen altogether. You will
just need to experiment. You can also combine it with color changes and loops or other things we have learned.
- Part 2: Deliverables: Run your code and save an image of the result.
Place your image in the CS145/Lab6/FinalImages folder.
Place your sketch
folder in CS145/Lab6/ProcessingProjects.
Summary: To Be Submitted
At the beginning of class on Fri, April 4:
-
On gorr-classes, place the items listed above in Part 1 and Part 2 Deliverables.
-
Be prepared to demonstrate your programs in class.