 |
Lab 3: Transformations and Scene Graphs
|
|
Lab 3: Transformations and Scene Graphs
|
You will be working with a randomly assigned partner.
Get together with your partner and work through practiceTransforms.pdf:
 | In this part you are to display your primitive objects all at
once in the scene. To do this, you will need to add transformations to your code to prevent the
objects from sitting on top of each other.
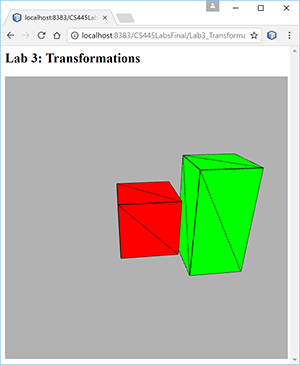
Begin by downloading the code Lab3_Transformations.zip. Unzip and add the Lab3_Transformations folder to your project folder from Lab 2 (you will need the files in the Common folder in order to run this code.) Run the start_here.html file. It should look like the image on the left and should be rotating. Follow the directions below. |
thetaY is updated in the cameraSetup function. You can also move the camera location by changing the eye variable in cameraSetup.
gl.uniform4fv(uColor, vec4(0.0, 0.0, 1.0, 1.0)); render function to see how the
model-view matrix (viewMat) is updated and set. Two cubes are displayed. The first one is at the origin and the second one is scaled and moved
along the x-axis. In class, we will also go over how to use matrix transformations in general to move your objects.
The matrix functions are all defined in the file MV.js that is in the Common folder. You will
need to look at the code to see how to use the matrix functions.
render function to display each of your objects in the scene all at once. Make each object a different color.
The goal of this lab is learn about the matrix stack and scene graphs, and then to use them to build a composite object (e.g. car, robot, house, etc) which is made using your primitive shapes. Feel free to create additional primitive shapes if need be. Your composite object should make use of transformations in a non-trivial way. Ideally, include some kind of moving component (e.g. a rotating wheel, arm, etc). If you do have some kind of movement (e.g. a wheel rotating) it is best to turn off the animation so that the two motions don't interfere (do you see how to turn off the y rotation?)
|
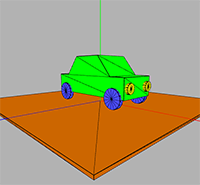
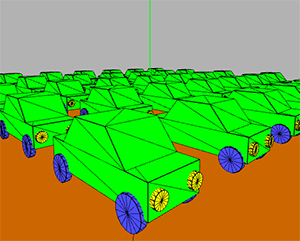
A car made from a cube (lower car body), cylinders (wheels & headlights) and a wedge ( upper car body). The car's wheels turn as it moves forward or backwards along the x-axis. |
To solve this problem we introduce the concept of a matrix stack. In class, we will discuss how it works. For the implementation, you will need to do the following
In the html code, use a script tag to add the MatrixStack.js code which is in the Common folder.
In render_scene.js, create a MatrixStack global variable (e.g. called stack) somewhere at the top of the code with the other global variables.
Before attempting the next part, try rewriting your scene from part 1 using the stack. You should find that it is easier to keep track of where things are placed. For example, to use the stack to display 2 cubes:
function render()
{
    gl.clear(gl.COLOR_BUFFER_BIT | gl.DEPTH_BUFFER_BIT);

    cameraSetup(); // computes viewMat
    stack.clear();  // clear the stack and place identity matrix on top [Ident]
    stack.multiply(viewMat); // stack is now: [viewMat]
    stack.push();            // stack now contains 2 copies of viewMat:  [viewMat,viewMat]

    // Draw a translated red cube
    stack.multiply(translate(1.5,0,0)); // multiply top of stack with translation on right
                                 // stack now has 2 matrices: [viewMat,viewMat*translate]
    gl.uniformMatrix4fv(uModel_view, false, flatten(stack.top())); // set modelview transform
    gl.uniform4fv(uColor, vec4(1.0, 0.0, 0.0, 1.0));  // set color to red
    Shapes.drawPrimitive(Shapes.cube);    // draw cube

    stack.pop(); // pops off top of stack leaving: [viewMat]

    // draw a non-uniformly scaled and translated green cube.
    stack.multiply(translate(-1.5,0,0)); // multiply top of stack by translate on right [viewMat*translate]
    stack.multiply(scalem(1,2,1)); // multiply top of stack by scale on right [viewMat*translate*scale]
    gl.uniformMatrix4fv(uModel_view, false, flatten(stack.top())); // set view transform
    gl.uniform4fv(uColor, vec4(0.0, 1.0, 0.0, 1.0));  // set color to green
    Shapes.drawPrimitive(Shapes.cube);  // draw cube

    requestAnimFrame(render);
}
Scene Graphs and Your Composite Object: Once you are familiar with how the stack works, you are to design a composite object using a scene graph. The car shown above is an example of a composite object.
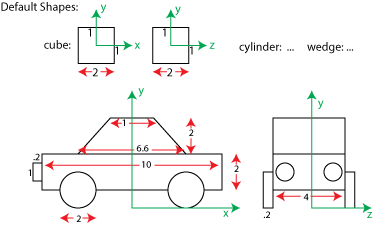
On paper (or in a drawing program), carefully draw your object showing the sizes, distances angles, placement, and orientation relative to your coordinate system. It is also important that you indicate the size, location, and orientation of your default shapes so that you know how much to scale, rotate and translate them for your final composite object. It may help to do side, front, or top views. For example, the car is oriented along the x axis and is sitting with its wheels touching the xz plane. The diagram for the car might look something like:
Based on your drawing above, make a drawing on paper (or in a drawing program) of the associated scene graph. Indicate all of the matrix transformations and the push/pops of the stack. A simplifed scene graph of a simplified car is shown here: Car Scene Graph. Note, this scene graph does not indicate the details of the transformations but you should do this on your scene graph, e.g. indicate the specific axis and number of degrees for rotations. The blue arrows indicate the order of the transformations and drawing of the primitves that need to take place in your code. If you do a good job with the scene graph, writing the code is easy.
Once you have the above two steps completed (and not before!) proceed to implement the object in your code in a similar manner as was done in class for the robotic arm.
render function to draw your object.
It should require a single top level function call, e.g. Shapes.car.draw();.
To really test your code and your understanding, create a scene containing many multiple objects (e.g. in a loop). Depending on what your object is, you may also want to scale or rotate some of them.
By the beginning of lab on Monday, Sept 18, be ready to show your object drawing and scene graph to the instructor.
By the beginning of lab on Friday, Sept 22: