Lab 5: A Walk Through A Museum
CS 445: Computer Graphics,
Fall 2008
[previous lab][schedule][next lab]
Goals
- Become acquainted with texturing in OpenGL
- Reading in images and converting to ByteBuffers
- Procedurally generating textures
Practice
|
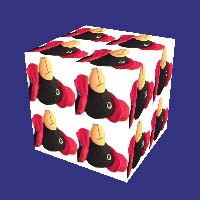
- Download and run the TextureCube program. Read through it so that you understand what it is
doing. Try changing the values of the texture coordinates. Try modifying the checkerboard texture to get something
different, e.g. horizontal or diagonal stripes, sin waves, etc.
- Collect together a set of 4-5 related pictures. They could be pictures of your family or
friends, pictures of the campus, or pictures of different varieties of trees, dogs, musical instruments, etc.
The only requirement is that they be related to each other in some way (and they are tasteful). You will
also use these in the next part of the lab. In order to use an image as a texture in OpenGL, its width and
height need to be powers of two (for OpenGL versions before 2.0) and not be too large (ideally at most 128x128).
You will need to use some photo editing software to convert your images into the proper size. Place the
resized images into the "images" folder in the TextureCube project.
- In the code, replace percy with one of your images. If it doesn't show when you run the program, it is
probably because it was not resized properly. Try adding additional choices for images.
|
Your Virtual Museum
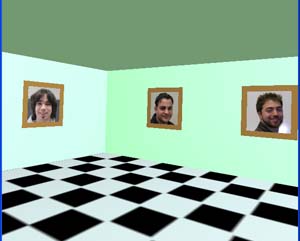 In this part of the lab, you are going to create a virtual museum containing the images you collected from
the first part of this lab. To do this, you will be combining, expanding, and modifying components of your navigation
code and the TextureCube program.
In this part of the lab, you are going to create a virtual museum containing the images you collected from
the first part of this lab. To do this, you will be combining, expanding, and modifying components of your navigation
code and the TextureCube program.
Navigation and Room Geometry
- Navigation class: Begin with your navigation lab. Organize the code by moving the navigation methods and variables to
a separate class so they don't clutter up the OpenGL listener.
- Cube class: Replace the original scenery with a large cube or rectangular shape (also in a separate class) to serve as
the room for your museum. You will be texturing this cube differently on different sides so you can't use a glutCube.
Besides, unlike the teapot, glutCubes do not come with texture coordinates. Instead, list the vertices, faces, and normals.
- You will be texturing the floor but, for the moment, just set the color using glColor. You might want to
set each wall to a different color so that you can see where you are when navigating around.
Once, you add lighting and texturing, this won't be
as necessary.
- To make the texturing and lighting easier to do later on, do the following:
- For each quad (i.e. wall) , set the normal to be the inward normal since you will be inside the room.
- Set the order the vertices of each quad so that, when inside the room facing the wall, the first
vertex is the bottom left corner, the second vertex is the bottom right, and so forth.
- Collisions: Next, modify your navigation code so that the viewer can't go through the walls, floor, and ceiling.
To do this, you need to put contraints on the navigation updates to prevent a collision some distance before
reaching the walls, etc.
Also check that the near plane of the camera is set fairly small otherwise it will look like you walked through
a wall when you are close but not past the wall.
Texturing the Floor and Pictures
- Loading Images: Next, add code to load the checkerboard and all of your images into texture objects. Look at
portions of the TextureCube to see how to do this. Note, you need to load in all of your images into separate texture objects.
- Floor: The floor of your museum should be checkerboard (or some kind of procedural texture). The walls and
ceiling can just be a solid color.
- Pictures on the walls: Create additional geometry for the "picture frames", e.g.
squares or rectangles located just in front of the walls and which are textured with your images.
- When you are done, you should be able to walk through your museum looking at the pictures.
Add Lighting
Add at least one light to the center top of the room. Look at the last lab to remember what
code needs to be added.
Setting the Mode
In order to mix lighting and texturing, you need to set the environment mode.
Experiment with different settings for the mode. For example, to set the mode to GL_DECAL, add the line
gl.glTexEnvi(GL.GL_TEXTURE_ENV, GL.GL_TEXTURE_ENV_MODE,GL.GL_DECAL);
In general, the mode may be on of the following
- GL.GL_BLEND, where the resulting fragment color is C = Cf*(1-Ct) + Cc*Ct
- GL_REPLACE, C = Ct
- GL_DECAL, C = Ct
- GL.GL_MODULATE, C = Cf * Ct (note if material is read and texture is blue, result is black)
- GL.GL_ADD, C = Cf + Ct
and where
- Cf = color of fragment (set through the material or glColor)
- Ct is color of texture
- Cc is texture env color set using
gl.glTexEnvfv(GL.GL_TEXTURE_ENV, GL.GL_TEXTURE_ENV_COLOR,Cc,0);
Deliverables:
- By class time on Tuesday, Nov 11: Be ready to demo what you have so far. At a minimum,
you should be able to navigate around the room without going through the walls. Place the jar file on enfuzion.
- By class time on Thursday, Nov 13: Be ready to demo the rest of the program. Place the jar file of the final version
on enfuzion. Email the corresponding zipped project code
to gorr.
[top] [Schedule]
[Home]