 |
Lab 1: Building a Recursive Ray Tracer
CS 445: Computer Graphics,
Fall 2010
[next lab][schedule]
|
Assignments are due at the beginning of class on Sept 7 (part 1), Sept 14 (part 2), and Sept 21 (part 3).
For details on how and what to turn in, see Deliverables at the bottom of this page.
Goals
- To understand recursive ray tracing.
- To learn the basic components of a graphics system.
- To understand the phong lighting model.
Description
In this lab, you are to implement a simple ray tracer
based on the discussion in class.
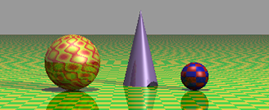
- It should contain at least 2 types of objects in addition to spheres (planes, cylinders, cones, etc.)
- It uses the Phong lighting.
- It implements shadows.
- It implements reflections (using recursion).
- One should have the ability to add multiple objects and lights to the scene.
- The code should be modular; the structure should be easy to figure out. Include the
javadoc.
- (Optional) It should have procedural and/or image based Textures
Directions
Week 1 (due Sept 7 at the beginning of class):
This week, you are just get the main algorithm working. A sphere is already included. Shading
will be ignored.
- You may start from scratch but I recommend that you download the netbeans project RayTracer10labStart. This code will run but it
won't create an image. Begin by reviewing class notes so that you know what all of the parameters mean. Don't
begin coding until you do this!
- The only parts of the code you need to implement this week are 5 methods in the RayTracer.java class:
- calcUVN(): calculate the eye coordinate basis vectors (u,v,n)
- pixelDir(): determine the normalized direction of the ray that starts at the camera and goes through a given pixel
- trace(): Trace a single ray. Note, trace() is called from startTrace(). trace() must
do the following:
- Determine whether or not there is an intersection.
- If there is an intersection, set color of the current pixel to some color for now (e.g. red or call localColor())
- If there is no intersection, set color to background color
- If there are reflections (later part of lab), you will need to recurse, that is, call trace() from within trace().
For the moment, just think about (don't implement) how the recursion will work (i.e. what ray will be used as
the parameter for the recursive call?)
- getIntersection(): Find the closest object to the camera that intersects a given ray.
Here, you need to loop over all objects and, for each object, determine 1) does the ray intersect this object and, if so, 2)
is this the closest intersection that has been seen so far.
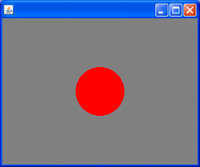
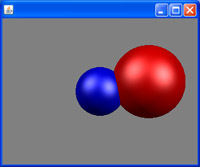
- createScene(): You will add a second sphere object to the scene. However, don't touch do this
until you are certain the first 4 methods above are working (see directions/pictures below).
- The resulting image should be:
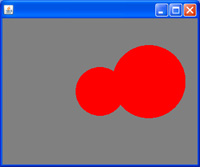
- Go into the createScene() in RayTracer.java and try adding a second sphere with a different size
that partly overlaps the first sphere.
Week 2 (due Sept 14 at the beginning of class):
This week, you are to get the shading implemented. The parts you need to implement are:
- Material.java: localColor This is the heart the
shading algorithm. Uses the Phong model to compute the local color at the intersection point.
(Note, the uv value is ignored for the moment so pass in null).
- RayTracer.java: localColor - Loops over all the lights and adds together the color contribution from each light source.
For each light, it calls localColor() in the Material class. It uses the surface normal found in the intersection object.
- Sphere.java: getNormal - Calculate the surface normal at the intersection point - this is really easy for a sphere!
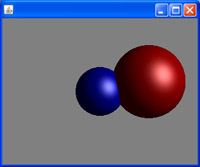
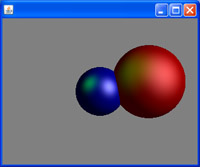
- RayTracer.java: createScene - you need to add a material to each sphere, e.g. to add a blue color to
your sphere s1:
s1.setMat(new Material(Color.blue));
- The resulting image should be:
- Go into the createScene method in RayTracer and try adding a second light at a different location (left image below).
Try changing the light color or the material properties such as or ka, kd, ks and n (right image below).
Week 3 (due Sept 21 at the beginning of class):
This week, you should:
- are to add several more objects such as a plane and cylinder.
- Implement shadows You are also to add shadows. This should be done in the localColor method of the RayTracer class.
- Add reflections. This is done using recursion in the trace() method using the variable "step" to control the number of
recursions. You will need to calculate the reflected ray at the intersection.
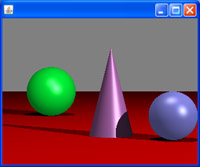 | 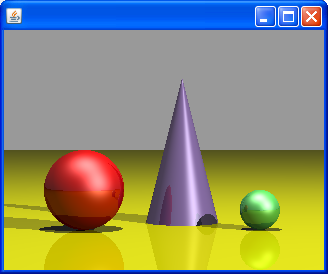 |
| With shadows | With shadows and reflections |
Extra Credit
For extra credit, 2D image textures. You may add either a procedural texture (there is already a stub for a checkerboard)
or image based textures (you will need to read in an image). Note, extra credit is only given if the
regular part of the assignment has been fully completed.
 |
| With shadows and reflections and textures. |
You will have 3 weeks to complete the entire ray tracer. The lab is worth 30 points (approx 10 points per
part). Each week, you are to turn in the entire Netbeans project for that part of the lab. Please do the following:
- Clean up your code:
- Delete portions of the code that you may have commented out but no longer need.
- Add comments (Javadoc and otherwise) so that it is reasonably easy for someone reading the code to
understand what the code is doing.
- Run the Autoformat command so that your code is well formatted.
- Deleted any unused java or other files (except those in the gleem library)
- Make sure the java classes you created have been placed in the proper packages.
- If you were not able to complete the lab, at least try to get it to a point where the code runs and compiles.
Turn this in so that you may get partial credit and explain (in WISE, see below) how far you were able to get
and the types of problems you were having.
- Generate a jar file for your code. Netbeans will do this when you do a clean-and-build.
The jar file should be in the "dist" folder in your project. Test the jar file to make sure 1) it runs
and 2) it runs the most recent version of your code.
- Zip together entire project folder and submit the zipped file to WISE.
In Wise, select the tab for CS 445 01 10/FA. Under Course Tools select Assignments. Click on
the appropriate assignment and send your zipped file as an attachment for that assignment.
If you were not able to complete the lab or
if you did extra work on the lab, please indicate this in the text area.
- Note, a grade will be assigned at the end of part 3 of the lab. This lab will be based on the following
criteria:
- Does your code run and do what it is supposed to do?
- Was your assignment turned in on time?
- Is your code well written (clean and modular)?
- If the assignment was not completed, how far did you get and did you make a reasonable effort to start early and ask for help?
- Did you do the extra credit? Did you make an effort to go beyond what was asked for in the lab
in any way? Yay! - such efforts do not go unnoticed!!
[top] [schedule]
[home]