Open up Maya 2009
Learning the Interface: To do this part, you will need headphones. If a window titled Essential Skills Movies does not appear automatically, click on the menu Help;Learning movies. Take a look at movies 1 through 5 (i.e. "Zoom, pan, and roll" through "Discover secret menus"). As you watch, try things out in Maya itself.
Location, location, location: Organizing and keeping track of files on your computer is critical! For the moment, you will use your H-drive to store your Maya projects. Create a folder on your H drive called ids252. Within this folder, you will keep subfolders containing your Maya projects. Projects are described below. You should have at least one project for each lab.
Your completed images will be turned in through WISE.
Making a Project in your working folder: A Maya project is
simply a folder or set of nested folders where all the files
are stored. Projects are important to create because
when you save or render maya scenes,
a number of different files are generated and saved. If you have
created a
project, all of these files will be saved into the project folder. If
you don't set the project each time you open Maya, then it is anyone's guess where many of these
files will end up. To make sure that you don't misplace these files, it
is good practice to always create a Maya project and to save your Maya
scene into the project. When you need to work on your project at a later
time, open up Maya, set the project, open up your scene, and begin to work.
For this lab, you should create a single project (e.g. called
Lab1Project) and save the scenes for this lab into this project. To
create the project, open
Maya and go to File;Project;New .... Enter
the
name and location of your project. The location should be your folder H:\ids252.
For now, leave all other fields blank.
Note, everytime you open up Maya you will need to reset the Project: File;Project;Set ....
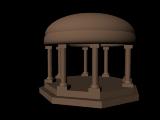 Create a Temple: Open Maya, create (or set) the project,
and click on the menu Help; Maya Help. In the index on the left, click on Learning Resources
and then Tutorials to open up that tab. Then, click
on Getting Started with Maya and then choose
Maya Basics. You are to work through
this entire section, including lessons 1-4. In the end, you should have a model of a simple temple.
Create a Temple: Open Maya, create (or set) the project,
and click on the menu Help; Maya Help. In the index on the left, click on Learning Resources
and then Tutorials to open up that tab. Then, click
on Getting Started with Maya and then choose
Maya Basics. You are to work through
this entire section, including lessons 1-4. In the end, you should have a model of a simple temple.
- Choose the perspective camera by clicking on the perspective window. Maneuver the camera in this window so that you are looking at a nice view of the temple.
- Go to the menu Window;RenderingEditors;Render
Settings... and do the following:
- Choose the Image Format to be JPEG (jpeg).
- Set the "Image Size; Presets" to 640X480.
- If you want a higher quality (but slower render time) then click on the Maya Software tab. Set the Quality to Production Quality. Close the Render Settings window.
- To actually do the render and generate the image, you must click the
render button
 on the toolbar in Maya (ask if you can't find it)
- When you render the image, Maya will save the image in the project folder (you may need to look in the tmp folder within project). Note, if it isn't there then the project was probably not set correctly. Name the file based on the type of object (e.g. temple) followed by an underscore and your initials (e.g. temple_abc.jpg).
- When you have completed the rest of the lab, you will upload all of the final images to WISE. This will be explained in class.
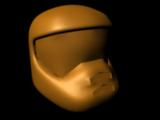 Helmet: The next thing you are to do is to learn how to create
a helmet using polygon
modeling.
Helmet: The next thing you are to do is to learn how to create
a helmet using polygon
modeling.
As before, click on the menu Help; Maya Help. In the index on the left, click on Learning Resources to open up that tab. Then, click on Tutorials, then on Getting Started with Maya and then choose Polygon Modeling.
To do the tutorial, you will need two files, HelmetFront.jpg and HelmetSide.jpg. These are provided in WISE under the resources for the first assignment. You may also find them on your computer in the folder (Windows)
Before beginning the tutorial, you should copy these two files into your project on your H drive. You may use the same project you used for the temple but you will need to create a new scene as is described in the instructions. Make sure you keep versions along the way so that, if you need to, you may go back to an earlier stage to correct a mistake. This is a long tutorial and can be rather tricky to do. For example, when you get to the section "Bridging between Edges", you may find the "bridged" polygons are twisted. To fix this, be sure to read the Note at the bottom of the "Bridging between Edges" section regarding reversing surface normals.
If you really run into problems, you may use the maya file helmetBridged.mb as a reset point. This file is also given in Wise under the assignment 1 resources. Download it and begin at the section in the tutorial called "Adding polygons to a mesh".
When you are done the tutorial, place a 640x480 jpeg rendered image of your helmet (named appropriately, e.g. helmet_abc.jpg) in the folder along with your temple. If you had to use helmetBridged.mb as a reset point, then please include an image of how far you got before you got to the reset point.