- Please work on the cs-render drive.
- Do the tutorials in the folder \ids252Sp11\lab6\TutorialWorkspace\your_name
- Do the joint animation the folder \ids252Sp11\lab6\ProjectWorkspace\your_name_Your_partner's_name. You will need to create this folder once you know who your partner is.
- When you have completed the animation, place a copy into the folder
\ids252Sp11\lab6\FinalAnimations Make sure that the name of the file you copy into this folder includes your both your name and your partner's name.
Render Farm: This is a good time to try out the render farm. Note, to use the render farm:
- Your project files must be on cs-render.
- The computer must be booted with Windows.
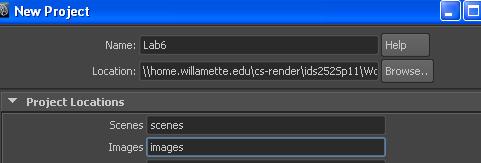
- When you create your project, the project's full path must entered as the Location.
That is, the path must start with "\\home.willamette.edu\cs-render\" as shown below:
- When you are ready to render, make sure you have set the project and the parameters in the Render Settings window.
- Go to the Render menu and select Create Backburner job....
- Enter the settings below:
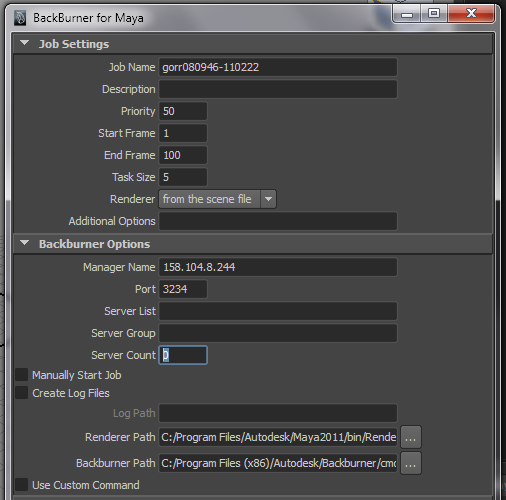
Note, the Renderer Path should be C:/Program Files/Autodesk/Maya2011/bin/Render
and the Backburner Path should be C:/Program Files (x86)/Autodesk/Backburner/cmdjob.exe - You can monitor the render farm job by going to BackBurner's monitor. To get there, you need to go (via Windows, outside of Maya) to the list of Programs and find your way to Autodesk;Backburner;Monitor. There should also be a shortcut to this on the desktop. Once the Monitor has been started, you need to connect to the server by going to the menu Manager;Connect and replace the "localhost" with the server address 158.104.8.244 .
- Right now, the render farm is accessible from the computers in Ford 202. Eventually, it should also be available in Ford 224 and Collins 407. The farm is composed of computer in Collins 407. If it seems as though the farm is not using many machines, it may be that they are turned off. Wits will be putting up signs in 407 to make sure that people do not turn off these machines.
Organization: One of the main goals of this lab is to learn how to stay organized! For example:
- Project Setup:
- When you create the project, add the appropriate subfolders (e.g. images, scenes, sourceimages, etc).
- Always set your project before you begin.
- Make sure that all assets (e.g. textures, maya files, source images, etc) are somewhere in the project folder.
- Modeling:
- Before beginning to model a character, think about the hierarchical structure and the controls that are needed in order to animate it.
- "Clean up" the model before adding controls or referencing, e.g. delete history, freeze transforms, group & rename elements, ...
- Rename objects and materials in your scene so that they are easily identifiable in, say, the outliner. If an object is composed of multiple parts, be sure to group all of the parts.
- File Referencing: Learn how to use file referencing. Each character and object in the scene should be created in a separate file and referenced into the main animation file.
- Layers: Learn how to use layers so that you can focus on only the parts that you are working on.
- Shot List: Make a list of the shots. Generally each shot will have its own maya file.
Tutorials: In Maya, go to Learning Resources, Tutorials, Getting Started with Maya, then:
- (Required) Go to File Referencing and do Lesson 1: Using file references.
- (Optional) If you want to learn more about using images as textures, go to Polygon Texturing and do Lesson 1: UV texture mapping.
- (Optional) If you want to learn more about skeletons, then Go to Character Setup and do
Lesson 1: Skeletons and kinematics
Lesson 2: Smooth skinning - (Optional) If you want to learning about facial animation, go to Character Setup and do Lesson 3: Cluster and blend shape deformers.
Project Description & Directions
- Task: In this lab, you are to work with one other person to create a 10-20 second animation. The animation will be about the interaction of two characters. Each person will model one of the characters. The interaction could be as simple as two characters walking into the scene from either side, meeting briefly, and leaving. The main requirement is that there be some simple but noticable interaction that takes place.
- Focus: The focus should be on the characters and their interaction, that is, the scene should be minimal, containing only a few objects (if any) other than the characters. Any objects that do appear should be there for a reason, i.e. they should play an active part in the interaction or in setting the mood or scene. Shading and texturing can be minimal, however, do pay attention to lighting.
- Planning: Before starting with Maya, you and your partner need to do the following:
- Decide together the look and movement of each of the characters.
The characters should be different
(i.e. don't make one just a copy of the other). They should not be complex. They don't
have to look human-like, in fact, a character with arms and legs is likely way too
complicated! A lot can be expressed with something much simpler - remember the wedge from Polyworld!
In any case, your characters do need to have attributes that convey something about their personality.
Suggestions include:
- Use deformers to control the change in shape of an object. This might be a bit limiting but it depends on what you want to do.
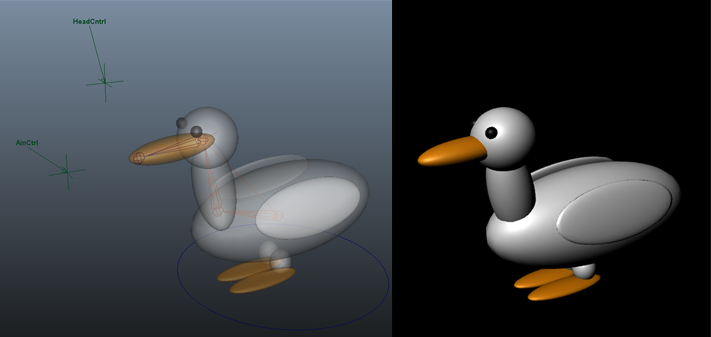
- A better option may be to copy the structure of the mechanical arm from the previous tutorial but use
your own geometry. For example, a duck made up of several nurb spheres can be modeled
using the identical skeletal structure as the mechanical arm:
- Decide the nature of the interaction. Include a brief background story. Who are these characters, what leads to their interaction (is it planned, accidental?) and what is the emotional exchange during the encounter?
- Decide together the look and movement of each of the characters.
The characters should be different
(i.e. don't make one just a copy of the other). They should not be complex. They don't
have to look human-like, in fact, a character with arms and legs is likely way too
complicated! A lot can be expressed with something much simpler - remember the wedge from Polyworld!
In any case, your characters do need to have attributes that convey something about their personality.
Suggestions include:
- Project Setup:
- You and your partner need to to create a single Maya project in which to work. Besides including "images", you should also create a "scenes" folder where all of your Maya scene files will reside. Within the scenes folder, you might also want to create subfolders for "characters", "props", and "environment". This may be overkill now, but it gets you thinking about how to organize your 1 minute animation.
- Do the Maya tutorial on referencing (or read section called "About file referencing"). Each character and scene object should be created in a separate Maya scene file. The scene file where the animation will be done should reference these three files. Avoid multiple levels of referencing (e.g. a file references a file which references a file ...). Before creating the references, be sure that the characters and environment being referenced are cleaned up.
- Division of Labor:
- Each person will create one of the characters. Controls need to be understandable to someone who did not model the character because your partner may do some of the animation of your character.
- The environment should be minimal so one person should volunteer to do this, or you can do this together. Or have one person create the environment and the other person do the lighting. Note, the lighting should be done at the end after all the animation is complete.
- The animation should be divided into two time segments where one person animates one and the other animates the other. These two segments should be done in separate Maya scene files (note, referencing should make this easier) making sure that the two segments match up properly when the frames are put together (this could be a place where there is a change in the camera (i.e. shot change)). If there is no camera or shot change, then you need to set the pose in the first file to be the same as the pose in the second file. You also want to make sure that the camera and lighting is identical. One option, for example, is to set up the lights in one file, export only the lights to a new file and reference the light file in the second file.