- Making a Project: For the lessons below, create a single
project (e.g. called Lab2Project) on cs-render in the folder
IDS252Sp14/Lab2/MayaProjects/your_name
Remember, once the project is created, you must set the project every time you re-open
Maya to insure that Maya will save files to the right place.
- Modeling: In Maya, go to Help → Tutorials.
Click on the link Getting Started with Maya 2014 and then go to Getting Started with Maya.
Do the following lessons:
- NURBS Modeling:
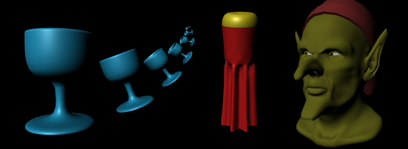
- Lesson 1: Revolving a curve to create a surface (glass),
- Lesson 3: Lofting Curves to create a surface (saltshaker)
- Polygon Modeling:
- Lesson 2: Sculpting a Polygon Mesh
The file you will need is Poly_head.mb. Download it
and place it into the scenes folder of your Lab2Project.
versions.
- Rendered Image: For each object (glass, saltshaker, head), render a
640x480 jpeg image and copy over to the folder on cs-render called
IDS252Sp14/Lab2/FinalImages/your_name
Name the image files as you did in lab 1, e.g. OrrJenny_Lab2_glass.jpg.
-
Importing Objects: At this point, you have
created or modified
several Maya scenes (i.e. .mb or .ma files) from labs 1 and 2. Each scene file should contain a
different object such as a temple, character, glass, saltshaker, head. Copy the scene files
from lab 1 (temple and character) over into the scenes subfolder of your current project folder (Lab2Project),
so that all of the scene files are in one place.
Before you continue, prepare the objects in each scene file as described below. If you don't do this, your
composition scene file will be an utter mess thus making it difficult to transform and duplicate objects.
Cleaning Things Up:
- Open Maya and set the project (e.g. Lab2Project).
- Open up one of the scene files in that project, e.g. temple.mb.
- Make a backup copy before continuing.
- Go to the Outliner and make sure that the only objects and groups that are there are the ones you
want to be there. Delete everything else.
- Select all objects. If there are multiple subparts, make sure everything is selected.
- Delete constuction history by going to the menu Edit→Delete by Type→History.
- If there are multiple parts, group all of the parts together by selecting everything and going to the
menu Edit→Group.
- Rename the object (or the group if you grouped items) so that the name reflects what the object is. For example,
the temple object should be called "temple".
- You might want to scale the object so it isn't tiny or huge. Make sure the object is sitting at the
origin.
- With the temple group selected, set the pivot point in an appropriate place on the object. Holding down
the d key will give you access to the pivot (Alternatively, on Windows,
you press the "Insert" key to move the pivot point. On a Mac, you press "fn" key an "Enter" key). Position it so that the pivot is at the origin. When done, select the menu "Modify→Freeze Transformation" to zero out the
transformation node values.
- If you are using the default lambert1 material, you must replace it a different material that you create.
You should choose a color palette ahead of time so that you can set the colors of your different
objects to fit in with the color scheme.
To choose a color scheme, use the Color Scheme Designer.
A consistent color scheme can help give a sense of unity to your final image.
- Delete any other items that you created unless you specifically want them (leave the default lights and cameras).
- Save the scene file.
- Repeat for the next scene file in the project.
For future reference: a general list of things to do to cleanup files can be found
here.
Importing: Once the objects in the individual scenes are cleaned up, you can now combine these objects into one
scene as follows.
- Create a new scene and save it into project folder (e.g. call it composition.mb)
- Go to the main menu in Maya and choose File; Import....
- Select one of your previous scenes to import. The object should appear in this new scene.
- Repeat to import several more objects. You will need to translate the different objects so they aren't on top of one another.
Composition: In the scene you just created, arrange/duplicate/scale/etc the different objects in a way that tells a story or makes the viewer curious.
Colors should be chosen from a specific color palette. DO NOT USE FIRE OR OTHER SPECIAL EFFECTS THAT YOU DISCOVER IN MAYA).
Note, in the class critique we will discuss the questions in the Evaluation Sheet (pdf)
-
Images to turn in: Copy the image of your composition to same folder containing your
other images (IDS252Sp14/Lab2/FinalImages/your_name)
which should now contain 4 images: the glass, the saltshaker, the head, the composition. Please name them
accordingly.
-
Project Folder Organization: Copy your project folder, Lab2Project, over to cs-render (assuming you weren't already
working there in the first place). Then clean-up your Lab2Project folder on cs-render, as follows:
- If you don't already have a backup of this folder, make one now!
- Make sure that your final scene files are appropriately named (e.g. temple.mb, hand.mb, saltshaker.mb, composition.mb).
- Delete all other scene files, i.e. the ones that are no longer used.
- Delete all images files except for your final .jpg (or png) images.
Most importantly, remove any files with an *.iff extension since these are really big files!
Note that late assignments will be penalized.