Lab 1: Introduction to Maya
IDS252: 3D Animation,
Spring 2015


Due Date: Tues, Jan 27, before the beginning of class.
Evaluation Sheet (pdf)
Goals
- Familiarize yourself with the Maya interface.
- Understand how files and projects are named and organized.
- Understand how to turn in assignments on the shared network drive called cs-render
- Learn basic modeling tools in order to make a model of a temple and a human-like character.
- Deliverables: Two images (temple and character) placed in designated folder on cs-render. Details described below.
Mac vs PC
The computers in Ford 202 are dual boot. If you hold down the "options" key as the computer
boots up, it will give you the option of booting in Windows. If you do nothing, it will boot up as a Mac.
At the moment, it does not matter which you use. However, for some of the things we do later, you will need to be working
on the PC side which can cause confusion with the
keyboard.
To see the mappings of a PC keyboard on a Mac, go here.
Getting Started: Digital Tutors vs Maya Online Help
In class, we will walk through some of the more
common things you will need to know about the interface and file server. However, most of your technical learning will be achieved
by watching and doing the tutorials during lab and for homework. Learning Maya will be slow going at first but
once the basics are learned, the rest will come more quickly.
People learn differently. Some prefer to watch a video and others prefer to work through a written tutorial.
We will be doing some of both using the Digital Tutors (DT) videos and the written online tutorials which come with Maya.
DT provide many excellent videos for you to watch but can be fast paced.
Until you are comfortable with
the Maya interface, you may find it difficult to follow details. The introductory DT videos, however, are worth watching because they help you
become familiar with the terminology and to develop an overall understanding of process. DT
also provides hundreds of videos on advanced topics that are not covered in the online help and which will be invaluable as you
become more skilled.
The Maya Online Help provides a number of good, hands-on written tutorials. You will be working through a number of them
during the first half of the semester. Remember, if you want to learn more, you can always search through DT for tutorials on
similar topics.
Digital Tutors
It is suggested that you watch these videos before doing the online tutorials, however, you may prefer to
go back and forth, i.e. watch a few of these, then do some hands-on work with Maya using the online tutorials, and then
go back to the videos. Do whatever works best for you. You might want to open up Maya and try to follow along some of what they
do but don't worry about keeping up. You will get plenty of hands-on practice when you do the online written tutorials.
Suggested DT tutorial: Introduction to Maya 2015.
The lessons to watch within this tutorial are the following:
- General Interface: Lessons 1 - 10
- Modeling: Lessons 14 - 16, and then watch as much as you want of 16-33 (you do not need to watch them all!)
- Cleaning Up: Lesson 34, I can't emphasize how important it is to clean up your scene. This video goes
rather fast so we will be going over many of the steps
in class as well. Some of this will also be covered in the online tutorials.
The main steps are to: delete history, remove unneeded objects, name and group all remaining
objects. In these lessons, they wait until the very end to clean things up. I recommend that you don't
wait until everything is created but, at a minimum, name objects
as you create them. Note, when you turn in an assignment, you are expected to have cleaned up your scene.
- Do not go any further than Lesson 34. We will be covering these lessons in later labs.
Maya Online Help and Tutorials
It is important to become familiar with Maya's Online Help. You will make constant use of it over the course of the semester.
Below are instructions on how to access them.
If you find the DT tutorials adequate for learning about the interface, you may want to skip some of this. However,
in any case, you need to become familiar with how to access the Maya Help and Tutorials.
-
Open up Maya 2015
-
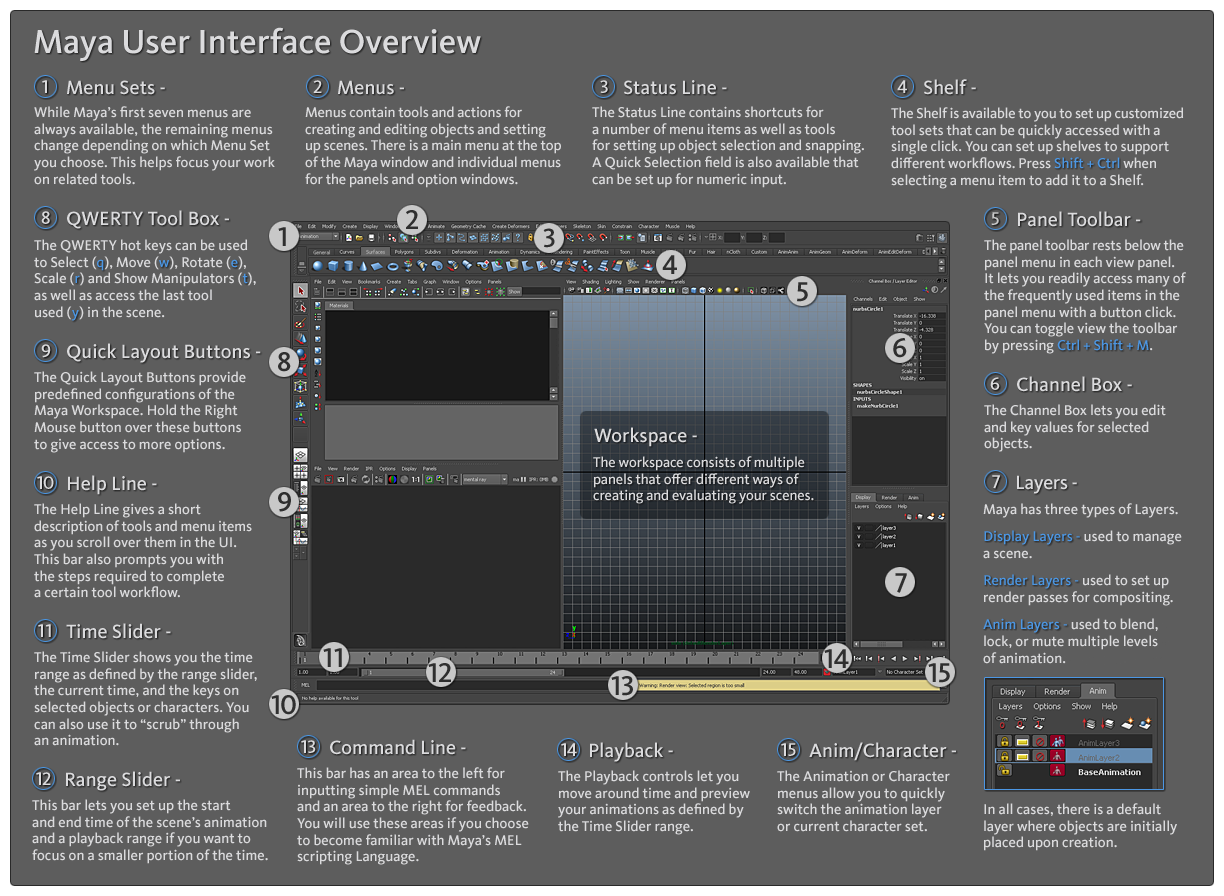
Learning the Interface: A quick reference of the interface may be found
here. This will be explained more in the links described below.
You want to become familiar with the terms used to refer to the different parts of the interface, e.g. Menu sets, Status line, etc.
-
Getting Help: In Maya, go to Help → Maya Help (F1).
You will see a list of topics. Select Basics and read through the topics "Working in Maya"
through "Selecting". Back in the top level help screen, select the 1-minute Startup Movies and watch the
movies "Zoom, pan, and roll" through "Discover secret menus". As you watch, try things out in Maya.
Poke around the other sections to explore what else is available.
You can also search on topics. To see the search box, you may need to click the following icon
on the far left of the Help page:

- We will also be making use of the Online Tutorials which can be reached either from the Maya menu
Help → Maya Help (F1) and selecting Tutorials, or
going directly to Help → Tutorials. Under the Maya Tutorials, select
Getting Started with Maya 2015.
- For some of the tutorials you will also need the
lesson files which can be downloaded by going under Maya Tutorials and selecting
Getting Started with Maya 2015 Lesson Files . You will not need these for this lab.
Set Up
In this part of the lab, you will be actually working with Maya and modeling two objects. A temple and a character.
Before starting the modeling, you need to properly set up Maya. Most importantly, you need to create a Maya project.
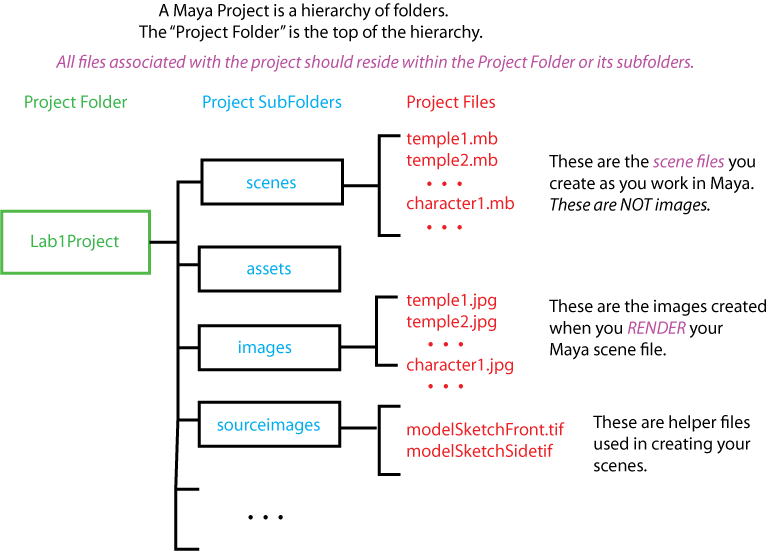
Maya Projects: A Maya project is
simply a folder or set of nested folders where all your maya files
are stored.
 .
Projects are important to create because
when you save or render maya scenes,
a number of different files are generated and saved. If you have
created and/or set a
project, all of these files will be saved into the project folder, otherwise it is anyone's guess where many of these
files will end up. Note, DT Lesson 4 discusses Maya Projects.
.
Projects are important to create because
when you save or render maya scenes,
a number of different files are generated and saved. If you have
created and/or set a
project, all of these files will be saved into the project folder, otherwise it is anyone's guess where many of these
files will end up. Note, DT Lesson 4 discusses Maya Projects.
In this lab, it is recommended that you create one Maya Project to store your separate scene files for
both the temple and
the character. A scene file is the file which contains all of the Maya information for your particular object(s).
Your scene files should be stored in the "scenes" folder of your Maya Project.
Directions will given in the tutorials explaining how to create your project.
Note, everytime you open up Maya
you need to make sure that you are in the correct project.
If you aren't sure, just set the project
using File → Set Project ....
-
Keep Multiple Versions: You should save versions of your scene as you work
(e.g. temple1.mb, temple2.mb, etc) so that, if
you make a mistake that can't be undone, or if Maya crashes (a common occurrance!), then you don't have to
start back at the very beginning again. You can save versions by saving and manually renaming your files or by going to
the menu File → Increment & Save
Location, location, location:
- cs-render network drive: You will be storing your files on a Willamette shared network drive called cs-render.
(Note, if you joined the class late, you may not yet have access to cs-render. If so, please work on your H drive and
copy your project to cs-render once you have access.) You need to work on cs-render because
1) your files may take up too much disk space, 2) you may need to share your work with others, or 3) you may need to
use the render farm, and 4) the instructor will want access to your projects for grading purposes.
To access cs-render, you need to follow the directions under "Shared Network Drive: cs-render" on this page
- Organization: Organizing and keeping
track of files on your computer is critical! All files that are associated with a project need to be
kept in the project folder, otherwise, you risk losing these files.
- Project location: For this lab, store your Maya projects on cs-render in the folder
\IDS252Sp15\Lab1\MayaProjects\your_name
- Image submission location: To submit your completed work, you must copy your rendered images (jpg or png)
from your project into the folder
\IDS252Sp15\Lab1\FinalImages\your_name
before the
beginning of class on the due date.
Part 1: The Temple
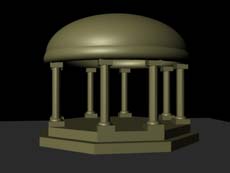 |  | 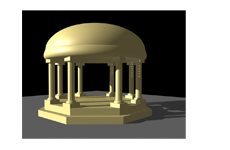 |
| Basic Temple | Bad! Pay attention
to camera location. | Temple with lighting |
Tutorial Instuctions: Go to Help → Tutorials,
click on the link Getting Started with Maya 2015 and then go to
Getting Started with Maya → Maya Basics → Introduction .
Follow the directions for making the temple (lessons 1-4). In the end, you should have a model of a simple temple. Notes:
- You do not need to download the "Getting Started 2015 Lesson Files".
- Save your new project into the folder: \IDS252Sp15\Lab1\MayaProjects\your_name
- Save your scene and call it something like your_last_name_temple.mb
- Don't forget to save multiple versions as you work in case Maya crashes or something else goes wrong. To
save versions after you have saved the initial scene file, go to the menu File → Increment & Save
Render the Temple: Rendering means taking the scene you
have created, choosing a camera, and generating an image file (png or jpg). It should look something like the Basic Temple image
shown above. Directions are
described here:
- Add a polygon plane to represent the ground so your temple doesn't look as though it is floating.
- If desired, add a simple solid color to the temple (ask if you need help). Please do not do anything more complicated.
- Choose the perspective camera by clicking on the perspective
window. Maneuver the camera in this window so that you are looking at a
nice view of the temple.
- Go to the menu Window → RenderingEditors → Render
Settings... and do the following:
- Set the "Render Using" option to "mental ray". If this is not a listed option, you need to add the mental ray plug-in. To do this,
go to the Maya's main menu:
Window → Settings/Preferences → Plug-in Manager . In the Plug-in Manager window, scroll down
towards the bottom to where you see Mayatomr.mll listed. Check the "Loaded" and "Auto load" boxes to the right. Exit the window
by selecting the "Close" button at the very bottom. Return to the "Render Settings" window. Mental ray should now be an option.
- Choose the Image Format
to be JPEG (jpeg).
- Set the "Image Size; Presets" to HD 540. This should give you an image that has a pixel resolution of 960 (width) x 540 (height).
- Close the Render Settings window.
- To actually render the image, you must click the
"render current frame"
button
 on the toolbar in Maya (ask if you can't find it)
- When you render the image, Maya will automatically save your image in the
"images" folder within the
project folder (you may actually need to look in the "images/tmp" folder). Note, if it isn't there then the project was probably
not set correctly.
- Change the filename of the image to something like your_last_name_temple.png
and copy it over to the cs-render folder \IDS252Sp15\Lab1\FinalImages\your_name.
Part 2: Character
 |
 |
 |
| The basic character |
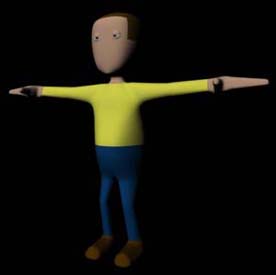
The shaded character
with eyes |
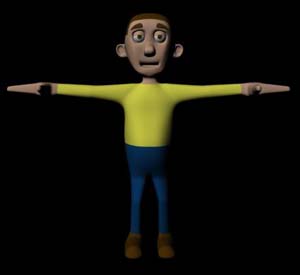
The character with Chp 4 |
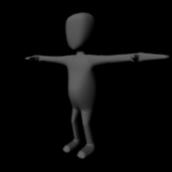
Polygons: Polygon modeling is an easy and common way of modeling objects.
Here, you will learn how to create a human-like character using polygon
modeling.
In the project below you will be doing a lot of extruding faces of polygons. Here is a Digital Tutor video on the
Extrude tool.
It uses a slightly older version of Maya but the basic idea has not changed.
Instructions: The instructions are in the file MayaPolyModeling.pdf which can be found in the folder on cs-render:
\IDS252Sp15\IDS252Resources\Lab1Files\
These directions were created for a version of Maya from 2013 and, as usual, Maya changes from version to version. To
alert you to these changes, text bubbles have been added to inform you what you need to do differently.
You will also see two tif files stored in the Lab1Files folder which you must copy over into your project's sourceimages folder.
Please be careful not to change or delete the files that are in the Lab1Files folder. Once you copy them
to your own folder, you may do whatever you want with them. The tutorial instructions will explain how to use these files.
You do not need to create a new
Maya project. You may save your files for this exercise in the same project you used for the temple.
Your goal is to:
- Chapter 3: Do all of this chapter.
- Chapter 4: This chapter adds the facial details. Skip this chapter.
- Chapter 5: Start with your model from chapter 3. The main thing to do is to try a little bit of the refining
and be sure to mirror the model. Don't add the eyes unless you really want to.
- When you are done the tutorial, you should have something that looks like the gray character shown above on the far left.
Render an HD 540 jpg or png image of your character, named appropriately, (e.g. your_last_name_char.jpg).
Copy it over to the cs-render folder \IDS252Sp15\Lab1\FinalImages\your_name.
Deliverables and Evaluation
Before the beginning of class on due date listed at the top of this lab, you should have your one Maya project
on cs-render in the folder
\IDS252Sp15\Lab1\MayaProjects\your_name
Your two rendered images (the temple and character) should be in the folder
\IDS252Sp15\Lab1\FinalImages\your_name
The main goal of this lab is to familiarize yourself with the Maya interface and basic modeling tools.
A link to the evaluation sheet is given at the top, under the due-date.
There is a lot to get used to in this first lab. If you have ANY questions, it is important that you ask.
