
Lab 1: Introduction to Maya
IDS252: 3D Animation, Spring 2016
Due Date: Tues, Jan 26, before the beginning of class.
Evaluation Sheet (pdf)
This is a summary of the links in the sections below.
The computers in Ford 202 are dual boot. If you hold down the "options" key as the computer
boots up, it will give you the option of booting in Windows. If you do nothing, it will boot up as a Mac.
It is highly recommended that you use the PC side. To see the mappings of a PC keyboard on a Mac, go here.
The purpose of this section of the lab is to get familiar with the Maya interface by looking at a few Digital Tutor videos and exploring the Online Maya Help. There is nothing to turn in for this section of the lab.
Digital Tutors
People learn differently. Some prefer to watch a video and others prefer to work through a written tutorial. We will be doing some of both using the Digital Tutors (DT) videos and the written online tutorials which came with Maya (before 2016). DT provides many excellent videos for you to watch but can be fast paced. Until you are comfortable with the Maya interface, you may find it difficult to follow details. The introductory DT videos, however, are worth watching because they help you become familiar with the terminology and to develop an overall understanding of the Maya workflow. DT also provides hundreds of videos on advanced topics that are not covered in the online help and which will be invaluable as you become more skilled.
Please sign up for the 30 day free trial of Digital Tutors (see the "Start for Free" link). After the 30 days are up, you should purchase the monthly subscription for 2 or 3 months. If you want to have access to many of the Maya files used in the videos, you can select the "Plus" level at $49 per month. Otherwise, select the basic level at $29 per month. A few of the tutorial files are provided for free. You don't need any of these files for his lab, however, for future reference, the files can be downloaded from Maya Tutorials. Follow the link "Exploring Maya tutorial scene files".
Much of the content covered over the course of the semester, is discussed in the DT tutorial: Introduction to Maya 2016. You are not expected to watch all of them. In fact, a lot the material we will not cover in class. For this lab, just take a look at the General Interface lessons and a few of the Modeling lessons in order to get a feel of how Maya works.
Summary of the topics covered in the Digital Tutors Introduction to Maya 2016
Maya Online Help and Tutorials
An alternative way to learn about Maya is through Maya's Online Help. Please become familiar with it. Below are instructions on how to access it.
Open up Maya 2016
Learning the Interface: A quick reference of the interface may be found Online Help: Maya Interface. You want to become familiar with the terms used to refer to the different parts of the interface, e.g. Menu sets, Status line, etc.
Getting Help: In Maya, go to Help → Autodesk Maya Help (F1). You will see a list of topics:

Online Tutorials : In previous years, Autodesk provided a number of good, hands-on written tutorials in their Online Help. This year, they seem to have stopped supporting them. In this lab, we will do several the 2015 Online Tutorials (explained more below) although you should note that the interface might be slightly different. Please ask the instructor or lab assistant if you get confused. These tutorials can be found through the Maya menu Help → Maya Help (F1) and selecting Tutorials, or by going directly to Help → Tutorials. Under the Maya Tutorials, look for the heading Maya Getting Started and click on the Getting Started with Maya 2015 link. For some of these tutorials you will also need the lesson files which can be downloaded under Maya 2015. You don't need any of them for this lab.
In this part of the lab, you will be actually working with Maya and modeling several objects: A temple, glass, and saltshaker. Before starting the modeling, you need to properly set up Maya. Most importantly, you need to create a Maya project.
Maya Projects: When you make a new Maya Project from within Maya, Maya will create a main folder containing a set of subfolders. All files used for a project should be stored in these folders.
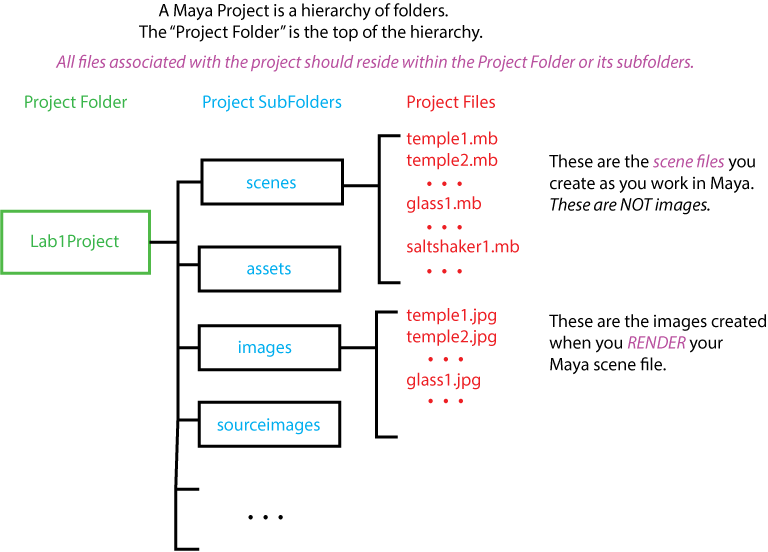
In this lab, it is recommended that you create one Maya Project to store your separate scene files for the temple, glass, and saltshaker. A scene file is the file which contains all of the Maya information for your particular object(s). Your scene files should be stored in the "scenes" folder of your Maya Project. Directions will given in the tutorials explaining how to create your project.
Keep Multiple Versions: You should save versions of your scene as you work (e.g. temple1.mb, temple2.mb, etc) so that, if you make a mistake that can't be undone, or if Maya crashes (a common occurrance!), then you don't have to start back at the very beginning again. You can save versions by saving and manually renaming your files or by going to the menu File → Increment & Save
Location, location, location:
 |  |
to camera location. |
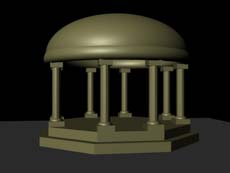
Tutorial Instuctions: Open Maya. Go to Help → Tutorials→ Maya Tutorials, scroll down and click on the link Getting Started with Maya 2015 and then go to Getting Started with Maya → Maya Basics → Introduction . Follow the directions for making the temple (lessons 1-4). In the end, you should have a model of a simple temple. Notes:
Render the Temple: Rendering means taking the scene you have created, choosing a camera (e.g. persp) and camera location, and generating an image file (png or jpg). It should look something like the Basic Temple image shown above. Directions are described here:
 on the toolbar in Maya (ask if you can't find it).
Alternatively, go to the menu Render → Render Current Frame
on the toolbar in Maya (ask if you can't find it).
Alternatively, go to the menu Render → Render Current Frame
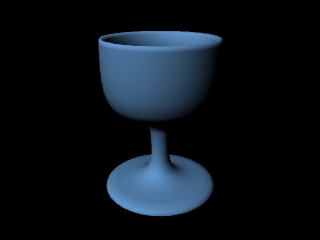 | NURBS Modeling, Lesson 1: Revolving a curve to create a surface (glass) |
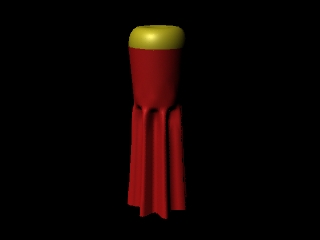 | NURBS Modeling, Lesson 3: Lofting Curves to create a surface (saltshaker) |
Before the beginning of class on due date listed at the top of this lab, you should have a single Maya project containing your scene files (among other things): temple.mb, glass.mb, and saltshaker.mb. This project should be located on cs-render in the folder \IDS252Sp16\Lab1\MayaProjects\your_name.
Your three rendered images (the temple, glass, saltshaker) should be in the folder \IDS252Sp16\Lab1\FinalImages\your_name
The main goal of this lab is to familiarize yourself with the Maya interface and basic modeling tools. A link to the evaluation sheet is given at the top, under the due-date. We will complete this sheet during class on the day the assignment is due.
There is a lot to get used to in this first lab. If you have ANY questions, it is important that you ask.