Lab 5: Textures
CS 445: Computer Graphics,
Fall 2010
[previous lab][schedule][next lab]
Assignments are due at the beginning of class on Tues, Nov 16.
For details on what to turn in, see the Deliverables section at the bottom of this page.
Goals
- Become acquainted with texturing in OpenGL
- Reading in images and converting to ByteBuffers
- Procedurally generating textures
- Combining Lights and Textures
- Applying all of the above to a large scene.
Practice (not to be turned in)
Getting started with the texture parameters: Take a look at Nate Robbin's texture.exe tutorial to see how the parameters
affect the resulting image.
|
Code Example:
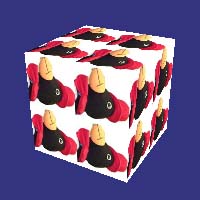
- Download and run the TextureCube program. Read through it carefully so that you understand what it is
doing. Try changing the values of the texture coordinates. Try modifying the checkerboard texture to get something
different, e.g. horizontal or diagonal stripes, sin waves, etc.
- In the code, replace the image of Percy with one of your own images. In order to use an image as a texture in OpenGL, it is important to remember that:
- the image's width and height need to be powers of two (this is not true for new versions of OpenGL)
- The image should not be too large (ideally at most 128x128).
|
You may need to use some photo editing software to convert your images into the proper size. The TextureCube code
works with jpg files but may not work with other image formats. If the image doesn't show when you run the program, it is
probably because it was not resized properly. Try adding additional choices for images.
General Steps involved:
- Read in your images and, for Java, store in ByteBuffer. To be on the safe side, the image should have dimensions
that are powers of 2.
- If you plan to use N textures, then you need to obtain N unused texture identifiers: glGenTextures
- For each texture you plan to use:
- Set the texture ID : glBindTexture
- Set the texture object's state parameters: glTexParameter
- e.g. how textures are filtered when texels are of different size from pixels.
- Set the texture's environment parameters: glTexEnvi - e.g. how texture interacts with lighting
- Load texture into texture memory: glTextImage2D or glBuild2DMipmaps
- At render time, for each object you render:
- For each rendered object, set the texture for that object: glBindTexture.
- Enable texturing glEnable(GL.GL_TEXTURE_2D) (or disable if the object does not use texturing)
- Send geometry to OpenGL making sure to set texture coordinates:
- Set glTextCoord at each vertex (or use vertex array/buffer)
- Texture coordinates can also be done automatically - glEnable(GL_TEXTURE_GEN_S).
Must specify how the projection is to be done, e.g. eye_linear, sphere_map etc. Doesn't always give
very satisfying results.
Creating a Scene (to be turned in)
In this part of the lab, you are to create a complex scene that combines:
- multiple textures (at least 2)
- lighting
- naviation
You may do whatever type of scene you like as long as it has the above characteristics and it has a complexity
similar to the examples below. Keep things as
modular as possible. For example, you should probably have separate classes for the geometry (e.g. cube),
lights, navigation, textures. Otherwise your listener code will be too large and unwieldy. Now is a good time
to try to get organized before you start your final project in the next lab.
Below are two examples. You may choose to work on one of them or you may choose something else with similar complexity.
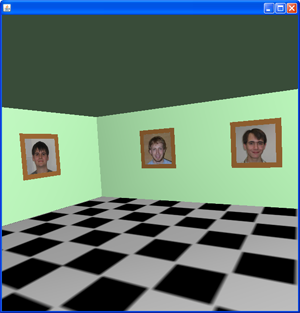
Example 1: A Virtual Museum
|
|
-
Cube class: The room will be a large cube or rectangular shape. You will be texturing this cube
differently on different sides so you can't use a glutCube.
Besides, unlike the teapot, glutCubes do not come with texture coordinates. Instead, list the vertices, faces, and normals as was
done in the TextureCube example.
-
To make the texturing and lighting easier to do for the room, it is recommended that you do the following:
- For each quad (i.e. wall) , set the normal to be the inward normal since you will be inside the room.
- Set the order the vertices of each quad so that, when inside the room facing the wall, the first
vertex is the bottom left corner, the second vertex is the bottom right, and so forth.
-
Collisions: Modify your navigation code so that the viewer can't go through the walls, floor, and ceiling.
To do this, you need to put contraints on the navigation updates to prevent a collision some distance before
reaching the walls, etc.
Also check that the near plane of the camera is set fairly small otherwise it will look like you walked through
a wall when you are close but not past the wall.
-
Loading Images: Add code to load the checkerboard and all of your images into texture objects. Look at
portions of the TextureCube to see how to do this. Note, you need to load in all of your images into separate texture objects.
- Floor: The floor of your museum should be checkerboard (or some kind of procedural texture). The walls and
ceiling can just be a solid color.
-
Pictures on the walls: Create additional geometry for the "picture frames", e.g.
squares or rectangles located just in front of the walls and which are textured with your images.
Remember that picture size and/or the texture coordinates need to be chosen so that the picture is not distorted.
- When you are done, you should be able to walk through your museum looking at the pictures.
-
Add Lighting: Add at least one light to the center top of the room. Look at the last lab to remember what
code needs to be added.
-
Setting the Mode: In order to mix lighting and texturing, you need to set the environment mode.
Experiment with different settings for the mode. For example, to set the mode to GL_MODULATE, add the line
gl.glTexEnvi(GL.GL_TEXTURE_ENV, GL.GL_TEXTURE_ENV_MODE,GL.GL_MODULATE);
In general, the mode may be on of the following
- GL.GL_BLEND, where the resulting fragment color is C = Cf*(1-Ct) + Cc*Ct
- GL_REPLACE, C = Ct
- GL_DECAL, C = Ct
- GL.GL_MODULATE, C = Cf * Ct (note if material is read and texture is blue, result is black)
- GL.GL_ADD, C = Cf + Ct
and where
- Cf = color of fragment (set through the material or glColor)
- Ct is color of texture
- Cc is texture env color set using
gl.glTexEnvfv(GL.GL_TEXTURE_ENV, GL.GL_TEXTURE_ENV_COLOR,Cc,0);
Example 2: A Virtual City
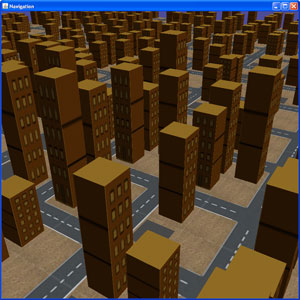
Create a city consisting of buildings and a large rectangle for the ground which is also textured.
Review the instructions above for the museum for things you need to think about. The buildings can all be scaled cubes. It is
probably easier to create several simple textures in Photoshop rather than trying to find good building or road textures online.
Shaders: Extra Credit (5 pts)
Download ShaderLabExample.zip. This has a number of different
shaders included. Run the code and try changing the shaders to see what each does. We will go over
this code in class.
For extra credit, take an earlier lab (e.g. algebraic surface or DEM) and add a vertex and fragment shader to compute
the shading. Try several different shaders.
Deliverables:
By class time on Tues, Nov 16: Submit your zipped Netbeans
program (with the images you used) to Wise.
Be sure to include a working jar file.
on enfuzion. Be prepared to demo your program and to discuss what you discovered.
[top] [Schedule]
[Home]