 |
Lab 1: Building a Recursive Ray Tracer
|
|
Lab 1: Building a Recursive Ray Tracer
|
In this lab, you are to implement a simple ray tracer based on the discussion in class.
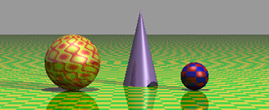
This week, you are just get the main algorithm working. A sphere is already included. Shading will be ignored.
The resulting image should look something like:
Demonstrate your program in lab no later 5pm on Tues, Sept 11. No need to turn anything in (yet).
This week, you are to get the shading implemented. The shading is probably the most difficult part of the lab because you have to add so much before you can actually see any change. To do the shading, you first need to add lights and materials. Once you have added them, you can add the phong algorithm for calculating the shading.
Do the following:
The project folder should already contain a Material.h and Material.cpp. You need to add these files to the project in order to see them in Codeblocks. Complete the Material class so that it includes reflection coefficients (ka, kd, ks as floats), a reflection coefficient (kr, a float, used later in Part 3 for reflections), colors (ambient, diffuse, specular as RGBColors), and specularity (for specular component, as float). The methods to include are constructors, destructor, assignment operator, setters/getters. Set the default values: ka = 0.2, kd = 0.6, ks = 0.4. Make sure you build and run after you are done implementing the Material class. The program output won't change but it is important to make sure you didn't break anything along the way.
Add a PointLight class which includes a color (RGBColor), location (Vector3D), and intensity (float). Note, this is simpler than what is described in the Ray Tracing notes. To add a class, you can go to the menu File->New->Class... The methods to include are constructors, destructor, assignment operator, setters/getters. Optionally, it can be useful to have a method that calculates the normalized direction from a hit point to this light, where the hit point (or the ShadeRec object) is passed in as a parameter. This method is used, for example, in calc_shade to calculate the light direction L. Again, build and run before continuing to make sure your PointLight class compiles and does not disrupt anything else.
In the World Class:
// Create and add a light
PointLight* light_ptr = new PointLight();
light_ptr->set_color(1,1,1);
light_ptr->set_intensity(.7);
light_ptr->set_location(10,10,-30);
add_light(light_ptr);

// Create and add a sphere
Sphere* sphere_ptr = new Sphere;
sphere_ptr->set_center(2, 0, -40);
sphere_ptr->set_radius(3.0);
add_object(sphere_ptr);

// Create a yellow material
Material* mat_ptr = new Material();
mat_ptr->setAllColor(1,1,0);       // yellow
// Set the sphere's material to the yellow material
sphere_ptr->set_material(mat_ptr);

// Create and add another sphere
sphere_ptr = new Sphere(Vector3D(-2, 0, -40), 2);
sphere_ptr->color = RGBColor(1,0,1);
add_object(sphere_ptr);
In Sphere.cpp, when there is a hit, you need to set the ShadeRec's material pointer to be that of the sphere's material pointer.
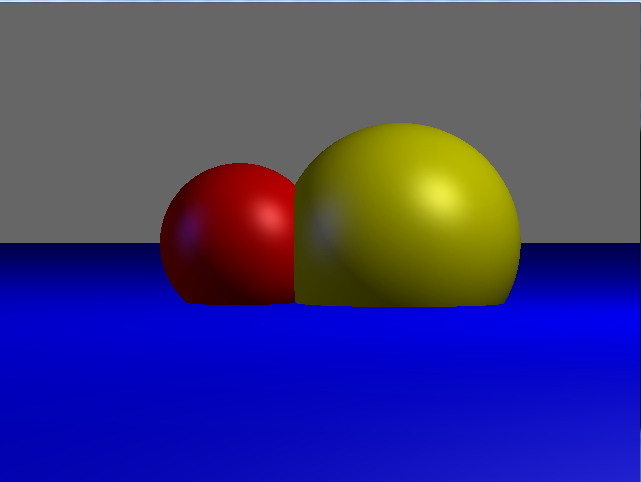
In RenderEngine: Modify trace_ray (so that it calls calc_shade). And modify calc_shade to so that it computes the Phong lighting equation for the closest hit point. In calc_shade, start by implementing only the ambient light since this equation is simple. Note, to see anything, you will need to set the ambient light coefficient ka of the material to be 1 instead of .2. At this point, when you run the program, you should see the sphere color to be the ambient color. Set ka back to .2 after you add the diffuse and specular.
The resulting image should look something like:
Demonstrate your program in lab no later 5pm on Tues, Sept 16. No need to turn anything in (yet).
This week, you should:
Implement your CalcUVN method in the Camera class. Refer to Sect 2.2 of the Ray Tracing Notes. Use it to change the orientation and location of the camera. For example, here in World::build(), we move the camera closer to the spheres and tilt it by 45 degrees:
camera_ptr = new Camera();
Vector3D vpn(0,0,1);       //  the direction the camera is aimed
Vector3D vup(1,1,0);       //  the up direction
Vector3D camloc(0,0,-15);  //  camera location
camera_ptr->loc = camloc;  // set camera location
camera_ptr->calcUVN(vpn, vup); // compute the orthonormal coordinate system
Once you get the plane working, now implement a more challenging shape, e.g. a cylinder. Or, if you are ambitious, you might want to try an algebraic surface but remember you need to solve for it's intersection with a line so don't choose a shape that has order greater than 2 or 3.
Once you have your shapes tested, place them in different locations and vary the camera locations/orientations to make sure everything really is working properly.
Implement Shadows: To do this, do the following:
Implement reflections. This is done using recursion in the trace_ray method using the variable "depth" to control the number of recursions. You will need to calculate the reflected ray at the intersection. Do the following
The resulting image should look something like:
Part 3: Shadows only |
Shadows and Reflections |
Tilted Camera |
Demonstrate your program in lab no later 5pm on Tues, Sept 23. Before the demo, generate several images showing the different shapes you have implemented with shadows and reflections. You can save the images on Windows by using the Snipping Tool. Include at least 1 image showing that you can move and reorient your camera. Zip together the images and your codeblocks project (please delete the bin and obj folders) and submit via WISE.