|
Lab 5: Lighting & Shaders
CS 445: Computer Graphics,
Fall 2014
|


 Due Dates: 5pm, Tuesday, Nov 4
Goals
- Learn about vertex and fragment shaders.
- Learn the basics of GLSL (shading language)
- Learn how phong lighting is implemented in shaders.
- Learn how the shaders interact with the Opengl program.
- How are lights placed in the scene.
- What is the difference between Gouraud vs Phong Shading (this is different from Phong lighting!)
Resources
- Readings about shaders are be provided on gorr-classes including
slides from a siggraph workshop and several pages from Mike Bailey's Graphics Shaders book.
- Your textbook discusses shaders in Chapter 2 (starting in p. 33). It is suggested that you at least read pp 33-47 and pp 70-76. Note, we
will only be concerned with Vertex and Fragment shaders, and not Tesselation, Geometry, or Compute shaders.
Examples of vertex and fragment shaders are found throughout the book. Of most interest is Chp 7 (starting on p. 359) which discusses
using shaders to implement Phong lighting.
- OpenGL Shading Language
Questions
Go over the material discussed in class and read the above references. You should be able to answer the
following questions.
- Where does each shader fit into the graphics pipeline?
- What functions are typically done in a vertex shader? In a fragment shader?
- At a minimum, what must the vertex shader do? At a minimum, what must the fragment shader do?
- What functions are still done by the fixed pipeline and so do not need to be done in the shaders?
- What are attribute variables and uniform variables? What does "in" and "out" mean?
- What are some differences between GLSL and C or C++ ?
Part 1: Lighting and Shaders
The Base Color
- The base color of the surface may be obtained in several different ways, including:
- Using the "colors" array that you created when you modeled the object. This is what you have
been using in earlier labs.
- Using a uniform variable (model_color) which gets set when you are about to draw the object.
- Calculated in the shaders (vertex or fragment).
- Start with your Lab 4 code (make a copy of the project so you retain your original code).
In Codeblocks, open up the shader code: vertex.glsl and fragment.glsl. In vertex.glsl, there are
two lines, one of which is commented out:
Color = vColor;
Color = model_color;
You can also set Color in the shader to be whatever you want. For example, comment out both the Color lines and
add the line
Color = vec4(1,0,0,0);
You could also have made everything red (regardless of what is done in the vertex shader)
by setting gl_FragColor in the fragment.glsl to
gl_FragColor = vec4(1,0,0,0);
Adding Lights and Phong Lighting
- You are already familiar with the Phong lighting model which you implemented in your ray tracer. In this
part of the lab, we will see how the Phong lighting model can be implemented in the shaders. There are two common ways of doing this:
- Gouraud Shading - color calculations are done in the vertex shader and interpolated for the fragment shader.
- Phong Shading - color calculations are done in the fragment shader. This gives much better results.
- We will now extend your lab 4 code to include lighting. Here are the changes you need to make:
- On gorr-classes, in the folder \CS445Fa14\Lab5Materials, you will see a folder containing:
- The vertex and fragment shader files for Phong and Gouraud that you need to use for this lab.
Copy them over to the top
level of your Codeblocks project folder.
- The class that stores the lighting parameters: LightingShading.cpp and LightingShanding.h.
Copy them over to the top level of your Codeblocks project folder.
They also need to be added to the Codeblocks project. Read through the code so you are familiar with
what it contains. This class is where the lighting
parameters (colors, coefficients, specularity (called shininess)) as well as the
position of the light is stored. It is in the setUp method where the associated uniform variables
are created so they can be accessed in the shaders.
- Note, we will now make use of the normals. Remind yourself how these are set in
the separate shapes (e.g. Cube, Disk, etc) and how they are passsed to the gpu
in the createBuffers method (in GeometryBase). Normals do not transform the same as vertices.
This will not be an issue for this part of the lab, however, it may be an issue for the next depending
on how you generate your vertices.
- In Shapes.cpp, you no longer need to draw the wire frame objects because the lighting will
make the shapes easy to see. In each of the draw methods in Shapes.cpp, comment out the wire part.
In this same part of the code, do you see where we pass in a color parameter which is used to set the uniform variable model_color?
- In main.cpp:
- You need to include LightingShading.h and create a LightingShading object.
- In init(), call LightingShading's setUp method (look at setUp in the LightingShading code to see
what parameters it needs. )
- The choice of shader is set in the init() method in the line
program = InitShader( "vertex.glsl", "fragment.glsl" );
To use a different shader, just change the names that are passed into InitShader.
Try running the code, first with the simple shader,
and then with the Gouraud and Phong shaders. Can you see a difference between Gouraud and Phong?
Probably not because the location of the light is set so you can't see many highlights.
However, if you change the light position to something like vec4(10,10,-10,1) then you will
notice much more of a difference. Try it. Can you explain to yourself why there is a difference?
- If you run the program, as is, the light position as it is set in LightingShading will be
sent to the shader without any transformations applied to it. The shader is expecting the light position to be in the
eye coordinates. Thus the light position in LightingShading is interpreted as being its location
in the eye coordinates. Thus, as you move the camera around, the
light stays attached to the camera.
- It is more common to want to specify the light position in World coordinates.
So, let us now assume that the position as specified in LightingShading
is to be the light position in World Coordinates. To get this to work, you need to
transform it to eye coordinates before sending it to the shader:
- In display, calculate the light_position in the eye coordinates (think about what matrices are needed)
and send it to the shader using the glUniform command.
- Once you think you have this working properly, draw a cube at the light location so we can see
exactly where the light is located in the scene. You will have to think about what transformatins
are needed.
- Once you feel confident that the code runs and does what you expect, add code that
animates the camera so that it rotates around the y axis of the world coordinate system.
Alternatively, you could add key presses that allow you to change the location of the light.
This movement (the animation or keypresses) will enable you to really test to
make sure that the lighting is working and placed as you expected.
- Question: how would you modify the code so the light is attached to the object, e.g. as
if you had a headlight? You don't have to implement this but you should at least think about
what would change.
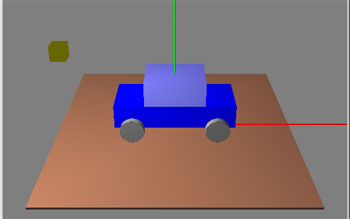
Car with Gouraud Lighting
|
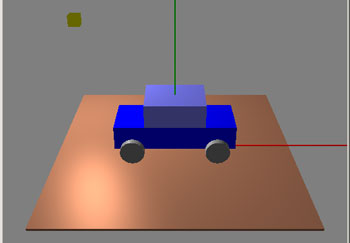
Car with Phong Lighting
|
You are not to turn in anything just yet. You will apply what you learned in this section to part 2.
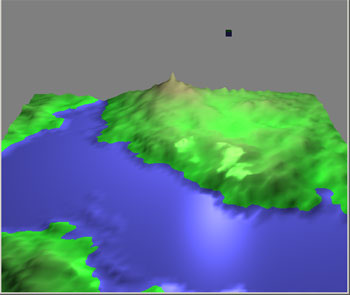
Part 2: Fractal Landscape
Before beginning, make sure you make a copy of your program in part 1. You will use it as a starting
point for the next lab (Lab 6: Textures).
Overview: This part of the lab will take some work so please get started early! A summary of your tasks is listed here:
- Create a FractalLandscapeShape class (e.g. inherits from GeometryBase, similar to what you did to create the cyclinder or disk).
To implement the FractalLandscapeShape class you need to figure out how to generate the normals. You will also
add a getColor function which calcuates a color based on an elevation (y-value). This is used to determine colors in the
color buffer of your FractalLandscapeShape.
- Use the phong lighting shaders.
- Draw your fractal landscape so you can see it in the window. It should sit at the origin of the world.
- Add a light which rotates (animates) around the scene at a fixed height (y-value) similar to what you did in part 1.
You should include a small cube at the location of the light. Include a keypress toggle which will let you stop/start the
animation so you can examine the lighting more carefully at a given light location.
- After you implement this, carefully examine the lighting to convince yourself that you have implemented everything
correctly (especially the normals).
- In the phong fragment shader, add code to calculate the color of the fragment based on
the y-elevation (passed from the vertex shader). This coloring method can be used instead of the vertex color set in
FractalLandscapeShape. Compare the quality of the two coloring methods.
A Few More Details:
Download the zipped file containing the files
FractalLandHeights.cpp and FractalLandHeights.h, which will generate a height map, i.e. a
2-dimensional grid of values that
represent heights (the y-value) on a square grid (x and z). Read the comments at the top of
FractalLandHeights.cpp to see what it does and how the heights are stored.
Create a new class e.g. called FractalLandShape (along the lines of the Cube or Disk) which takes
the heights and generates a list of triangles (vertices) and normals. Think
about how to calculate the normals efficiently. Note, the normal at a vertex needs to be the average of
the normals of the surrounding triangles. Think carefully how best to do this. Work it out first with pencil and paper.
We will also discuss this in class.
The colors should be stored in your FractalLandShape class as a colors array (the Color buffer).
To do this, add a getColor function which calcuates a color based on an elevation (y-value).
It can be called to compute the color for a given vertex.
Later, you will implement the color in the shader.
In main.cpp, create a new FractalLandShape object and render it. Include a light source which animates in a
circle (centered at the center of the landscape) and at a fixed height. The position should be such that it clearly
lights up the landscape from above at different angles. Include a keypress toggle so that you can stop/start the
movement of the light.
Include a cube that sits at the light location so you know exactly where the light is.
Moving the light will help you test whether your normals and light location are
set properly.
Once you are confident everything has been done correctly. Modify your vertex and fragment shaders so that the
color is calculated in the shaders based on the vertex's y-value. GLSL has some nice smoothing functions
which you can use. The y-value needs to be extracted in the vertex shader and passed to the fragment shader.
In the fragment shader you need to compute the color based on this y-value (much the way you did it in the
FractalLandShape class.
Compare the coloring that results when using the color buffer versus the shader. Which is better and why?
Demonstrate your program in lab no later than 5pm on Tuesday, Nov 4. It should show your
fractal landscape with the animated light source that can toggle to stop/start. The landscape should
have a color ramp (e.g. blue for water, white for snow peaks, etc) implemented in the shaders.
Zip together your codeblocks project (please delete the bin and obj folders) and submit via WISE.
