Lab 8: Animation Production
IDS252: 3D Animation,
Spring 2018
The goal of this lab is for you to collaborate with 2-3 other classmates to write and produce a complete 1 minute animation based on the stories developed in Lab 7. You will also be collaborating with several students in a music class taught by Professor Mike Nord. Good communication with your group members and with the muscians is very important.
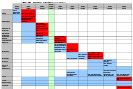
The schedule is given in the gantt chart. Items in red are hard deadlines. Critiques will be held on these dates and groups are expected to have indicated items completed. Each individual in the group is expected to demonstrate their contribution to this completed work.
Story, StoryBoards, and Storyreel: In Lab 7 you developed a one minute story. The first task for Lab 8 is to create a storyreel. It is important to try to get the storyreel timing as close as possible both for the sake of the music students and also for the people in your group doing layout/animatics. A lesson learned by previous groups is that it pays to get as much detail (timing, camera angles, story line) worked out as possible at the storyreel (and animatics) stage. You save time in the long run.
Shot List & Task List: Each group should fill out a Collaboration Form which will contain the story summary along with the task and shot lists.
The tasks should be assigned in a way so as to insure that each group member has something to do in any given week. Note that everyone should do some of the animatics, and the animation.
Based on the storyreel, each group should fill out the scene/shot list for the animation. Each member of the group should be assigned several of these shots and be responsible for the making sure they are completed.
The Collaboration Form should be placed on cs-render in the lab 8 group folder for this animation. If changes are made to the shot or task list, please make sure this form is kept up-to-date.
Music students will generally be assigned to each group sometime between the storyreel and animatics phase. Be certain that everyone (animators and musicians) exchange contact information. Once the musicians are assigned, animators must not change the high level timing without consulting first with the muscians. If any animations involve dance scenes, the animators should ask the musicians for a click track.
Concept and Reference: As the story is being developed, individuals in the group will begin to work on the look and feel of the characters and scene. Collect or take photos of actual items. Reference materials should be collected and placed on cs-render in the lab 8 group folder for your animation.
Scene and Props: Once the "look" of the animation has been decided and the reference materials have been collected, work can begin on the scene and prop modeling in Maya. If there are any special effects, the special effects person can start to learn about how to generate them.
File Referencing: You should be using file referencing for the environment and character models for ease of editing and to insure consistency across shots. Make sure referenced scene files are cleaned up before you do the referencing (name objects, delete history, delete unused objects, name materials, freeze transforms, group objects, set pivots, etc)
Maya Scene Files: In general, keeping all of your Maya files organized will save you time and headaches. So, as discussed above in File Referencing, don't forget to cleanup all of your scene files before animating/referencing. It helps to constantly monitor the outliner for clutter.
Character Modeling and Motion Testing: Character modeling (or search for already rigged characters) can also begin once the "look" is decided and reference materials collected. If you create your own characters, movement controls should be added and motion tests should be done to make sure the model can do the movements needed in the animation.
Layout/Animatics: Once the characters and props are mostly completed, the group should begin to create the layout/animatics. This will be done in Maya and should focus only on the high level character motion and camera work. There will be many changes made to the animatic so do not waste your time on detailed and time consuming motion that will only have to be redone. As shots of the animatic are completed, they should replace the storyboard image in your Adobe Premier Elements project and a new quicktime file should be generated.
Timing: Once the animatic is complete, we will probably pitch the stories to the musicians. Once musicians have been assigned to the animation groups, make sure they are aware of any timing changes. Keep them in the loop about the latest quicktime versions. Also, let them know how much time will be added for the title and credits so they can plan the music accordingly.
Animation: This is the most time intensive part. Everyone in the group should animate the shots they have been assigned. Follow the pose-to-pose method. As portions are completed and rendered, they should replace the appropriate sections in your Adobe Premier project. Once the animation is complete, YOU CANNOT MAKE ANY CHANGES to the animation without first consulting with the musicians to make sure it won't louse up what they have done so far.
Lighting, Shading, and Textures: As the above tasks are being done, someone in the group can be doing some experimentation with the lighting, shading, and textures. Since the lighting is often so dependent on the animation and camera position, it should not be started in earnest until the animation is complete. Make sure that the lighting is consistent from shot to shot.
Title and Credits: Add your title and credits. The title should be no more than a couple of seconds and the credits should be no more than 5 seconds. Be sure to add the names of the musicians. If you have several musicians doing separate scores, then you will have multiple copies of your animation, each with different music and credits.
Rendering: The final render should be done using a higher value for the "Overall Quality" settings in Mental Ray.
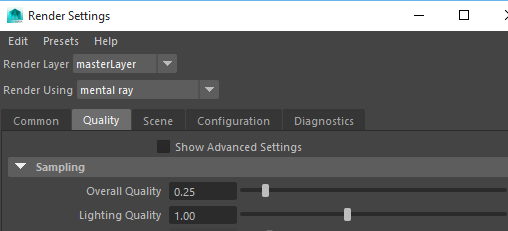
The default value is .25. You might try somewhere between .5 and 1 instead. Do some tests to see what is the best setting.
The final image size should be HD720. Render to png format (warning, if you use Mental Ray Sun & Sky, you may have alpha channel issues where the background does not show up).
Do some testing ahead of time to estimate how long the rendering will take when you are at full resolution and quality. Make sure plenty of time (several days or a week) is allowed to do the final render. Use the renderfarm but remember that, as the deadline approaches, all the groups will be competing for renderfarm time.
In addition to assigning people to the various tasks (story, lighting, shading, etc. ), each group should have a:
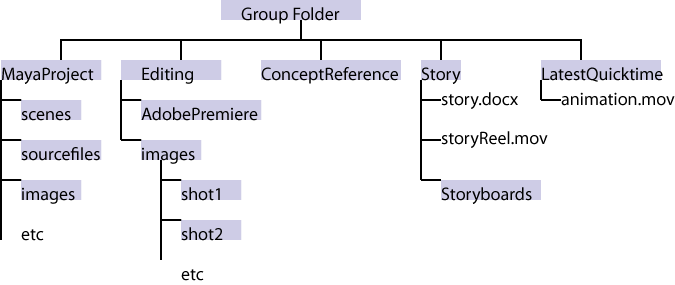
As you know, keeping the group's Lab 8 folder organized is important. For example, it is strongly recommended that you have separate top level folders for the 1) story (text, boards, and reel), 2) concept & reference, 3) the Maya Project, 3) the Editor (e.g. for finished images and Adobe Premiere), and 4) a LatestQuicktime (e.g. for musicians). :
It is best if there is only one Maya
Project on cs-render for the entire group. If students need to work on their own machines, it may be necessary to copy over a temporary version of
the Maya project to their own machines. In such cases, please be sure that the edited files are copied back to the project folder on cs-render. Version
control can be a challenge.
The instructor relies, in part, on the status reports to evaluate what each student in the group did.
Status reports should be completed every Friday, starting on Mar 16 and continuing through April 27 (see gantt chart).
Due Date: All of the items below should be
completed by the presentations on Saturday, May 5, 2-5pm:
Group Reflections: In preparation for the final presentation, each group should write
a document addressing the items below. The group presentation will be a summary of this document.
An electronic copy should be placed on cs-render in the group folder in
a file named GroupReflections_GroupName.docx.
Status Reports
Final Deliverables
![]()
![]()
![]()
![]()
![]()
![]()