The goal of this lab is for you to collaborate with 2-3 other classmates to write and produce a complete 1 minute animation. The animation should, e.g. tell a story, express an idea or opinion, or teach a concept. You will also be collaborating with several students in a music class taught by Professor James Miley. Good communication with your group members and with the muscians is very important.
For a detailed day-by-day schedule of what groups are expected to be doing, please consult the links in the weekly schedule as they are made available.
There will be weekly critiques. Each individual is expected to have some work completed. Failure to have anything to show will be reflected in your individual grade for the project.
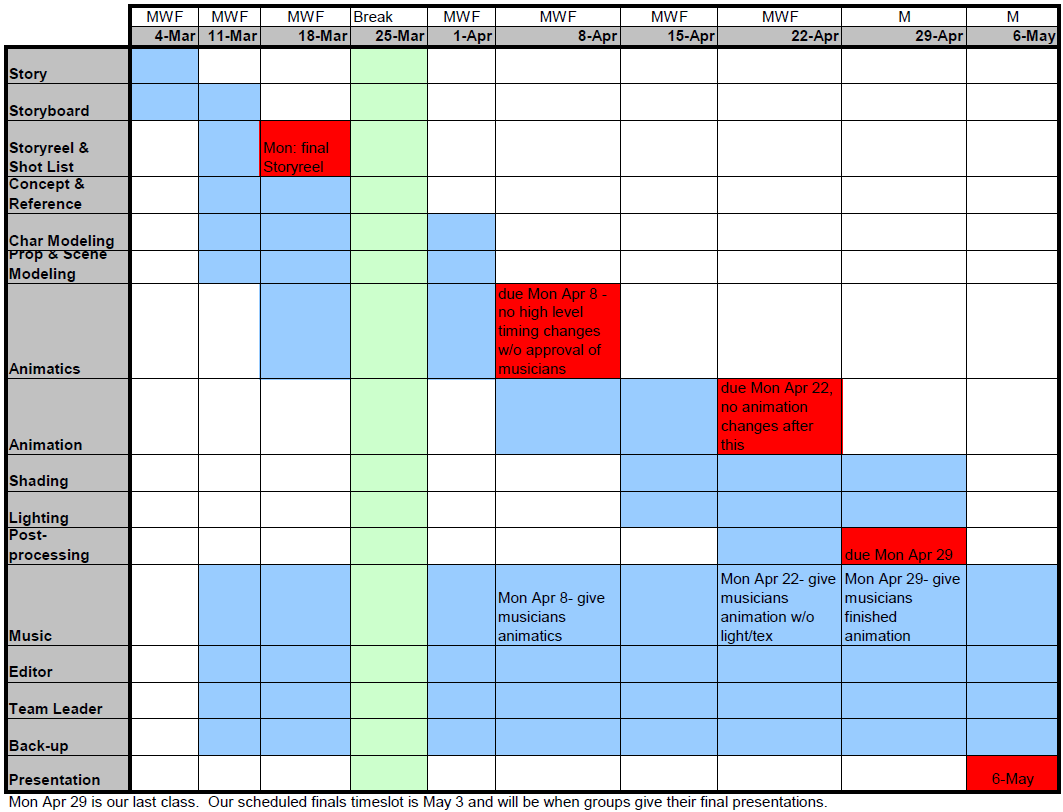
For a high level overview of the schedule, see the gantt chart below. The dates in red are hard deadlines. Groups must have the indicated items complete by this time. Failure to complete these items will be reflected in the group's grade for the project.
Story, StoryBoards, and Storyreel: In Lab 7 you developed a one minute story. The first task for Lab 8 is to create a storyreel. It is important to try to get the storyreel timing as close as possible both for the sake of the music students and also for the people in your group doing layout/animatics. A lesson learned by previous groups is that it pays to get as much detail (timing, camera angles, story line) worked out as possible at the storyreel (and animatics) stage. You save time in the long run.
Assign Tasks: The gantt chart below contains the dues dates and approximate time span of each task. Each group should fill out a task list (excel file) to identify who will to do what. The tasks should be assigned in a way so as to insure that each group member has something to do in any given week. The task list should then be placed on cs-render. Note that everyone should do some of the animatics and the animation.
Music students will generally be assigned to each group sometime between the storyreel and animatics phase. An email group will be established for each group and will be used to maintain communication between animators as well as musicians. Once the musicians are assigned, animators must not change the high level timing without consulting first with the muscians.
Shot List: Based on the storyreel, each group will create a written scene/shot list for the animation. Each member of the group will be assigned several of these shots and will be responsible for the making sure they are completed. The shot list should have a form along the lines of (e.g. download shotList.xls excel file)
| Scene # | Shot # | Maya Scene File | Reference Files | Length | Start Frame | End Frame | Animator | Description |
| 1 | 1 | opening.mb | char1.mb, env1.mb | 2 sec | 1 | 60 | Mary | Opening scene - Frog enters room |
| 1 | 2 | opening.mb | char2.mb, env1.mb | 1 sec | 61 | 90 | Frank | Frog jumps on sofa |
| 1 | 3 | television.mb | char1.mb, env2.mb | 5 sec | 1 | 150 | Sarah | Frog watches TV |
| 2 | 1 | kitchen.mb | char1.mb, char2.mb, env3.mb | 10 sec | 1 | 300 | Mary | Baby frog gets in fridge |
The shot list should be placed on cs-render in the lab 8 group folder for this animation.
Concept and Reference: As the story is being developed, individuals in the group will begin to work on the look and feel of the characters and scene. Collect or take photos of actual items. Reference materials should be collected and placed on cs-render in the lab 8 group folder for your animation.
Project Organization: Keeping the group's lab 8 folder organized is important. For example, it is recommended that you have separate top level folders for the 1) story (text, boards, and reel), 2) concept & reference, 3) the Maya Project, 3) the Editor (described below), and 4) a LatestQuicktime (described below). Also see readme.txt
Scene and Props: Once the "look" of the animation has been decided and the reference materials have been collected, work can begin on the scene and prop modeling in Maya. If there are any special effects, the special effects person can start to learn about how to generate them.
Character Modeling and Motion Testing: Character modeling can also begin once the "look" is decided and reference materials collected. Movement controls need also to be added. Sample motion can be tested.
Layout/Animatics: Once the characters and props are mostly completed, the group should begin to create the layout/animatics. This will be done in Maya and should focus only on the high level character motion and camera work. There will be many changes made to the animatic so do not waste your time on detailed and time consuming motion that will only have to be redone. As shots of the animatic are completed, they should replace the storyboard image in your Adobe Premier Elements project and a new quicktime file should be generated.
Timing: Once the animatic is complete, it should be given to the musicians. At this point, YOU CANNOT MAKE ANY CHANGES TO THE LENGTH of the shots or HIGH LEVEL MOTION without first consulting with the musicians to make sure it won't louse up what they have done so far. Also, let the musicians know how much time will be added for the title and credits so they can plan the music accordingly.
Animation: This is the most time intensive part. Everyone in the group should animate the shots they have been assigned. As portions are completed and rendered, they should replace the the appropriate sections in your Adobe Premier project.
Lighting, Shading, and Textures: As the above tasks are being done, someone in the group can be doing some experimentation with the lighting, shading, and textures. Since the lighting is often so dependent on the animation and camera position, it should not be started in earnest until the animation is complete. Make sure that the lighting is consistent from shot to shot.
Title and Credits: Add your title and credits. The title should be no more than a couple of seconds and the credits should be no more than 5 seconds. Be sure to add the names of the musicians. If you have several musicians doing separate scores, then you will have multiple copies of your animation, each with different music and credits.
Rendering: The final render should be done using Production Quality (for the Maya Software renderer) or high quality settings (Mental Ray). The size should at least be 720x480. Render to png or tiff format. Make sure plenty of time (several days or a week) is allowed to do the final render. Use the renderfarm!
All project material, sample images and animations, references, etc for the entire project will be kept on cs-render. See readme.txt for rough idea of what goes in the group folder. In addition to assigning people to the various tasks (story, lighting, shading, etc. ), each group should have a:
Each group will have their own email group. Once a week (Mondays), each student should email their group with the following:
Status reports should not take you more than 10 minutes or so to complete. However, it is important that you are as specific as possible regarding the names and locations of the files you worked on.
The status report will be used throughout the semester to assess where things are with the group. At the end of the semester, these status reports will also be used to help with evaluation of each person's individual contribution. WARNING, if you don't send a status report, you may not be credited with doing the work you did.
Note, at the end of the semester, each person in the group will write an evaluation of themselves and the others in the group. This evaluation will be confidential.
Due Date: Except where noted, all of the items below are due on May 6, during the presentations:
Group Reflections: In preparation for the final presentation, each group will write-up a summary of the following. This will be turned in at the end of the presentation.