Lab 5: Creating an Animation Loop with Music
IDS252: 3D Animation,
Spring 2015


Due Date: Tues, Feb 24, before the beginning of class.
Evaluation Sheet (pdf)
Goals
- Continue practice using keyframes
- Learn how to import and respond to sound.
- Learn about path animation, skeletons, forward kinematics, inverse kinematics.
- Deliverables: A 10 second animation loop that responds to a 10 second sound loop. Place in
the designated folder on cs-render. See Evaluation Sheet (pdf).
Files and Folders
- When you create a new project for the animation, place it on the cs-render drive in the folder:
\IDS252Sp15\Lab5\MayaProjects\your_name. Be sure to follow the
directions for creating folders and setting parameters.
- When you have completed the lab, please move your final animation
over to the folder: \IDS252Sp15\Lab5\FinalAnimations\
- Make sure that the name of your final animation is named in a similar manner as in previous labs.
Reading
- Experiment more with camera cuts but, before you do, you should read about the "line of action" and maintaining continuity. See chap 8 in the readings in folder
\IDS252Sp15\IDS252Resources\booksExcerpts\StoryBoarding
- If you do want to use camera cuts, you might want to organize your shots using Maya's camera sequencer and ubercam. Go to Maya help
to read about these. Otherwise, you must manually do a separate batch render for each camera sequence.
- To learn about the power of sound to help tell a story, read
Designing a Movie for Sound by Randy Thom
Digital Tutors
The following tutorials are suggested:
- Quick Start to Animation in Maya Volume 2
- Lesson 3: Path Animation This gives a quick introduction to path animation
- Lesson 2: Animating with constraints Constraints provide powerful but simple way to control/constrain behavior. These include
parent constraints, orient constraints, point, constraints, etc. This
tutorial demonstrates using a parent constraint.
- Maya Rigging Reference Library Deformers
Deformers provide powerful but simple way to animate or alter the geometry of objects. Examples include
such things as parent constrains, bend deformers, squash and stretch deformers, etc. This tutorial contains lessons that
demonstrate a number of them.
Maya Tutorials
In Maya, go to Help → Tutorials.
Click on the link Getting Started with Maya 2015. In the contents,
click on Getting Started with Maya, and then Animation.
Do the following lessons:
- Lesson 3: Path animation. You will need the file PathAnim.mb. Download and place it into your project's scenes folder.
- Lesson 4: Inverse Kinematics.You will need the file IK_MechArm.mb. Download and place it into your project's scenes folder.
The above tutorials will not be collected.
10 Second Animation Loop
Project Setup: Your project should have settings as described in the
directions here.
Music Assignments: When these become available, you will be able to find your 10 second music loops in the
folder \IDS252Sp15\Lab5\MusicLoops.
Your assignment will be made once they music files are available:
| Music File | Animator |
| audeo_loop1MG.aif | Jalal, Jordan |
| Audio Loop 1 KF.aif | Audrey |
| Audio.Loop1NW.aif | Kristian, Anastasia |
| Audio_loop1CJT.aif | Nathan, Ariel |
| Audio_Loop1DC.aif | Alexa, Sebastian |
| Audio_Loop1JB.aif | Nicole |
| AUDIO_LOOP1KH.aif | D'Angelo, Muir |
| AUDIO_LOOP1LS.aif | Teddy |
| Audio_Loop1MKD.aif | Hyakub |
| AUDIO_LOOP1PS.aif | Ruvim |
| AudioLoop1 NS.aif | Jessa |
| Audioloops1MAB.aif (use only first 10 sec) | James |
| AudioLoop 1 PM.aif | Ashley |
| Audio_LoopGL.aif | Cajsa |
You may select another music file or swap with someone. The only requirements are 1) each music file must be
assigned at least one animator and no more than 2 animators and 2) you must get approval from instructor before making a change.
-
Loading Music into Maya:
- Copy your sound file into your project and place it into the "sound" folder.
- Below are the key things that you need to do to work with sound:
- If you haven't done so already, remember to set the frames-per-second (fps) to 24 and the "Playback Speed", select "Real-time (24fps)".
Note, if you don't select "real-time", you won't be able to hear the sound.
- To load in a sound file, go to File;Import... from
Maya's main menu. Select the sound file you copied into your project folder (if your project is not set, Maya will
place you in the wrong folder. You should always set the project).
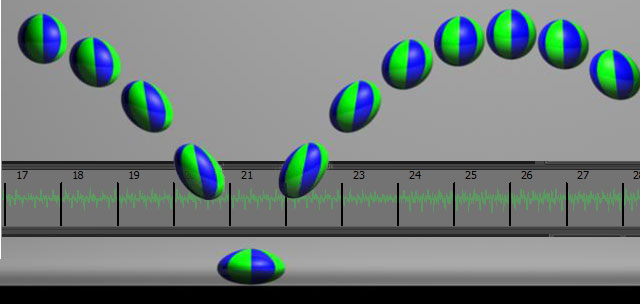
- To see the sound wave in the timeline at bottom of
Maya window, right click on the timeline, choose Sound, and select the name
of your sound file.
- You need to expand the time range slider so you can see the entire sound wave. To do this,
right click on the time slider and choose "Set Range to → Sound Length". The length should be
very close to 240 frames if the sound is 10 seconds long. If it isn't exactly 10 seconds long, use whatever length the sound is.
- More detailed directions for importing sound files can be found in the Maya Help (do a search on "Add audio to your animation").
-
Creating Your 10 Second Animation Loop: Listen to the sound multiple times to develop a sense of the movement and feeling of the music. Based on this,
create an animation that is your response to the music (remember, there is no right or wrong).
As in the last lab, your animation should be a loop, i.e. it's end should transition seamlessly back into the beginning. Be prepared to
discuss how you applied at least several of the animation principles listed below. Refer to
UW Principles for detailed explanations.
- Squash & stretch
- Anticipation
- Staging
- Follow-through
- Overlapping action
- Slow-in, slow-out
- Arc vs linear motion
|
- Secondary action
- Timing
- Exaggeration
- Knowledge of technique
- Observation and translation
- Appeal
- Imagination
|
-
Combining Sound and Animation: When you render the frames in Maya, the sound is not attached. You must
combine the frames and the sound separately. To add sound to the final quicktime animation, you will need to load the sound
file into Adobe Premier along with the image frames. The frames are dragged down to the video track and the audio needs to
be dragged down to the audio track. Make sure the video and audio are properly aligned. Generate the quicktime as you did in the last lab.
(See directions)
Evaluation
Before class on the due date listed above, place your final animation (in quicktime format and with sound attached) on cs-render in the folder
\IDS252Sp15\Lab5\FinalAnimations. Your Maya project should be in the folder
\IDS252Sp15\Lab5\MayaProjects.
Animations will be graded based on the evaluation questions
discussed during the critique (see link at top).
