Lab 1: Planar Composition
IDS360: 3D Virtual Sculpture,
Spring 2012


Due Date: Mon, Jan 30, before the beginning of class.
[Objectives]
[Description and Directions]
[Compositional Hints]
[Material Requirements]
[Evaluation]
[Introduction to Maya]
[Creating a Shape in Maya]
- To introduce students to the sculptural possibilities of non-traditional materials in general, and cardboard specifically.
- To familiarize students with the basic concepts of three dimensional design
- To make students aware of the possibilities of non-representational sculpture
- To develop students' understanding of Maya's interface and basic modeling tools.
- To familiarize students with our shared network drive (cs-render) and how Maya files and projects are named and organized.
- To present techniques for transferring a composition from the physical to virtual environment.
Design a monochrome, non-representational composition that uses planar forms only. You will build the composition first
using cardboard, and then on the computer.
Step 1 - Software (Ford 202): Begin by doing a tutorial to familiarize yourself
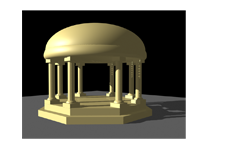
with the Maya software. See the directions below. When done, you are to place your final image of a temple
on cs-render in the folder IDS360/Lab1/TempleImages.
You do not need to turn in any other Maya project files for the temple.
Step 2 -Design (Ford 202): The composition should have a clear focal point,
should use both rectilinear and curvilinear form, and illustrate at least two other elements of concepts listed in the
handout "Elements and Concepts of 3-D Design". The composition should be monochrome and non-representational. Begin by making sketches
on paper to design your composition. For building on the computer, you will need to include at least 2 orthographic
sketches of your design on 8.5x11 in pages, e.g. front and side. Both need to be drawn to the exact same scale.
Step 3 - Building in Cardboard (Gatke B1): Once your design has been approved by the instructors, make a small maquette (model)
from recycled cardboard (no larger than 10"), before beginning to design the form on the computer. The final composition
should be unified, balanced, asymmetrical, avoid frontality, and make effective use of negative space. You are
encouraged to create your design on the computer, e.g. in Adobe Photoshop or Adobe Illustrator (both are on the lab computers).
We also have several drawing tablets that you may use (you need to get the drawing stylus from Prof Orr). These images can later
be brought into Maya to help you model your shapes and overall composition.
Step 4 - Building in Maya (Ford 202): After you have completed your cardboard maquette, you will
build the composition on the computer.
Begin by creating a new project on cs-render in the folder
IDS360Sp12/Lab1/Projects/your_login_name. All of your work should reside in this folder.
To create a single shape, see the directions below. We will also go over how to do this in class.
Once you have all of the shapes and scaled them to the right size, you need to assemble them into your composition.
It may be best to
load into Maya two orthographic reference images of the overall design.
When done, add lighting and shadows. Add a new perspective camera to select a view.
Step 5 - Rendering: Render your final scene from at least two distinct viewing positions and place on cs-render in the folder IDS360/Lab1/FinalImages.
Use the naming convention similar to what you used for the temple:
your-last-name + underscore + cardboard + underscore + view# + .jpg
For example orr_cardboard_view1.jpg
- Place the focal point off-center to avoid a static composition.
- The use of prominent diagonal forms tends to make a composition more dynamic.
- The repetition of curved forms can create the effect of movement.
- Juxtaposition of different types of forms (curvilinear vs. rectilinear, concave vs. convex, etc.) can make a composition more interesting.
- When forms are designed to obviously accommodate one another (by going through or around each other or clearly reflecting, echoing or repeating each others shape) they will appear much more unified.
- Avoid frontality
- A skilled designer can even use negative space as a focal point.
- Make optimal use of negative space
Most of the tools and materials for this project will be supplied by the instructor, but you will need the following:
- Cardboard (new or used)
- Masking tape (to hold sections in place while they are being glued; there should be no masking tape showing in the final product)
Evaluation of this lab will be based on the following criteria (pdf)
Mac vs PC Keyboard: Click here for info on the Ford 202 dual boot computers and keyboards.
Preliminaries:
-
Open up Maya 2012
-
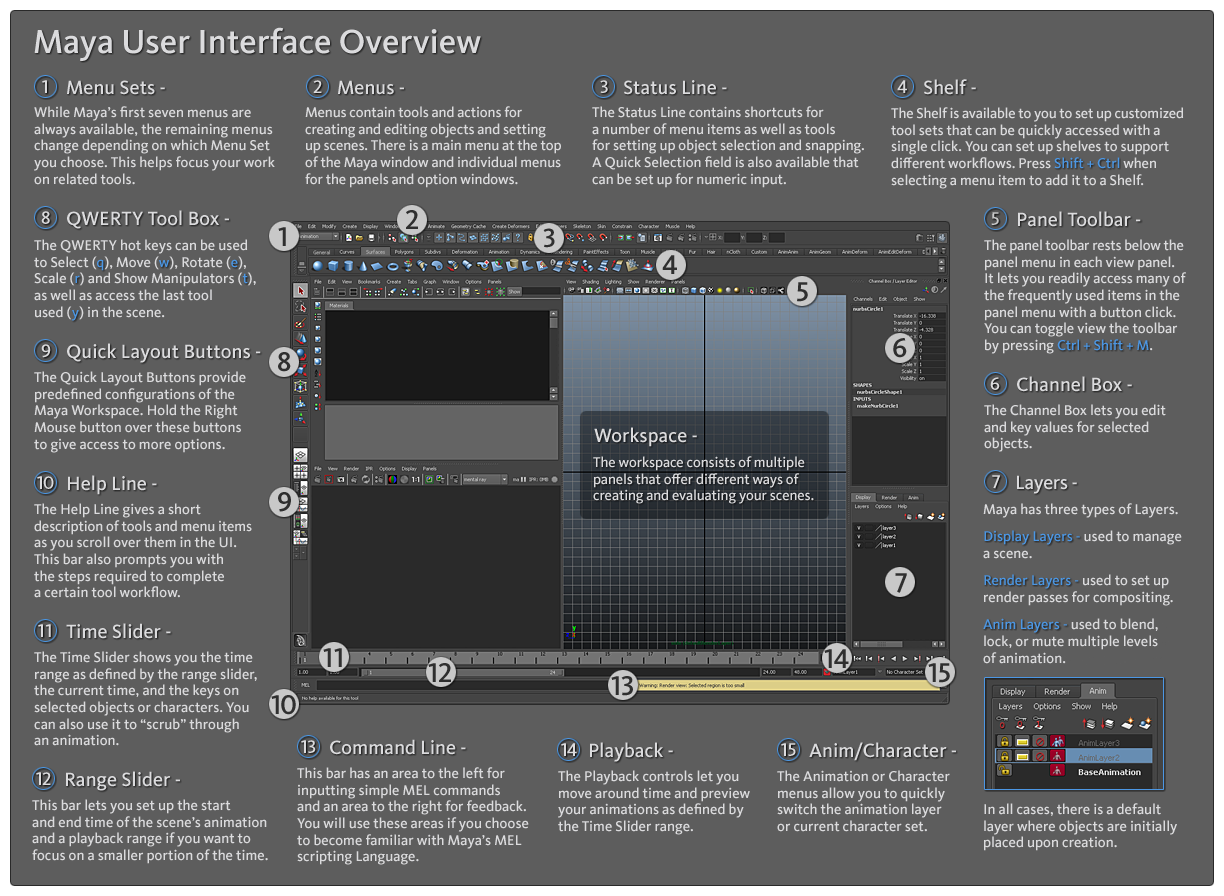
Learning the Interface: An overview of the interface may be found
here. Become familiar with the terms used to refer to the different parts of the interface, e.g. Menu sets, Status line, etc.
-
Getting Help: It is important to become familiar with the online help. You will make constant use of it
over the course of the semester. For example, in Maya, go to Help->Maya Help (F1) (or just click
the link here). Under the Contents, select
User Guide -> Basics -> Interface overview -> 3D coordinates to read about the Maya coordinate system. Read more about the
Maya interface in the Maya Interface section. Poke around to explore what else is available.
-
Navigation: To do this part, it is best to have headphones. If a window titled Essential Skills Movies does not appear automatically,
click on the menu Help;Learning movies. Take
a look at movies 1 through 5 (i.e. "Zoom, pan, and roll" through "Discover secret menus"). As you watch, try things out in Maya
itself.
Location, location, location: Organizing and keeping
track of files on your computer is critical! For this tutorial, you can just use your H-drive to store your Maya project.
Begin by creating a folder on your H drive called ids360.
Within this folder, you will create and store your Maya
project for the temple tutorial (explained later).
For your final composition, and to submit your completed images, you will work on the cs-render server. (also explained later)
Making a Project in your working folder: A Maya project is
simply a folder or set of nested folders where all the files
are stored. Projects are important to create because
when you save or render maya scenes,
a number of different files are generated and saved. If you have
created and/or set a
project, all of these files will be saved into the project folder, otherwise it is anyone's guess where many of these
files will end up.
For this lab, you should follow the directions given in the tutorial for creating a project.
Note, everytime you open up Maya
you should set (or create) the project!!
To set the project, select the menu: File -> Set Project ....
To create a new project, select the menu: File -> Project Window.
- Downloading the Tutorial Files: In Maya, go to Help -> Tutorials. Go to the
Maya 2012 section and download Getting Started 2012 Lesson Files (zip - 87695Kb)
to your H:/ids360 folder. Unzip them (ask, if you don't know how). These are the
files you will be using for all of the online tutorials. You will not actually need any of these files for
this first lab, however, it is useful to download them now for future use.
Temple Tutorial:
- Tutorial Instuctions:
Go back to page Help -> Tutorials,
click on the link Getting Started with Maya 2012 and then go to Getting Started with Maya -> Maya Basics -> Introduction .
Follow the directions for making the temple (lessons 1-4). In the end, you should have a model of a simple temple.
In class, we will go over how to add a light and turn on shadows.
Render the Temple: Rendering means taking the scene you
have created, choosing a camera, and generating an image file from that
scene
as described below:
- Choose the perspective camera by clicking on the perspective
window. Maneuver the camera in this window so that you are looking at a
nice view of the temple.
- Go to the menu Window -> RenderingEditors -> Render
Settings... and do the following:
- Choose the Image Format
to be JPEG (jpeg).
- Set the "Image Size; Presets" to 640X480.
- Select the Maya Software tab. Set Quality to
Production quality.
- Close the Render Settings window.
- To actually render the image, you must click the
render button
 on the toolbar in Maya (ask if you can't find it)
- When you render the image, Maya will save the image in the
project folder (you may need to look in the folder tmp or images/tmp within project). Note, if it isn't there then the project was probably
not set correctly.
- Change the filename of the image so that it is a concatentation of your last name, an underscore, and the item, for example
orr_temple.jpg.
cs-render: To access the shared network drive called cs-render, see
directions here. Once you have opened cs-render, copy your temple jpg file from your project folder to the cs-render folder IDS360Sp12/Lab1/Temple.
- Start Maya and create (or set) the project (it should reside on cs-render in the folder IDS360Sp12/Lab1/Cardboard/your_login_name.)
- Work in an orthographic panel (e.g. front, side, top).
- If you have an image of your shape, place the image
on an image plane for the chosen panel.
- You will use the image plane as a reference for drawing a CV curve. To create the curve,
make sure that the Surfaces menu set is selected.
Then select the menu (make sure you click on the box ◻)
Create → CV-Curve Tool ◻
In the options box, click the Reset Tool button.
- Create your shape by following along the reference image. If you want a "hard corner", place
three CVs exactly on top of each other. You might want to turn on snapping to help you
create a precise shape. In any case, you can always move the CVs later on after creating the curve. You can
also insert additional CVs. Once you are done adding CV points, hit return to finish the curve.
- You now need to close the curve. In the Surfaces menu set, go to
Edit Curves → Open/Close Curves ◻
In the options box, click the Reset Tool button. The best choice for the Shape
option (Ignore, Preserve, or Bend)
will depend on your curve. Try one and if it doesn't look right, undo and try a different one.
- Move around the CVs so that you get a good match for your shape. To do this, right-click on the curve and
select Control Vertex. Select a CV and use the Move Tool to move the CV around.
- To convert from a curve to a solid shape, select the curve, and go to
Surfaces → Bevel Plus ◻
In the options box, click the Reset Tool button.
Select Convex Out as the choice for the Outer bevel style.
Click on the Output Options Tab and select Polygons as the output.
You may need to increase the number of Along Curve: Span Samples to something larger than 6 if
the resulting shape is too jagged. Try it first with 6 and, then redo with a larger number if you need to.
Once the options are set, click the Bevel button to create your shape.
- Cleanup: Keeping the scene files clean and uncluttered is critical!!!
- Before cleaning up, make sure you have a back-up copy saved somewhere.
- Delete History (menu Edit -> Delete by Type -> History). Delete the CV curve and anything else that is around and which you won't need anymore.
If you aren't sure, check what is listed in the Outliner (menu Window->Outliner)
- Set the pivot to the center (menu Modify->Center Pivot) or to a location that makes transforming easy to do.
- Scale your shape to the desired (or approximate) size.
- Move the shape to the origin.
- Freeze Transforms (menu Modify -> Freeze Transformations)
-
Rename your shape to something more meaningful.
- Save.
Click here for more detailed cleanup list.
- Lighting. Once you have the completed sculpture, add a ground to your scene (e.g. create a Polygon plane, scale to an appropriate size). To add
lights, see Maya help.
It is recommended that you add either a point light or directional light. In the Attribute Editor for your light,
find the Shadows section. Check the "Use Depth Map Shadows". Render the image to see what the shadows look like.
If the shadows are too dark, change the "Shadow Color" from its default setting of black to a gray color using the slider.
Alternatively, add an ambient light and decrease it's intensity from 1 to around .2 or .3. Do not turn shadows on for this ambient light.
If the shadows for your point or directional light are grainy, you can try increasing their Depth Map's "Resolution" from 512 to 1024 and increasing the "Filter Size" from
1 to 2 or higher to produce a softer shadow.
Models are generally created each within their own scene file and then later all imported into a single scene file.
For this lab, it may be easier to create the shapes all in one scene file. However, if things start to get cluttered,
you should consider creating shapes in separate scene files.
