Lab 3: Functions and Animation
CS145: Images and Imagination,
Fall 2010
[previous lab][schedule][next lab]
Due Date:
Sept 22 at midnight. Note, this assignment will graded as pass/fail (10 pts).
Reading
- Text: Chapters 5: Response (repeated from last week)
- Text: Chapters 7: Motion (only read up to p. 104)
- Text: Chapters 8: Functions
- Online: Trigonometry Primer I (Optional, for now)
Summary of Goals
The main goals of this lab are to understand:
- how to structure programs using functions.
- how to create an animation.
- how to use if-else statements (also called conditional statements)
Suggested Folder Structure
On your H-drive, in the CS145 folder, create a new subfolder called Lab3. In this folder, create two subfolders, one named Practice, and the other named Lab3Final.
Save all of the practice sketches for this lab into the Practice folder. In the Lab3Final folder, save all of the sketches that you plan on submitting.
Practice Activities
The setup() and draw() functions:
Go through the examples in the Chapter 5 of the text (up to p. 58) so that you
understand how the setup() and draw() functions behave. Make small variations to see what happens.
The if-else statement:
Continue to work on the examples in Chapter 5 (up tp 67). This describes the use of the if-else statement.
Bouncing Ball Animation:
This is an example of an animation where the user has no control over the movement. Rather the
program automatically generates the movement.
Copy and past this into a Processing sketch. Run the program to see what it does. Your task is to
understand each line of code and what it does. Test your understanding by making small
changes. Try to predict what will happen before you run the code.
What do you need to do
to add a second ball?
// Creates a single black ball that bounces
//  off the sides of the window.
float x,y;         // ball position
float dx,dy;       // ball position update values
float radius = 10; // radius of the ball

void setup() {
  size(400,400);
  //fill(0);

  // inital position of ball
  x = width/2  + random(50);
  y = height/2 + random(50);

  // amount by which the x and y positions will be updated
  dx = random(-5,5);
  dy = random(-5,5);
}

void draw() {
  background(255);  // clear the window.
  x += dx;  // update the x position
  y += dy;  // update the y position
  if (x < radius  || x > width-radius) dx = -dx;  // bounce on sides
  if (y < radius  || y > height-radius) dy = -dy;  // bounce top/bottom
  ellipse(x,y,2*radius,2*radius);  // draw the ball
}
|
You can add a more interesting background by writing your own background function. For
example, add the following function to the above code.
void myBackground() {
  colorMode(HSB, width);
  for (int i =0; i < width; i++) {
     stroke(i,width,width);
     line(i,0,i,height);
  }
  colorMode(RGB,255);  // return to the original colorMode
  stroke(0);           // return to original pen color
} |
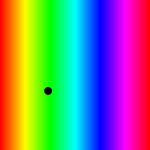 |
This function, when called, will draw a rainbow (as was done in lab 2). To add this as a
background, replace the line
background(255); // clear the window.
myBackground();
Saving an Animation as a Quicktime Movie:
In this lab, you will be turning in a 10 second quicktime animation movie. This movie will be
given to students in a digital music class to score. In a few weeks, we will get together
with these students to watch and listen to what was created. In this portion of the lab, we go over
how to generate the quicktime movie from a Processing animation.
Instructions:
- Open up Processing and save a blank sketch to your Lab3/Practice folder.
- Cut and paste the following into this sketch.
Note, This is an example of an animation where the user controls the movement.
void setup() {
  size(400,400);
  // This will initialize the movie:
  // movieSetup();
}

void draw()
{
  fill(random(255),random(255),random(255));
  rect(mouseX, mouseY, 40, 40);

  // This will save a frame to your movie:
  // makeFrame();
  delay(50);
}
|
Run the code to see what happens. You will need to move the mouse around the window.
-
Now, un-comment the two lines
containing the commands movieSetup() and makeFrame().
-
Next, in the processing window, you will see a small arrow in the
upper right:
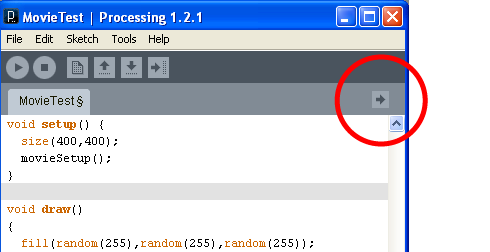
Click this arrow and select "New Tab". In the textbox that opens up at the bottom, enter the
name Movie, then click OK. A new tab will be created called Movie.
Copy and paste the following into this new tab:
import processing.video.*;
MovieMaker mm;
String movieName = "myMovie.mov";

// We want a 10 second movie.  If we set the frame rate to
// 30 frames per sec, then we need to have 300 frames:
int count = 0;      // Keep track of how many frames are generated
int maxCount = 300; // Maximum number of frames that will be generated.

void movieSetup() {
  count = 0;
  mm = new MovieMaker(this, width, height, movieName,
             30, MovieMaker.SORENSON, MovieMaker.BEST);
  println("movie setup");
}

void makeFrame() {
  if (count < maxCount) {
    mm.addFrame();
      count++;
      println("recording frame # " + count);
  }
  else if (count == maxCount ) {
    mm.finish();
    count++;
    println("finishing movie");
  }
}
|
This tab contains the code for movieSetup() and makeFrame(). For now, it is not
important that you understand any of the code details.
What you do need to understand is that Processing can start recording the movie after the program executes the
function movieSetup().
Each time makeFrame() is executed, the current image that has been drawn by draw() will be saved as a frame of the movie. The
movie stops recording when either the program is stopped or when the number of frames reaches 300 (whichever
happens first).
- Run the program and move the mouse around. If you wish to practice with
a shorter movie, you can change the maxCount in the Movie tab. For example
int maxCount = 30; //This will generate a movie with 30 frames (1 second in length).
- After running the program, navigate to the sketch folder (via Windows or the Mac). You should see a file
there called myMovie.mov This is your quicktime file. Double click on it to play it.
If you want Processing to save to a different file name, go to the Movie tab and change the name myMovie.mov
to something else, .e.g.
String movieName = "movingRectangles.mov";
To Be Submitted
This lab will be graded based on a Pass/Fail basis. A Pass equals 10 points and a Fail is 0 points.
To pass, you must turn in a working 10 second animation. As already mentioned, this animation will be
turned over to the music students to score.
Here are some suggestions to get you started:
- Set the size to be around 400x400.
- Get a sense of what 10 seconds is like. Time it on a watch. Create (300 frames) and play the
rectangles animation.
- Consider creating a background as was done for the bouncing ball.
- Decide whether you want the user to control the motion (as in the rectangles) or if you want the program to
automatically generate the movement (as in the bouncing ball). You could also use some combination.
- Review all the examples you have seen from this lab and from the readings in the text in order to
get ideas.
- Experiment with trying to generate different kinds of motion.
- Pick a theme that interests you if you need help to focus in on something.
Preparing the files for submitting to WISE:
Folder Structure: You should be turning in just one Processing Sketch. The sketch folder should
contain the *.pde file as well as your quicktime animation (*.mov).
Cleaning up the Code: Make sure that you have cleaned up the Processing code as follows:
- Delete any unused sections of code.
- At the top of the code, add comments containing your name, the lab number, the course number,
and a one sentence description of what the code does. Add additional comments, if
ncessary, so that someone else looking at the code can follow what the code does. This
will become more useful as your programs get longer and more complex.
- (THIS IS REALLY IMPORTANT) Run the Auto-format command by going to the Processing menu: Tools→AutoFormat.
You may have to do some additional formatting by hand.
Zipping: When you are done doing all of the above, zip together your sketch folder
into a single zip file.
Submitting to WISE:
By midnight of Sept 22 submit
the single zipped file via WISE as
an attachment.
[top] [Schedule]
[Home]