Lab 7: Image Filters
CS145: Images and Imagination,
Fall 2010
[previous lab][schedule][next lab]
Due Date:
Monday, Nov 8 at midnight.
Reading
- Text: Finish Reading Chapter 10.
- Online: Images and Pixels.
Scroll down to look at the section Pixels, pixels, and more pixels.
Summary of Goals
The main goals of this lab are to:
- Understand how pixels are stored.
- Understand how one can modify (i.e. filter) an image to get
a new version of the image.
- Review and practice working with arrays.
Learning and Practice
Carefully read through the new material in the online tutorial Images and Pixels.
The beginning part should be a review. The new material begins at the section Pixels, pixels, and more pixels.
It is important that you actually implement and experiment with the examples. Use your own images. Here is
some starting code which inverts the colors or an image:
| Program 1: Invert Image Colors |
PImage img;

void setup() {
  img = loadImage("capeLookout.jpg");
  size(img.width, img.height);
}

void draw() {
  loadPixels();   // the pixels in the Processing Window
  img.loadPixels();  // the pixels in your image

  for (int y = 0; y < height; y++) {
    for (int x = 0; x < width; x++) {
      // this is the location of the pixel
      //   at row=y and column = x
      int loc = x + y*width;

      // The functions red(), green(), and blue() pull out
      //   the 3 color components from a pixel.
      float r = red(img.pixels[loc]);
      float g = green(img.pixels[loc]);
      float b = blue(img.pixels[loc]);

      // Invert colos:
      r = 255-r;
      g = 255-g;
      b = 255-b;

      // Constrain RGB to between 0-255
      r = constrain(r,0,255);
      g = constrain(g,0,255);
      b = constrain(b,0,255);

      // Set the display pixel to the image pixel
      pixels[loc] =  color(r,g,b);
    }
  }
  updatePixels();
}
|
Original image:
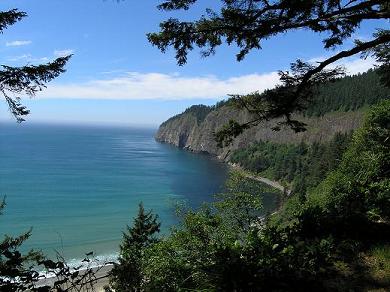
|
Filtered image:
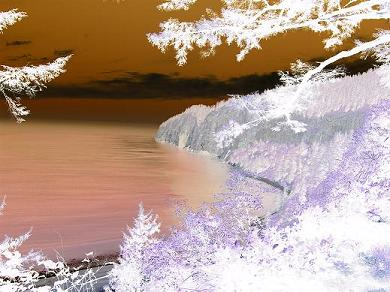
|
|
To get started, copy the above code into a Processing sketch and
save to your own folder. Place your own image in that folder. Run the program.
In class, we will go over the examples and discuss what is going on. For example, the examples include:
- Setting the color of each pixel in the Window based on the corresponding pixel in an image.
- Creating a new PImage (destination) from an existing PImage (source).
- Modifying a pixel color based on the color values of surrounding pixels (convolution).
Assignment
Once you are familiar with the above techniques, design at least 4 filters or your own.
Include at least one convolution.
For each filter, be sure to apply the filter to an image of your choice. Save a copy of the resulting filtered image.
Options to consider:
- Consider creating an image that merges two or more images in some way.
- Consider applying multiple filters in sequence to your original image.
You can do this by generating a filtered image in one of your sketches and copying it over to serve as the original
image in another sketch folder.
You do not need to use any animation unless you wish. If you
don't use animation, then please do not use a draw function.
To Be Submitted
This lab will be graded based on a 10 point scale. As in previous labs, zip together everything into
a single zip file
and add as an attachment in WISE. Please don't forget to follow the steps below for cleaning up your code. Clean, well commented, and easy to understand code is very important.
Preparing the files for submitting to WISE:
Files: You should be turning in at least four Processing Sketches. Each sketch folder should
contain
- A sketch for one of your filters.
- The original image and the resulting filtered images.
Cleaning up the Code: Make sure that you have cleaned up the Processing code as follows:
- Delete any unused sections of code.
- At the top of the code, add comments containing your name, the lab number, the course number,
and a one sentence description of what the code does. Add additional comments, if
ncessary, so that someone else looking at the code can follow what the code does. This
will become more useful as your programs get longer and more complex.
- (THIS IS REALLY IMPORTANT) Run the Auto-format command by going to the Processing menu: Tools→AutoFormat.
You may have to do some additional formatting by hand.
Zipping: When you are done doing all of the above, zip together your three sketch folders
into a single zip file.
Submitting to WISE:
By midnight of Mon, Nov 8, submit
the single zipped file via WISE as
an attachment.
[top] [Schedule]
[Home]