
Lab 1: Introduction to Maya
IDS252: 3D Animation,
Spring 2018


Due Date: Wed, Jan 24, before the beginning of class.
Evaluation Sheet (pdf)
Goals
- Familiarize yourself with the Maya interface.
- Understand how files and projects are named and organized.
- Understand how to turn in assignments on the shared network drive called cs-render
- Learn basic modeling tools in order to make a model of a temple, glass, and saltshaker.
- Deliverables: Three images (temple, glass, and saltshaker) placed in designated folder on cs-render. Details described below.
Summary of Resources
Mac vs PC
BOOT THE FORD 202 LAB MCHINES TO WINDOWS AND NOT iOS. The computers in Ford 202 are dual boot. If you hold down the "options" key as the computer
boots up, it will give you the option of booting in either in Windows or the Mac. If you do nothing, it will boot up on Windows.
You must use the PC side because you must use Maya 2016. The iOS side has a newer version of Maya (2017) which does not work
for some of what we will be doing. In addition, Maya 2017 is generally incompatible with Maya 2016.
To see the mappings of a PC keyboard on a Mac, go here.
Getting Familiar with the Maya Interface and Online Help
-
Open up Maya 2016
-
Learning the Interface: A quick reference of the interface may be found Online Help: Maya Interface.
You want to become familiar with the terms used to refer to the different parts of the interface, e.g. Menu sets, Status line, etc.
-
Getting Help: In Maya, go to Help → Autodesk Maya Help (F1).
You will see a list of topics:
- Select Basics and read through the some of
the topics e.g. 3D coordinates, interface overview, selecting, etc.
- Select the 1-minute Startup Movies and watch the
movies "Zoom, pan, and roll" through "Discover secret menus". As you watch, try things out in Maya.
Poke around the other sections to explore what else is available.
- Select Managing Scenes, Files, and Projects.
- Search on topics. To see the search box, you may need to click the following icon
on the far left of the Help page:

-
Online Tutorials : In previous years, Autodesk provided a number of good, hands-on written tutorials in their Online Help. In 2016, they
stopped supporting them. In this lab, we will do several the 2015 Online Tutorials (explained more below) although you should note that the interface might be slightly different. Please ask the instructor or lab assistant if you get confused. These tutorials can be found through the Maya menu
Help → Maya Help (F1) and selecting Tutorials, or
by going directly to Help → Tutorials. Under the Maya Tutorials, look for the heading
Maya Getting Started and click on the
Getting Started with Maya 2015 link.
For some later tutorials you will also need the
lesson files which can be downloaded under Maya 2015. However, you don't need any of them for this lab.
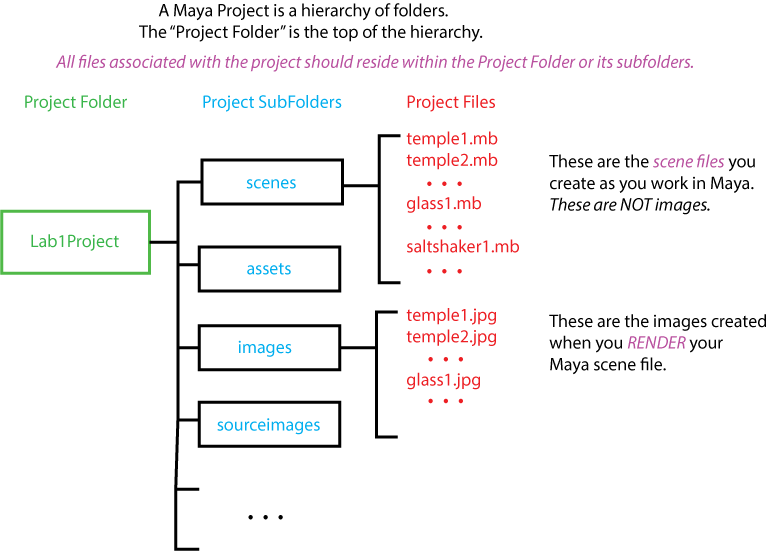
Maya Projects and the Maya File Structure
In this part of the lab, you will be actually working with Maya and modeling several objects: A temple, glass, and saltshaker.
Before starting the modeling, you need to properly set up Maya. Most importantly, you need to create a Maya project.
Maya Projects: When you make a new Maya Project from within Maya, Maya will create a main folder
containing a set of subfolders. All files used for a project should be stored in these folders.
 Projects are important to create because
when you save or render maya scenes,
a number of different files are generated and saved. If you have
created and/or set a
project, all of these files will be saved into the project folder, otherwise it is anyone's guess where many of these
files will end up.
Projects are important to create because
when you save or render maya scenes,
a number of different files are generated and saved. If you have
created and/or set a
project, all of these files will be saved into the project folder, otherwise it is anyone's guess where many of these
files will end up.
In this lab, it is recommended that you create one Maya Project to store your separate scene files for
the temple, glass, and saltshaker. A scene file is the file which contains all of the Maya information for your particular object(s).
Your scene files should be stored in the "scenes" folder of your Maya Project.
Directions will given in the tutorials explaining how to create your project.
Note, everytime you open up Maya
you need to make sure that you are in the correct project.
If you aren't sure, just set the project
using File → Set Project ....
-
Keep Multiple Versions: You should save versions of your scene as you work
(e.g. temple1.mb, temple2.mb, etc) so that, if
you make a mistake that can't be undone, or if Maya crashes (a common occurrance!), then you don't have to
start back at the very beginning again. You can save versions by saving and manually renaming your files or by going to
the menu File → Increment & Save
Location, location, location:
- cs-render network drive: You will be storing your files on a Willamette shared network drive called cs-render.
(Note, if you joined the class late, you may not yet have access to cs-render. If so, please work on your H drive and
copy your project to cs-render once you have access.) You need to work on cs-render because
1) your files may take up too much disk space, 2) you may need to share your work with others, or 3) you may need to
use the render farm, and 4) the instructor will want access to your projects for grading purposes.
To access cs-render, you need to follow the directions under "Shared Network Drive: cs-render" on this page
- Organization: Organizing and keeping
track of files on your computer is critical! All files that are associated with a project need to be
kept in the project folder, otherwise, you risk losing these files.
- Project location: For this lab, store your Maya projects on cs-render in the folder
\IDS252Sp18\Lab1\MayaProjects\your_name
- Image submission location: To submit your completed work, you must copy your rendered images (jpg or png)
from your project into the folder
\IDS252Sp18\Lab1\FinalImages\your_name
before the beginning of class on the due date.
Part 1: The Temple
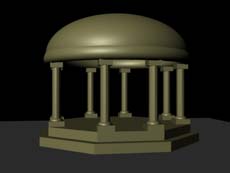 |  |
| Basic Temple | Bad! Pay attention
to camera location. |
Tutorial Instuctions: Open Maya. Go to Help → Tutorials→ Maya Tutorials, scroll down and
click on the link Getting Started with Maya 2015 and then go to
Getting Started with Maya → Maya Basics → Introduction .
Follow the directions for making the temple (lessons 1-4). In the end, you should have a model of a simple temple. Notes:
- Since this tutorial is for Maya 2015 (we are using Maya 2016), there may be minor differences
in the interface. Please ask questions if you get confused.
- You do not need to download the "Getting Started 2015 Lesson Files".
- Save your new project into the folder: \IDS252Sp18\Lab1\MayaProjects\your_name
- Save your scene and call it something like your_last_name_temple.mb
- Don't forget to save multiple versions as you work in case Maya crashes or something else goes wrong. To
save versions after you have saved the initial scene file, go to the menu File → Increment & Save
Render the Temple: Rendering means taking the scene you
have created, choosing a camera (e.g. persp) and camera location, and generating an image file (png or jpg). It should look something like the Basic Temple image
shown above. Directions are described here:
- Add a polygon plane to represent the ground so your temple doesn't look as though it is floating.
- If desired, add a simple solid color to the temple (ask if you need help). Please do not do anything more complicated.
- Choose the perspective camera by clicking on the perspective window. Maneuver the camera in this window so that you are looking at a nice view of the temple (like the above image on left, not the one on the right!).
- Go to the menu Windows → RenderingEditors → Render
Settings... and do the following:
- Set the "Render Using" option to "Mental Ray". If this is not a listed option, you need to add the Mental Ray plug-in. To do this,
go to the Maya's main menu:
Windows → Settings/Preferences → Plug-in Manager . In the Plug-in Manager window, scroll down
towards the bottom to where you see Mayatomr.mll listed. Check the "Loaded" and "Auto load" boxes to the right. Exit the window
by selecting the "Close" button at the very bottom. Return to the "Render Settings" window. Mental ray should now be an option. (If Mayatomr.mll is not listed, then for the moment, just use the Maya Software renderer
instead of Mental Ray)
- Choose the Image Format to be PNG (png) or JPEG (jpeg).
- Set the "Image Size; Presets" to HD 540. This should give you an image that has a pixel resolution of 960 (width) x 540 (height).
- Close the Render Settings window.
- To actually render the image, you must click the "render current frame"
button
 on the status line in Maya (ask if you can't find it).
Alternatively, go to the menu Render → Render Current Frame
on the status line in Maya (ask if you can't find it).
Alternatively, go to the menu Render → Render Current Frame
- When you render the image, Maya will automatically save your image in the
"images" folder within the
project folder (you may actually need to look in the "images/tmp" folder). Note, if it isn't there then the project was probably not set correctly.
- Change the filename of the image to something like your_last_name_temple.png
and copy it over to the cs-render folder \IDS252Sp18\Lab1\FinalImages\your_name.
Part 2: NURBS Modeling
- Work in the same Maya project that was used for the temple.
- In Maya, go to Help → Tutorials.
Click on the link Getting Started with Maya 2015 and then go to
Getting Started with Maya → NURBS Modeling .
Do the following lessons:
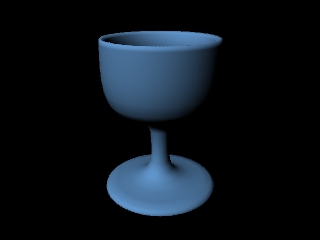 | NURBS Modeling, Lesson 1:
Revolving a curve to create a surface (glass)
- In "Preparing for the lessons", skip steps 1 & 2. You do not need to download any files and
you do not need to create a new project. Work in the same project as for the Temple.
Also, in step 5, select the "Modeling" menu set instead of the "Surfaces" menu set.
- Tool Settings button is in the very top right of screen.
- If the resulting curve is black, go into the outliner,
select the curve, and then select the menu Curves->Reverse direction.
|
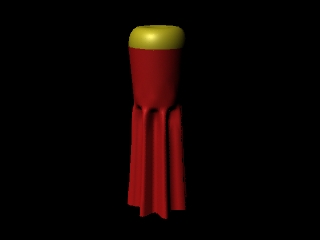 | NURBS Modeling, Lesson 3: Lofting Curves to create a surface (saltshaker)
- In "Preparing for the lessons", same comments as above.
|
- Setting the Color: Assign both of your objects a new material as descibed in the temple tutorial.
- Render HD 540 jpg or png images of your glass and saltshaker. Name the image files named appropriately, (e.g. your_last_name_glass.png,
your_last_name_saltshaker.png).
Copy it over to the cs-render folder \IDS252Sp18\Lab1\FinalImages\your_name.
Deliverables and Evaluation
Before the beginning of class on due date listed at the top of this lab, you should have a single Maya project
containing your scene files (among other things): templeFinal.mb, glassFinal.mb, and saltshakerFinal.mb. Since you may have multiple versions of each file, it is
good to put the word "Final" in the name so it is perfectly clear
which are the final versions. This project should be located
on cs-render in the folder \IDS252Sp18\Lab1\MayaProjects\your_name.
Your three rendered images (the temple, glass, saltshaker) should be in the folder
\IDS252Sp18\Lab1\FinalImages\your_name
The main goal of this lab is to familiarize yourself with the Maya interface and basic modeling tools.
A link to the evaluation sheet is given at the top, under the due-date. We will complete this sheet
during class on the day the assignment is due. Read through the
evaluation sheet ahead of time to make sure you followed all of the
directions. An important goal is for
you to develop a clear understanding
of how to organize your projects and files. This may seem like overkill now but
very soon you will have a lot of files and if you don't organize them,
you will have a complete mess.
There is a lot to get used to in this first lab. If you have ANY questions, it is important that you ask.
