
Lab 2: Composition and Gesture
IDS252: 3D Animation, Spring 2018
Due Date: Wed, Jan 31 before the beginning of class.
Evaluation Sheet (pdf)
Getting Familiar with the Rig Controls
Inside Maya, import this file by going to File→import, and selecting the file Ultimate_Bony_v1.0.5fixed.ma which you copied into your scenes folder. In class, we will go over how to work with the difference controls.
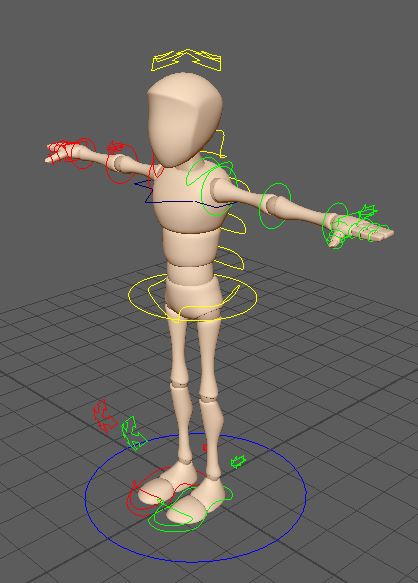
Explore the different controls until you are comfortable and familiar with them. For example, pick an image of a figure on the web and see if you can approximate the body pose. (You can google "images person standing" or "images person sitting"). For now, don't try to be very exact. Your goal is just to understand how controls can translate into body gesture. There is no need to save anything just yet.
Creating A Pose
Your reference photos should remain available in your MayaProjects folder so that we can look at them during the class critiques.
Continue to work with the same partner. You each will be doing your own composition; your partner will be there to provide help and feedback along the way.
An animation is composed of multiple objects, e.g. the characters and the scenery. In this part of the assignment, you and your partner will combine your poses and the objects you made in Lab 1 in order to each make a single composition.
You and your partner will each create a separate composition. Each composition will use both of your poses.
Outside of Maya, copy the final posed scene file your partner created, placing it in the scenes folder of your Lab2 project. Also copy over the final versions of your Lab 1 scene files (e.g. temple.mb, glass.mb, saltshaker.mb). Feel free to model a few additional objects if you want.
Preparing Your Objects: Before using your objects from Lab 1, you need to make sure they are cleaned up. Warning - If you don't clean up the files, your composition scene file will be an utter mess thus making it difficult to transform and duplicate objects. To clean up the files to do the following:
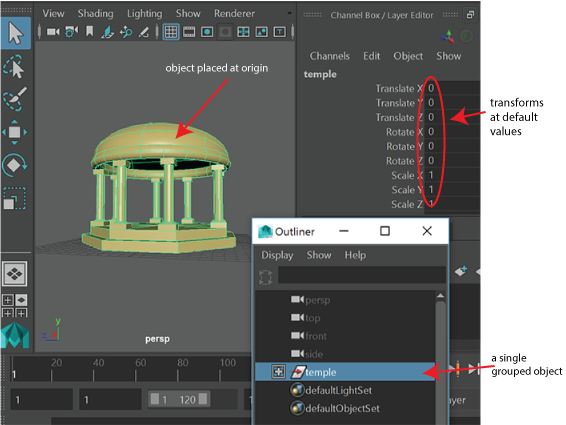
Consult with your partner to make sure you both agree that you have carried out the above procedure. The outliner and channel box should look something like
Importing Objects: Once the objects in the individual scenes are cleaned up, you can now combine these objects into one scene for your composition as follows.
Colors: A consistent color scheme can help give a sense of unity to your final image. For this exercise, all your objects should be solid shades from a palette of only 2 colors, plus white and black. The two colors should either be two complements or two analogous colors, e.g. see the color scheme designer - use Free style with 2 colors. You should choose a color palette ahead of time so that you can set the colors of your different objects to fit in with the color scheme.
In the last lab, you learned how to give an object a color by assigning it a material. Each object should already have its own material but, if not, right click on it and select "Assign New Material". Select either a Blinn if you want a reflective surface or Lambert material if you want a matt surface. In the Attribute editor, click on the gray square next to the word Color and, in the color selector window which opens, select a color. For now, ignore all the other parameters.
Note, you can easily change the color of Bony to fit your color scheme. Just go to Windows→Rendering Editors→Hypershade and then select Bony's material node.
As mentioned above in the "Clean-up" list, it is important that you do not use the default lambert1 material otherwise you will have conflicts when you import multiple objects.
Composition: In the scene you just created, arrange/duplicate/scale/etc the different objects in a way that tells a story or makes the viewer curious. Discuss the options and choices with your partner. Remember that we use the term "story" very broadly. Be careful to think about things such as framing, negative space, symmetry. Refer to the Sesign and Story elements listed at the bottom of the Evaluation Sheet (pdf)
Rendering: Once you are done putting together your composition, take time to select a camera angle and location. Consult with your partner. The location and angle of camera can have a dramatic effect on the story your image conveys. Render an image with size HD540 using the format png or jpg. It is best to use the Mental Ray renderer rather than the Maya Software renderer if you want better lighting and reflections.
Rename the rendered image to be composition_your_name.png (or jpg).
Images to turn in: Copy the image of your composition to same folder containing your other images (IDS252Sp18/Lab2/FinalImages/your_name) which should now contain 3 images: 2 angles of your posed character and the composition. Please name them accordingly.
Project Folder Organization: Your project folder Lab2 should be on cs-render in the folder IDS252Sp18/Lab2/MayaProjects/your_name. Please clean-up this project as follows:
This lab is due at the date given at the top of this lab. It will be graded based on the criteria sheet (see link at top). There will be a peer evaluation in class on the day it is due. It is important that you are present for the critique regardless of whether you managed to finish the assignment or not.