Lab 2: Introduction to Modeling
IDS252: 3D Animation, Spring 2012
Due Date: Mon, Jan 30, before the beginning of class.
Importing Objects: At this point, you should have several Maya scenes (i.e. .mb or .ma files) from labs 1 and 2. Each scene file should contain a different object such as a temple, helmet, glass, saltshaker, hand. Copy the scene files (temple and helmet) from lab 1 over into the scenes subfolder of your current project folder (Lab2Project), so that all of the scene files are in one place. Before you continue, prepare the objects in each scene file as described below. If you don't do this, your composition scene file will be an utter mess thus making it difficult to transform and duplicate objects.
Cleaning Things Up:
For future reference: a general list of things to do to cleanup files can be found here.
Importing: Once the objects in the individual scenes are cleaned up, you can now combine these objects into one scene as follows.
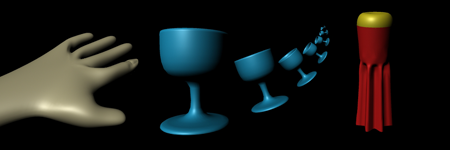
Composition: In the scene you just created, arrange/duplicate/scale/etc the different objects in a way that tells a story or makes the viewer curious. Assign simple colors to objects, DO NOT USE FIRE OR OTHER SPECIAL EFFECTS THAT YOU DISCOVER IN MAYA). Note, in the class critique we will discuss the following questions.
Images to turn in: Copy the image of your composition to same folder containing your other images (ids252Sp12/Lab2/FinalImages/your_login) It should now contain 4 images: the glass, the saltshaker, the hand, the composition. Please name them as described in lab 1.
Project Folder Organization: To clean-up your Lab2Project folder on cs-render, do the following:
This lab will be graded on the modeling and organization. For details, see lab 2 evaluation.
Class critique: In the class critique, we will discuss the following questions. Camera angles and shot types are explained in the readings. You will be asked to examine one other person's work.
Note that late assignments will be penalized.