Lab 6: Collaboration, Character, and Sound
IDS252: 3D Animation,
Spring 2013


Due Dates:
Wed, Feb 27: Modeled Characters with controls will be evaluated in class.
Fri: Mar 1, Animation is due before the beginning of class.
Evaluation Sheet (pdf)
Group and Sound Assignments are here.
Goals
The goals of this lab are to:
- Experiment with character interaction.
- Experience collaboration with one other person.
- Experiment working with Foley sound effects.
- Learn how to organize a complex Maya project.
- Learn how to manage your time!
- Deliverable: A 10-20 second animation about the interaction of 2 characters with foley sound.
The sound is used to help to create a connection between them.
See Evaluation Sheet (pdf).
Maya Tutorials
-
The only required tutorial is on File Referencing. In fact, you only need to do the very
beginning of the tutorial (up to the part on proxies). The remainder of this tutorial
as well as the other tutorials listed below, can be done based on
interest or need. The supplementary files that you will need for the tutorials can be found,
as usual, in
IDS252Sp13\IDS252GeneralResources\GettingStartedMaya2012LessonData.
You can place your work on cs-render in the folder
IDS252Sp13\Lab6\MayaProjects\Tutorials.
These tutorials will not be collected.
-
In Maya, go to Help -> Tutorials.
Click on the link Getting Started with Maya 2012. In the contents,
click on Getting Started with Maya.
Do the following lessons:
- Required:
- Go to File Referencing and do Lesson 1: Using file references.
- Optional
- If you want to learn more about using images as textures, go to Polygon Texturing and do Lesson 1: UV texture mapping.
- If you want to learn more about skeletons, then Go to Character Setup and do
Lesson 1: Skeletons and kinematics
Lesson 2: Smooth skinning
- If you want to learning about facial animation, go to Character Setup and do Lesson 3: Cluster and blend shape deformers.
The above tutorials will not be collected.
Files and Folders
- In this lab you will be working with one other person. Since we have an odd number of students in
the class, there will be one (and only one) group with 3 people.
- On cs-render, in folder
\IDS252Sp13\Lab6\MayaProjects\Collaboration,
create a folder whose name is derived from both partners' names, e.g. last names and first initials.
Place your Maya project and editing subfolders in this folder.
There should be only one Maya
project - it will contain the maya scene files for both partners.
- When you have completed the lab, please copy your animation
over to the folder: \IDS252Sp12\Lab6\FinalAnimations\. Name the file based on
the names of both partners.
Renderfarm
This lab is a good time to test out the render farm. See directions here: Farm.
Project Description and Directions
-
Task: In this lab, you and your partner are to create a 10-20 second (approximately) animation.
The animation will be about the interaction of two characters where the foley sound will help create the connection between them.
Each person on the team will model one of the characters.
The interaction could be as simple
as two characters "walking" into the scene from either side. As they pass, they are each startled by a sound causing them
to react in some way. By this shared action, they experience a connection. Keep it simple!
-
Focus: The focus should be on the characters and their interaction, that is, the scene should be minimal, containing
only a few objects (if any) other than the characters themselves. Any objects that do appear should be there for a reason, i.e. they should
play an active part in the interaction or in setting the mood or scene. Shading and texturing can be minimal, however, do pay attention to lighting
and to a choice of color scheme.
-
Planning: Before starting with Maya, you and your partner need to do the following:
- Listen to the sounds you have been assigned and decide what these sounds represent.
Remember that "Foley is the reproduction of everyday sounds for use in filmmaking."
- Brainstorm ideas for the kind of interaction this sound might trigger.
- The characters should look different
(i.e. don't make one just a copy of the other). They should not be complex. They don't
have to look human-like, in fact, a character with arms and legs is way too
complicated! A lot can be expressed with something much simpler - remember the wedge from Polyworld!
In any case, your characters do need to have attributes that convey something about their personality.
Suggestions include:
- Use deformers to control the change in shape of an object. This might be a bit limiting but it depends
on what you want to do.
- Copy the structure of the mechanical arm from the previous tutorial but use
your own geometry. For example, a duck made up of several nurb spheres can be modeled
using the identical skeletal structure as the mechanical arm that you used in last week's tutorial:

- Make up a brief background story. Who are these characters,
what leads to their interaction (is it planned, accidental?) and
what is the emotional exchange during the encounter?
-
Project Setup:
- You and your partner are to create a single Maya project in which to work.
Within the scenes folder, you might also want to create
subfolders for "characters", "props", and "environment". This may be overkill now, but it gets you thinking
about how to organize your 1 minute animation.
- Make sure that all assets (e.g. textures, maya scenes, sounds, source images, etc)
are somewhere inside the project folder.
- Do the Maya tutorial on referencing (or read section called "About file referencing").
Each character and scene object should be created in a separate Maya scene file. The scene file
where the animation will be done should reference these files. Avoid multiple levels of referencing
(e.g. a file references a file which references a file ...). Before creating the references, be sure that the characters and environment
being referenced are cleaned up.
- Don't use the default lambert shader because Maya will get
confused if different referenced files have different parameters for the "default" shader. Instead, always create new
shaders for your models.
- Layers: Learn how to use layers so that you can focus on only the parts that you are working on.
Division of Labor:
-
Shotlist: Make a list of the shots. Shots generally correspond to camera cuts and each
will have its own maya file. Each shot will also generally be
assigned to a single person to animate. For this assignment, you may just have two shots.
-
Tasklist: It is important that each collaborator knows exactly what they are responsible for. Put
it in writing - make a tasklist of what needs to be done and who will do it. Save this tasklist into your project
folder (this may be used in the grading as a way to identify who did what).
-
Characters: Each person will create one of the characters:
- Before beginning to model the character, think about the hierarchical structure and the controls that are needed
in order to animate it.
- Controls need to be understandable to someone
who did not model the character because your partner may need to do some of the animation of your character.
- "Clean up" the model before adding controls or referencing, e.g. delete history, freeze transforms, group & rename elements, ...
- Rename characters, objects and materials in your scene so that they are easily identifiable in the outliner. If
an object is composed of multiple parts, be sure to group all of the parts.
- File Referencing!! Learn how to use file referencing. Each character and object in the scene should be created in a separate file and
referenced into the main animation file.
-
The Environment: The environment should be minimal; one person could volunteer to do this, or you can
do this together. Or have one person create the environment and the other person do the lighting. Note,
the lighting may be planned early but its actual implementation is
typically done towards the end after most of the animation and camera movements are complete.
- More on Shots:
- Each shot should be done in separate Maya scene files
(note, referencing should make this easier).
- Make sure that the shots match up properly when the frames are put together (typically shots
correspond to camera cuts). In any case, you may need to
set the last pose in the first file to be the same as the first pose in the second file.
- You also want to make sure that the
camera parameters and lighting are identical from shot to shot. One option, for example, is to set up the lights in one file, export only the lights to
a new file and reference the light file in the second file.
Foley Sound
You and your partner will be assigned several foley sound effects.
- Use at least two of the sounds. You may use more if you want.
Each sound may be played once or twice in the animation.
- Listen to your sound and
decide what simple event might have generated that sound and what emotional state you want the
sound to provoke. Note, a given sound could provoke any number of different emotions depending on your scene, e.g. one reacts
differently to a gunshot if it is during a robbery as opposed to a hunting party. This sound will be
the trigger for the interaction of your two characters.
Sound Assignments: You will find sounds in the folder \IDS252Sp12\Lab6\FoleySounds.
Assignments will be made after you choose a partner. We want to make sure at least one sound from
each musician is used.
Loading Music into Maya:
- Import the sound as you did in Lab 5. You can shift the sound so that it starts at a
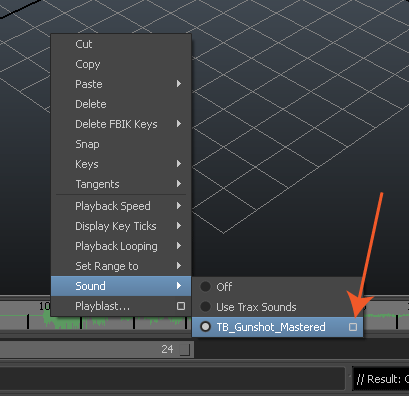
different frame by right clicking on the timeline, selecting Sound, and then select the small box
to the right of the name of your sound. (see picture below) This will bring up the attributes for the sound. Change the
Offset to move the sound to a different frame. For example, set
Offset to 5, to shift the sound over by 5 frames.
- If you want to use a second sound, import it as you did the first. To see both sounds in the time slider, you need
to right click on the timeline, select Sound, and then select Use Trax Sounds.
- When you render the animation in Adobe Premiere:
Jot down the sound's offset from Maya. You will need this in order to correctly
place the audio in Premiere. Note, in Adobe Premiere, the time units are hours, minutes, seconds, and frames. For example,
the time of 00;00;02;8 corresponds to 2 seconds (i.e. 60 frames) plus 8 frames or, in other words, the 68th frame.
Evaluation
On Wed, Feb 27, the class will evaluate your characters. Nothing is actually turned in but you will
be graded on what you have to show to the class (5 pts).
Before class on Fri, Mar 1, place your final animation on cs-render in the folder
\IDS252Sp13\Lab6\FinalAnimations.
Animations will be graded (20 pts) based on the evaluation sheet, which will be
discussed during the critique.
