Due Date: Friday April 13: A preliminary model should be submitted for the purpose of checking the format.
Monday, April 16: Final versions are due before the beginning of class.
Design a composition of your choice with the requirement that it be printable on a 3D printer (see below). The final composition should be unified, balanced, asymmetrical, avoid frontality, and make effective use of negative space. The composition should be cleanly and smoothly constructed. Lighting will be used only for the purpose of seeing the virtual object. Keep the material color simple.Using a 3D printer is new for all of us. We will do our best to insure that your piece is printed, however, there may be glitches which we have not anticipated. Please be patient!
We will be using a Zcorp 3D printer in the Atkinson Graduate School of Management's Rapid Prototyping Lab (RPL). See the demo of how Zcorp printers work. See a flashier ad showing a much newer version (650) than the one we will be using.
"3D printing is a general term for an additive manufacturing process whereby a digital 3D object is created by printing successive layers on material in the Z direction. 3D printing requires that the digital model to be a closed mesh so that the machine software can make a series of cross-sections from the model's surface limits. These cross-sections are then printed from a fine powder one on top of the other using an adhesive binder dispensed from print heads to define the digital model as a physical object." (quoted from here).
In order for a model to be printed, it needs to be watertight, have a manifold topology, outward facing normals, and combined into a single polygon mesh by selecting all the shapes
Size: Take size into consideration when designing your sculpture. Your design should work well when viewed at the printed size. The printed model will not be large, at most around 10 inches high but probably smaller because of cost.
Cost: The material (plastic resin) is not cheap, e.g. ~$3 per cubic inch. Therefore, you may need to hollow out your model to avoid having large solid volumes. The inside hole should be connected to the outside otherwise there is no way for the powder to empty out.
Mesh requirements:
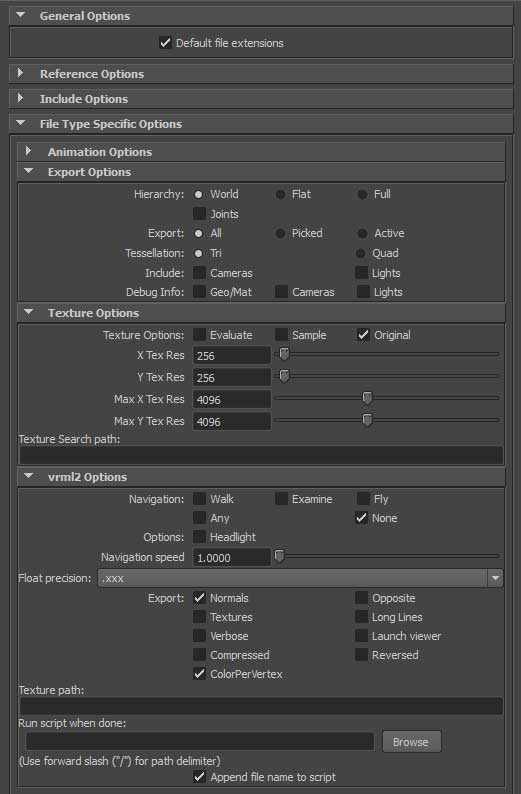
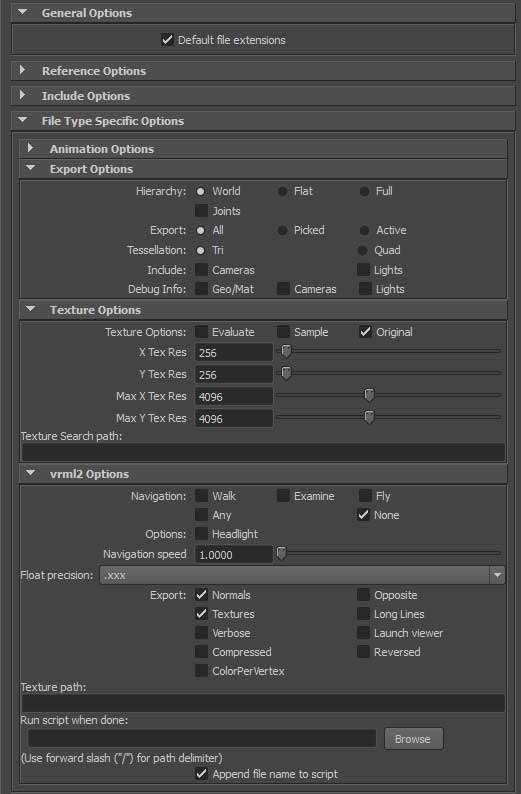
Files: Please work on cs-render in the \IDS360Sp12\Lab6 folder. Your Maya projects should go in the Projects folder. You are to generate two sample images of your model and place them in the Images3DprintFiles folder. This is also where you should place your exported model file (vrml, stl, or obj).
Due Dates On Friday, April 13, you are to place a preliminary version of your model in the Images3DprintFiles folder so that we can check that your model will likely print. It is recommended, however, that you submit even earlier versions if you are unsure of how well your model will print. The final deliverables are due on Monday, April 16. At that point, we will begin the actual printing.
Once your Maya model is complete and exported to an appropriate file format (on Apr 16), the instructors will do a last check of your model to make sure the model meets the requirements. The file will then be sent over to the RPL lab to print. If the model can't be printed, you will be asked to try to fix the model. Once it has been confirmed that the model can be printed, a cost estimate will be obtained. If the cost exceeds the lab fee, the model will either be printed at a smaller size or you will be asked to reduce the volume. We will make the best effort we can to see that your model is printed. This is a new process for all of us and we are still learning how best to do it.
Evaluation of this lab will be based on the following criteria (pdf)