Understanding the Initial Repository
When you download the initial repository, the folder will contain three source files–EnigmaModel.py, EnigmaConstants.py, and EnigmaView.py–along with an images folder. The main program that you will be running in EnigmaModel.py, and when you run it as it currently stands, you should see the display shown in Figure 1.
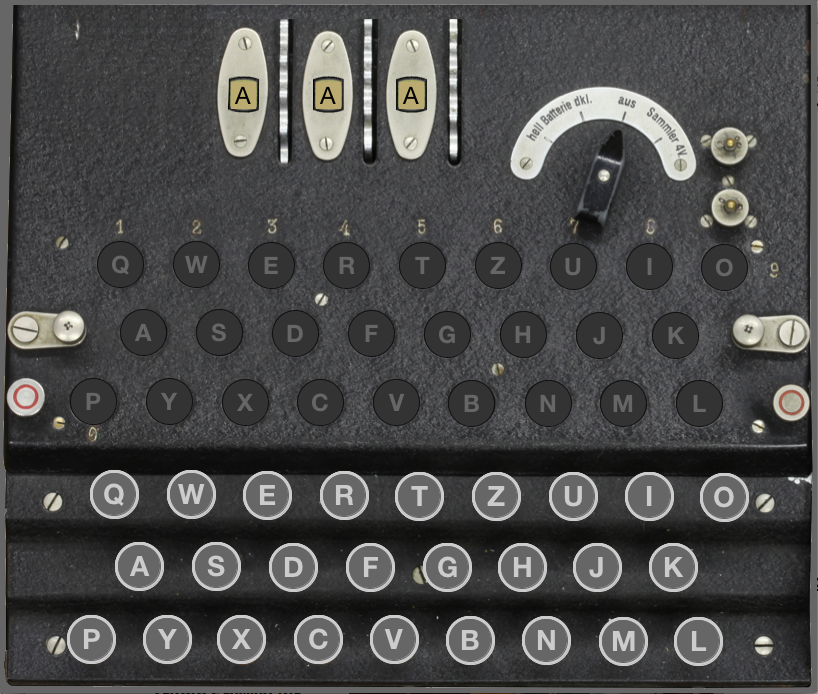
EnigmaModel.py.
Sadly, even though the screen display shows the entire Enigma machine, that doesn’t mean that you’re finished with the project. The display is simply an image that shows what the Enigma machine looks like when viewed from the top. Your job is to make it interactive! To do so, it helps to take a look at and explain the various starting files.
EnigmaView.py
Contrary to what it’s name might imply, this file is actually where we have handled all of the controller and view code. It is responsible for creating the graphics window, displaying and updating content in the window, and handling user generated events (in the form of mouse clicks). It uses the tkinter library under-the-hood, the same as the PGL library does. The way you interact with the view (and controller) is through some predetermined methods that you will define within EnigmaModel.py. You must not change the name of these methods (or what is passed into or returned from them) or else you will break the functionality with the view and controller.
EnigmaConstants.py
This is where some important constants are stored that you can import into your program and use. Most important among them is the rotor and reflector wiring offsets.
You can hover over the numbers to the right of the code below to show a further description about that block of code.
# File: EnigmaConstants.py
"""This module defines the constants used in the Enigma simulator."""
ALPHABET = "ABCDEFGHIJKLMNOPQRSTUVWXYZ" # The letters of the alphabet
# It is worth noting that the number of rotors cannot be changed
# without making significant changes to the EnigmaView.py class,
# which assumes that there are exactly three rotors to match the
# top-view image of the machine.
N_ROTORS = 3 # The number of rotors
# The early German Enigma machines include three rotors, which advance
# at different speeds. The rotor on the right is the "fast" rotor,
# which advances on every keystroke. The rotor in the middle is the
# "medium" rotor, which advances when the fast rotor has made a
# complete revolution. The rotor at the left is the "slow" rotor,
# which advances when the medium rotor has made a complete cycle.
# The ROTOR_WIRING array lists the three rotors from left to
# right: the slow rotor, the medium rotor, and the fast rotor.
#
# Each rotor contains 26 electrical contacts on the right side, and
# 26 contacts on the left side. Wires randomly connect these contacts
# such that the first contact on the right might be connected to the
# 5th contact on the left. In such a case, an offset of 4 would be
# indicated. A full rotor consists of 26 of these offsets, each
# representing how far the left contact is from the right contact.
# Offsets are all positive, so any that would result in values larger
# than 26 should be wrapped back around to 0 using % 26
S_ROTOR_WIRING = [ 4,9,10,2,7,1,23,9,13,16,3,8,2,9,10,18,7,3,0,22,6,13,5,20,4,10 ]
M_ROTOR_WIRING = [ 0,8,1,7,14,3,11,13,15,18,1,22,10,6,24,13,0,15,7,20,21,3,9,24,16,5 ]
F_ROTOR_WIRING = [ 1,2,3,4,5,6,22,8,9,10,13,10,13,0,10,15,18,5,14,7,16,17,24,21,18,15 ]
ROTOR_WIRING = [
S_ROTOR_WIRING,
M_ROTOR_WIRING,
F_ROTOR_WIRING,
]
# To the left of the slow rotor, the Enigma machine includes a
# component called the "reflector," which implements a fixed
# wiring that remains unchanged as the rotors advance. The
# constant REFLECTOR_WIRING defines the offsets of the reflector.
REFLECTOR_WIRING=[ 8,22,18,4,1,25,19,22,18,5,2,8,24,3,21,7,23,1,25,18,8,3,19,4,23,7 ]- 1
- Just a string of the letters of the alphabet that you can use to loop over
- 2
- The number of rotors in the machine. This would be difficult to change.
- 3
- A list of the rotor wiring offsets, from slow to fast (left to right on the machine)
- 4
- The reflector wiring offsets
EnigmaModel.py
Finally, and most importantly, we have the EnigmaModel.py file, in which you will be responsible for writing most or all of your code. The primary thing this file does is define the EnigmaModel class, and then set up several methods for the class to use. These methods are predefined for you because they form the linkages with the view and controller class. So you just need to populated them!
""" This is the starter file for the Enigma project. """
from EnigmaView import EnigmaView
class EnigmaModel:
def __init__(self):
"""Creates a new EnigmaModel with no views."""
self._views = [ ]
def add_view(self, view):
"""Adds a view to this model."""
self._views.append(view)
def update(self):
"""Sends an update request to all the views."""
for view in self._views:
view.update()
def is_key_down(self, letter):
return False # In the starter version, keys are all up
def is_lamp_on(self, letter):
return False # In the starter version, lamps are all off
def key_pressed(self, letter):
# You need to fill in this code, but leave the update call
self.update()
def key_released(self, letter):
# You need to fill in this code, but leave the update call
self.update()
def get_rotor_letter(self, rotor_index):
return "A" # In the starter version, all rotors are set to "A"
def rotor_clicked(self, rotor_index):
# You need to fill in this code, but leave the update call
self.update()
def enigma():
"""Runs the Enigma simulator."""
model = EnigmaModel()
view = EnigmaView(model)
model.add_view(view)
# Startup code
if __name__ == "__main__":
enigma()- 1
- The constructor method. In addition to keeping track of any views this model should be communicating with, you will also add new code here in early milestones to setup what information you will need to track to be able to maintain a functional Enigma machine. Remember: the model needs to keep track of the internal state of the machine! What lamps are on, what keys are pressed, etc.
- 2
- Any time you change the internal state of the machine, you will likely want to update the graphics view accordingly. This method is predefined for you, and handles updating any views that might be communicating with this model.
- 3
- The view will need a method to ask the model if a certain key is pressed or not. This is a starting template for that, which you’ll need to add code to in Milestone 0.
- 4
- Similar to the keys, the view also needs a way to ask the model what lamps it should be lighting up. You’ll fill in the needed code here in Milestone 1.
- 5
-
When the controller detects a mouse event on one of the keys, it needs a way to inform the model. This is the method that it will use when a user presses the mouse down on a key. You will need to take care of processing this information to update the internal state of the model in Milestone 0, and then later in Milestones 3 and 4. Note that the
updatemethod is called at the end of this method, to ensure that the screen gets updates after the models handles whatever it needs to handle with the click. - 6
-
Just like with
key_pressed, this method will be called by the controller when a mouse click is released on a given key. You’ll need to then update the internal state of the model accordingly in Milestone 0, and then again in Milestones 3 and 4. Again, note that theupdatemethod is called at the end to ensure that the screen reflects any internal changes to the model. - 7
- The view has no idea what the rotors are doing, so it needs to ask the model what letter should be displayed for each rotor. The index here would be either a 0, 1, or 2, proceeding from left to right over the slow, medium, and then fast rotors. Initially, all the rotors are hard-coded to display an A, but you will be changing that come Milestone 2.
- 8
-
Just like the keys, the controller needs a way to inform the model that a rotor has been clicked. This method is how it will do so. The index here corresponds to the exact name rotor ordering as in
get_rotor_letter. Note that theupdatemethod is called at the end of this method, to ensure the screen gets updated after the model handles the click. - 9
- Finally, here the model is initiated and a corresponding view created and tied to the model. You shouldn’t need to change this at all unless you are adding some fancy extentions!